


There are big differences between Vue and React, such as adding, deleting and changing data, passing data from parent components to child components in the form of props, and sending data from child components in the form of event listeners. There are big differences in the implementation methods of parent components.

The operating environment of this article: Windows7 system, Dell G3 computer, react17.0.1&&vue2.0 version.
There are big differences between Vue and React, such as adding, deleting and changing data, passing data from parent components to child components in the form of props, and sending data from child components in the form of event listeners. There are big differences in the implementation methods of parent components
Everyone must be familiar with the Vue and React frameworks, both of which are currently very famous front-end frameworks. But many people don’t know much about the difference between them. Today I will introduce the difference between the two in detail, hoping to help you better understand the difference between them.
1. Goal
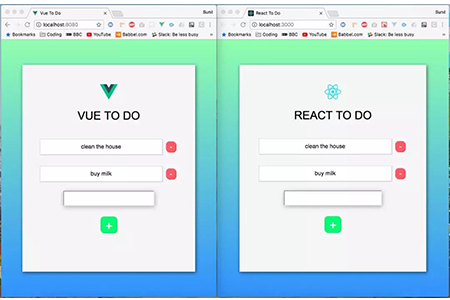
Build a standard to-do list application that allows users to add and delete items from the list. Both applications are built using the default CLI (command-line interface, command line interface), React uses create-react-app, and Vue uses vue-cli
The appearance of the two applications is as follows:
The CSS code of the two applications is almost the same, but there are differences in the location of these codes, as shown in the following figure:
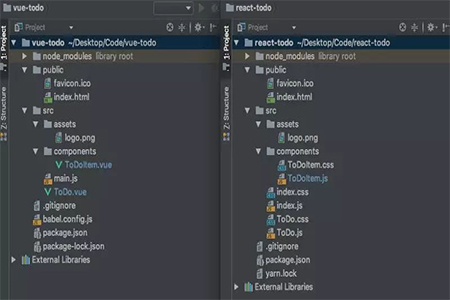
It can be seen from the picture that their structures are almost identical. The only difference is that React App has three CSS files while Vue App has no CSS files. This is because
React's create-react-app component requires a side file to save its styles, while Vue CLI takes an all-inclusive approach with its styles declared in the actual component file.
The results obtained by two different strategies are the same. I believe developers will soon be able to master these two different strategies. Developers can make choices based on their own preferences, and you'll hear a lot of discussion from the development community about how to structure CSS. Above, we listed the code structure following the two CLIs.
Before we go any further, here’s a quick look at what typical Vue and React components look like:

React tutorial、Vue.js tutorial】Now, let’s dive into the details!
2. How to modify dataModifying data is to change the data that has been stored. At this point, React and Vue approach things differently. Vue essentially creates a data object, and the data in it can be changed freely; React creates a state object, and changing the data requires some additional operations. React has its own reasons for requiring additional operations, which I’ll get into later. Before that, let’s take a look at the data objects in Vue and the state objects in React:
Vue data object
 React state object
 As you can see from the picture, we passed in the same data, but their marking methods are different. So the initial data is passed to the component in a very similar way. But as we mentioned, the way data is changed in the two frameworks is different.
Example: We want to modify a data element named name: ‘Sunil’
In Vue, we refer to it by calling this.name. We can also update it by calling this.name ='John' . In this way, the name was successfully changed to "Jhon".
In React, we refer to the same piece of data by calling this.state.name. The key difference now is that we can't simply write this.state.name='John' because React has restrictions that prevent this simple modification. In React, we need to write: this.setState({name: 'John'}).
Although the results are the same as those achieved in Vue, the operation of React is more cumbersome. The reason is that Vue by default combines its own version of setState every time it updates data. React requires setState before updating its internal data.
Now that we know how to change data, let’s look at how to add new items to the To-Do application.
3. Add new to-do items
React implementation method
createNewToDoItem = () => { this.setState( ({ list, todo }) => ({ list: [ ...list, { todo } ], todo: '' }) ); };
In React, our input field has an attribute named value. This value is automatically updated using several functions, which are bound together to create a two-way binding. We create this form of two-way binding by attaching an onChange event listener to the input field. As shown below:
The handleInput function runs whenever the value of the input field changes. It updates the todo within the state object by setting the state object to whatever is in the input field. The handleInput function is as follows:
handleInput = e => { this.setState({ todo: e.target.value }); };
Now, whenever the user presses the button on the page to add a new item, the createNewToDoItem function will run this.setState and pass it a function. This function takes two parameters, the first is the entire list array from the state object, and the second is the todo updated by the handleInput function. The function then returns a new object containing the entire previous list with the todo added to the end. The entire list is added by using the spread operator.
Finally, we set the todo to an empty string, which will automatically update the value in the input field.
Vue implementation method
createNewToDoItem() { this.list.push( { 'todo': this.todo } ); this.todo = ''; }
In Vue, there is a handle named v-model in our input field. This implements **two-way binding. The input field code is as follows:
V-Model Binds the content of the input field to the key of the data object named toDoItem. When the page loads, we set toDoItem to an empty string, like: todo: ' '. If the data already exists, for example todo: 'Add text', the input field will load the input content of the added text. Regardless, leaving it as an empty string, any text we type in the input field will be bound to the todo. This is actually a two-way binding (the input field can update the data object, and the data object can update the input field).
So, looking back at the previous createNewToDoItem() code block, we store the contents of todo in the list array, and then change todo to an empty string.
4. Delete to-do items
React implementation method
deleteItem = indexToDelete => { this.setState(({ list }) => ({ list: list.filter((toDo, index) => index !== indexToDelete) })); };
Although the deleteItem function is located in the ToDo.js file , but it's also easy to reference it from the ToDoItem.js file, passing the deleteItem() function as a prop on:
This will pass the function to the child component, making it accessible. We bound this and passed the key parameter. When the user clicks to delete an item, the function uses the key to distinguish which ToDoItem the user clicked. Then, inside the ToDoItem component, we do the following:
-
To reference a function located inside the parent component, just reference this.props.deleteItem.
The implementation method of Vue
onDeleteItem(todo){ this.list = this.list.filter(item => item !== todo); }
The implementation method of Vue is slightly different. We need to do the following three points:
Step 1 : First, call the function on the element:
-
Step 2: Then we have to create an emit function as an internal method of the child component (ToDoItem.vue in this case) like this:
deleteItem(todo) { this.$emit('delete', todo) }
Step 3: After that, you will find that when we add ToDoItem.vue of ToDo.vue, we actually reference a function:
This is the so-called custom event listening device. It will listen for any trigger event using the 'delete' string. Once the event is listened to, it triggers a function called onDeleteItem. This function is inside ToDo.vue, not ToDoItem.vue. As mentioned before, this function simply filters the todo array within the data object to remove clicked to-do items.
What also needs to be noted in the Vue example is that we can write the $emit part in the @click listener, which is simpler, as shown below:
-
If you like, like this Doing can reduce 3 steps to 2 steps.
Child components in React can access the parent function through this.props, but in Vue, you need to emit events from the child component and the parent component collects the events.
5. How to pass event listeners
React implementation method
Event listeners handle simple events (such as click ) is very direct. We created a click event for the to-do item, which is used to create a new to-do item. The code is as follows:
+
It's very simple, just like using vanilla JS to handle inline onClick. As mentioned earlier, setting up the event listener takes longer as soon as the Enter button is pressed. This requires the input tag to handle the onKeyPress event. The code is as follows:
As long as this function recognizes that the 'enter' key is pressed, it will trigger the **createNewToDoItem** function. The code is as follows:
handleKeyPress = (e) => { if (e.key === ‘Enter’) { this.createNewToDoItem(); } };
Vue’s implementation method
Vue’s event listener is more straightforward. We only need to use a simple @ symbol to build the event listener we want. For example, if you want to add a click event listener, code:
+
注意:@click 实际上是 v-on:click 的简写。Vue 事件监听器很强大,你可以为其选择属性,例如 .once 可以防止事件监听器被多次触发。此外,它还包含很多快捷方式。按下回车按钮时,React 就需要花费更长的时间来创建事件监听器,从而创建新的 ToDo 项目。在 Vue,代码如下:
6. 如何将数据传递给子组件
React 的实现方法
在 React 中,我们将 props 传递到子组件的创建处。比如:
此处我们向 ToDoItem 组件传递了两个 prop。之后,我们可以在子组件中通过 this.props 引用它们
因此,想要访问 item.todo prop,我们只需调用this.props.item 。
Vue 的实现方法
在 Vue 中,我们将 props 传递到子组件创建处的方式如下:
我们将它们传递给子组件中的 props 数组,如:props:['id','todo']。然后可以在子组件中通过名字引用它们。
7. 如何将数据发送回父组件
React 的实现方法
我们首先将函数传递给子组件,方法是在我们调用子组件时将其引用为 prop。
然后我们通过引用 this.props.whateverTheFunctionIsCalled,为子组件添加调用函数,例如 onClick。然后,这将触发父组件中的函
数。删除待办事项一节中详细介绍了整个过程。
Vue 的实现方法
在子组件中我们只需编写一个函数,将一个值发送回父函数。在父组件中编写一个函数来监听子组件何时发出该值的事件,监听到事件之后触发函数调用。同样,删除待办事项一节中详细介绍了整个过程。
8. 总结
通过介绍了如何添加、删除和更改数据,以 prop 形式从父组件到子组件传递数据,以及通过事件监听器的形式将数据从子组件发送到父组件等方法来理解React 和 Vue 之间的差异,希望通过本文的内容有助于大家理解这两个框架
The above is the detailed content of What is the difference between vue and react?. For more information, please follow other related articles on the PHP Chinese website!


![[Web front-end] Node.js quick start](https://img.php.cn/upload/course/000/000/067/662b5d34ba7c0227.png)


