This article brings you an introduction to the Windows GUI version of the cloud migration tool. It has certain reference value. Friends in need can refer to it. I hope it will be helpful to you.
Introduction to the Windows GUI version of the cloud migration tool
The cloud migration tool supports the Windows GUI version starting from version 1.2.9, and the program file name is go2aliyun_gui.exe. If you are using an old version of the cloud migration tool, please re-download the compressed package to get more features. The settings of the Windows GUI interface of the cloud migration tool are consistent with the configuration principle of the command line interface, and the Windows GUI version is compatible with the command line interface running process. You can switch the usage method during the use of the cloud migration tool.
Interface introduction
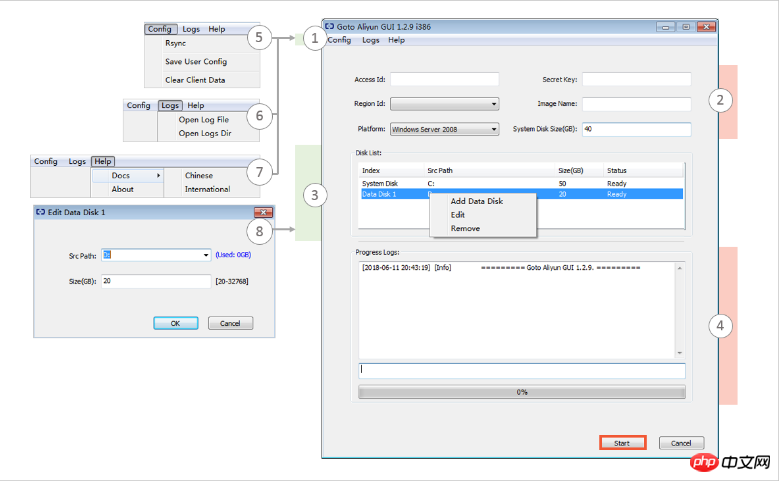
The cloud migration tool Windows GUI interface consists of four areas, including the menu bar, user-defined configuration (user_config.json ) editing area, disk list and task progress and log area. As shown in the figure below:

Icon description
Menu bar consists of Config, Logs and Help It consists of functional pages.
The user-defined configuration (user_config.json) editing area is mainly used to configure some necessary configuration information of the source server, including your AccessKey information, source server operating system information, system disk size, source server The region ID for migration to Alibaba Cloud, the name of the generated ECS image, and the configuration information of the generated target custom image, etc. For more details, see Edit user_config.json using the cloud migration tool.
Disk list, including system disk and data disk. You can right-click in this area to add disks that need to be migrated to the cloud, and double-click to enter the disk information editing page.
Task progress and log area. After running the cloud migration tool, you can view the task progress and troubleshoot according to the interface prompts through this area.
One of the menu bars, you can click Rsync here to set the upper bandwidth limit for data transmission in KB/s. Click Save User Config to save the current page settings for batch operations. Click Clear Client Data Initializes the client configuration file with one click. For more details, see Using the Cloud Migration Tool.
One of the menu bars, you can click Open Log File here to quickly open the log file, or click Open Log Dir to find the path where the log file is located.
One of the menu bars, where you can obtain online documentation or cloud migration tool version information.
You can add data disks here. The cloud migration tool will automatically query the data disk drive letter list in your server and display the used data disk space. The data disk size setting needs to be larger than the actual occupied size of the source server data disk. For example, if the source data disk size is 500 GiB and the actual occupied size is 100 GiB, then you only need to set it to greater than 100 GiB.
After completing the server information configuration on the GUI interface, you can click Start to start the cloud migration. When the Goto Aliyun Finished! prompt appears in the task progress and log area, go to the ECS console image details page to view the results. When the Goto Aliyun Not Finished! prompt appears, check the same log file through the menu function page Logs to troubleshoot the fault. After fixing the problem, re-run the cloud migration tool to resume the cloud migration work. The cloud migration tool will continue the cloud migration from the last execution progress without starting over.
The above is the detailed content of Introduction to the Windows GUI version of the cloud migration tool. For more information, please follow other related articles on the PHP Chinese website!