This article introduces the change detection mechanism ofangularjs. There are many kinds. This article introduces it in detail. I believe it is still very useful to everyone. Now let us take a look at this. Let’s start this article:
If you want to fully understand Angular’s dirty value detection mechanism like me, there is no other way but to browse the source code. But there isn't much information available. Most articles mentioned that each component in Angular comes with a dirty value detector, but they only stop at the dirty value detection strategies and case usage, and do not go into too much depth. This article will take you through the story behind the case and the impact of the dirty value detection strategy. In addition, after mastering the content of this chapter, you will be able to independently propose various performance improvement solutions.
The article contains two parts. The first part is based on Angular 4.0.1. The content is more technical and contains many source code links, explaining the deep mechanism of dirty value detection. The second part shows the specific application of dirty value detection. Use in (Translator's Note 1). Views are the core concept It is mentioned in the tutorial: Angular applications are composed of component trees. However, angular uses views as its lower-level abstraction in the underlying implementation. . There is a direct relationship between components and views. A view corresponds to a component and vice versa. The view has a component property, which is a reference to the component instance. All operations (such as property detection, DOM update) are completed at the view level, so to be precise, Angular should be composed of a view tree, and components can be described as higher-level concepts of views. You can view the relevant source code here. View is the basic building block of application UI. It is also the smallest combination of creating and destroying elements.The properties of elements in the view can be changed directly, but the structure (number and order) of the elements cannot. The structure of the elements can only be changed by inserting, moving or removing nested views through ViewContainerRef. Each view can contain many view containers.
It should be noted that all articles about dirty value detection and answers on StackOverflow use the View I mentioned above as the object of dirty value detection or ChangeDetectorRef, but in fact, dirty value detection There is no dedicated object. Each view can link subviews through node attributes, so operations can be performed on the subviews. State of properties Every view has a state, which plays a very important role because based on its value, Angular decides whether to run or jump on the view and all its children. Passed dirty value detection. There may be many values for the status, but the following are relevant to this article: 1.FirstCheckIn this article, I will use the concepts of component view and component interchangeably.
If falseor the status value of the view isErroredorDestroyed, the view and its subviews will skip dirty value detection. Unless the dirty value detection strategy (ChangeDetectionStrategy) isOnPush, the initialization state of all views will beChecksEnabledby default. States can coexist. For example, a view can have two states:FirstCheckandChecksEnabledat the same time.Angular has a series of advanced concepts for manipulating views. I've written a bit about them here. ViewRef is one of them. It encapsulates the underlying component view and has an aptly named methoddetectChanges
ViewRef, and after itself has finished running, it will perform dirty value detection for its subviews.You can useChangeDetectorRef
viewRef:
export class AppComponent { constructor(cd: ChangeDetectorRef) { ... }
in the constructor of the component. You can see the clues from the definition of this class:
export declare abstract class ChangeDetectorRef { abstract checkNoChanges(): void; abstract detach(): void; abstract detectChanges(): void; abstract markForCheck(): void; abstract reattach(): void; } export abstract class ViewRef extends ChangeDetectorRef { ... }
true, otherwisefalse
在子组件上调用AfterContentInit和AfterContentChecked(AfterContentInit仅在第一次检查时调用 )
如果当前视图组件实例的属性有改变则更新对应的DOM插值
为子视图运行脏值检测(重复列表中步骤)
更新当前视图的 ViewChildren 查询列表
子组件上调用AfterViewInit和AfterViewChecked生命周期钩子(AfterViewInit仅在第一次检查时调用)
更新视图检测状态为禁用
在这里有必要强调几件事:
1.在检查子视图之前,Angular会先触发子组件的onChanges,即使子视图不进行脏值检测,onChanges也会被触发。这一条很重要,我们将在文章的第二部分看到如何利用这些知识。
2.视图的DOM更新是作为脏值检测机制的一部分存在的,也就是说如果组件没有被检测,即使模板中使用的组件属性发生更改,DOM也不会更新(我这里提到的DOM更新实际上是插值表达式的更新。 )。模板会在首次检测之前完成渲染,举个例子,对于some {{name}}这个html,DOM元素span会在第一次检测前就渲染完,在检测期间,只有{{name}}会被渲染。
3.另一个观察到的有趣现象是:在脏值检测期间,子组件视图的状态是可以被改变的。我在前面提到,在默认情况下,所有的组件的状态都会初始化ChecksEnabled,但是对于使用OnPush这个策略的组件来说,脏值检测机制会在第一次后被禁用(操作步骤9)
if (view.def.flags & ViewFlags.OnPush) { view.state &= ~ViewState.ChecksEnabled; }
这意味着在接下来的脏值检测运行期间,该组件视图及其所有子组件将会跳过该检查。有关OnPush策略的文档指出,只有在组件的绑定发生变化时才会检查该组件。所以要做到这一点,必须通过设置ChecksEnabled来启用检查。这就是下面的代码所做的(操作2):
if (compView.def.flags & ViewFlags.OnPush) { compView.state |= ViewState.ChecksEnabled; }
仅当父级视图的绑定发生变化且子组件视图的脏值检测策略已使用初始化为ChangeDetectionStrategy.OnPush,状态才会更新
最后,当前视图的脏值检测负责启动子视图的检测(操作8)。如果是视图状态是ChecksEnabled,则对此视图执行更改检测。这里是相关的代码:
viewState = view.state; ... case ViewAction.CheckAndUpdate: if ((viewState & ViewState.ChecksEnabled) && (viewState & (ViewState.Errored | ViewState.Destroyed)) === 0) { checkAndUpdateView(view); } }
现在你知道视图及其子视图是否运行脏值检测是由视图状态控制的。那么我们可以控制视图的状态吗?事实证明,我们可以,这是本文第二部分需要讨论的。
一些生命周期的钩子(步骤3,4,5)是在DOM更新前被调用的,另一些则是之后运行(操作9)。如果我们有如下组件层级:A->B->C,下面是钩子回调和绑定更新的顺序:
A: AfterContentInit A: AfterContentChecked A: Update bindings B: AfterContentInit B: AfterContentChecked B: Update bindings C: AfterContentInit C: AfterContentChecked C: Update bindings C: AfterViewInit C: AfterViewChecked B: AfterViewInit B: AfterViewChecked A: AfterViewInit A: AfterViewChecked
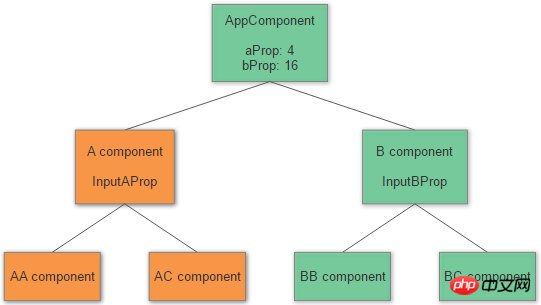
让我们假设有如下组件树:

我们知道,一个组件对应一个视图。每个视图的状态都被初始化为ViewState.ChecksEnabled,也就意味着在组件树上的每一个组件都将运行脏值检测。
假设我们想要禁用AComponent及其子项的脏值检测,通过设置ViewState.ChecksEnabled为false是最简答的方式。但是直接改变状态在Angular中是底层操作,为此Angular提供了一些列公开方法。每个组件可以通过ChangeDetectorRef标识来获取关联视图。 Angular文档定义了以下公共接口:
class ChangeDetectorRef { markForCheck() : void detach() : void reattach() : void detectChanges() : void checkNoChanges() : void }
让我们看看这可以为我们带来什么好处。(想看更多就到PHP中文网AngularJS开发手册中学习)
第一种允许我们操作状态的方法是detach,它可以简单地禁用对当前视图的脏值检测:
detach(): void { this._view.state &= ~ViewState.ChecksEnabled; }
让我们看看它在代码中的应用:
export class AComponent { constructor(public cd: ChangeDetectorRef) { this.cd.detach(); }
现在可以确保在脏值检测运行期间,左侧分支(从AComponent开始,橘色部分)AComponent将跳过检测:
这里需要注意两点:第一点,即使我们改变了ACompoent的状态,它的所有子组件也不会进行检测;第二点,随着左侧分支脏值检测的停止,DOM更新也不再运行。这里举个小例子:
@Component({ selector: 'a-comp', template: `See if I change: {{changed}}` }) export class AComponent { constructor(public cd: ChangeDetectorRef) { this.changed = 'false'; setTimeout(() => { this.cd.detach(); this.changed = 'true'; }, 2000); }
一开始模板会被渲染成See if I change: false,两秒之后change这个属性的值变为true,但相对应的文字却没有改过来。如果我们删除了this.cd.detach(),一切就会如期进行。
正如文章第一部分所述,如果输入属性发生变化,OnChanges就会被触发。这意味着一旦我们知晓输入属性了变化,我们就可以激活当前组件的检测器来运行脏值检测,并在下一轮关闭它。举个例子:
export class AComponent { @Input() inputAProp; constructor(public cd: ChangeDetectorRef) { this.cd.detach(); } ngOnChanges(values) { this.cd.reattach(); setTimeout(() => { this.cd.detach(); }) }
reattach通过位运算简单的设置了ViewState.ChecksEnabled
reattach(): void { this._view.state |= ViewState.ChecksEnabled; }
这几乎等同于把ChangeDetectionStrategy设置为OnPush:在第一次更改检测运行后禁用检查,在父组件绑定属性变化时启用它,并在运行后禁用。
请注意,OnChanges仅在禁用分支中最顶层的组件中触发,而不是在禁用的分支中的每个组件触发。
reattach方法仅作用于当前组件,对父级组件则不起作用。这意味着该reattach方法仅适用于禁用分支中最顶层的组件。
我们需要一种启用从当前组件到根组件检测的方法,markForCheck应用而生:
let currView: ViewData|null = view; while (currView) { if (currView.def.flags & ViewFlags.OnPush) { currView.state |= ViewState.ChecksEnabled; } currView = currView.viewContainerParent || currView.parent; }
从源码的实现中我们可以看到,markForCheck向上逐层遍历并启用检测。
这有什么用处呢?正如在检测策略为OnPush的情况下,ngOnChanges和ngDoCheck依旧可以被触发, 同样,它仅在被禁用分支中的最顶层组件触发,而不是被禁用分支中的每个组件触发。 但是我们可以使用该钩子来执行自定义逻辑,并将我们的组件标记为符合一次脏值检测周期运行。 由于Angular只检查对象引用,所以我们可以实现一些对象属性的脏检查:
Component({ ..., changeDetection: ChangeDetectionStrategy.OnPush }) MyComponent { @Input() items; prevLength; constructor(cd: ChangeDetectorRef) {} ngOnInit() { this.prevLength = this.items.length; } ngDoCheck() { if (this.items.length !== this.prevLength) { this.cd.markForCheck(); this.prevLenght = this.items.length; } }
使用detectChanges可以为当前组件及其所有子项运行一次脏值检测。此方法会忽略视图的状态,这意味着当前视图可能依旧保持禁用状态,并且不会对组件进行常规脏值检测。举个例子:
export class AComponent { @Input() inputAProp; constructor(public cd: ChangeDetectorRef) { this.cd.detach(); } ngOnChanges(values) { this.cd.detectChanges(); }
即使脏值检测器依旧是detached,输入属性更改时DOM也会更新。
脏值检测的最后一个可用方法是确保在当前检测运行过程中不会有变化发生。基本上,它执行了列表中1,7,8操作,如果它发现了需要变更的绑定或者会引发DOM的更新,它都会抛出异常。
好了,本篇文章到这就结束了(想看更多就到PHP中文网AngularJS使用手册中学习),有问题的可以在下方留言提问。
The above is the detailed content of Everything you need to know about Angular's change detection mechanism explained in detail. For more information, please follow other related articles on the PHP Chinese website!