This time I will bring you the back-end code for uploading images in the WeChat applet. What are the precautions for uploading images in the WeChat applet. The following is a practical case, let's take a look.
Of course, mini programs can also upload pictures, and the WeChat mini program documentation is also very clear.
Upload pictures
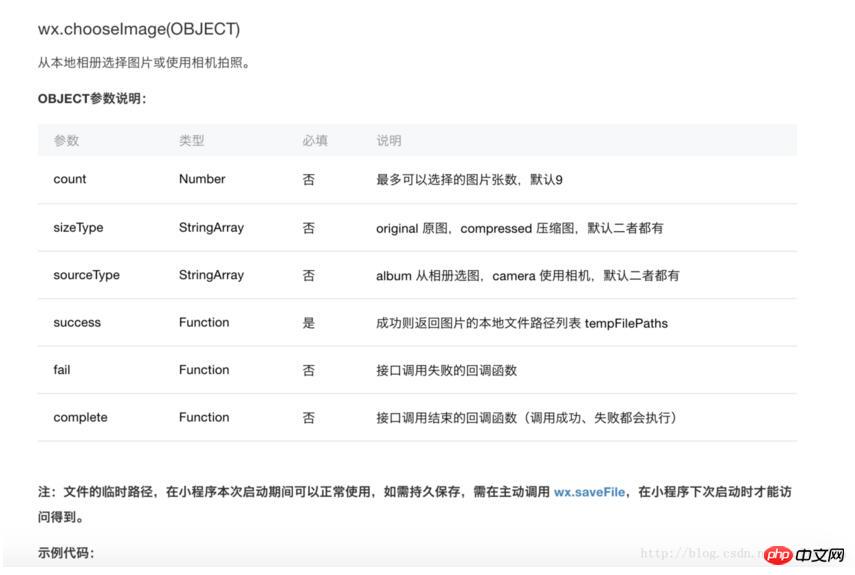
First select the picture
Achieve through wx.chooseImage(OBJECT)

Official sample code
wx.chooseImage({
 count: 1, // 默认9
 sizeType: ['original', 'compressed'], // 可以指定是原图还是压缩图,默认二者都有
 sourceType: ['album', 'camera'], // 可以指定来源是相册还是相机,默认二者都有
 success: function (res) {
 // 返回选定照片的本地文件路径列表,tempFilePath可以作为img标签的src属性显示图片
 var tempFilePaths = res.tempFilePaths
 }
})You can select up to 9 pictures, or you can take photos. After selecting the picture, you will get the picture path. This path will be used during this startup. efficient.
If you need to save, you need to use wx.saveFile(OBJECT)
##Upload the picture
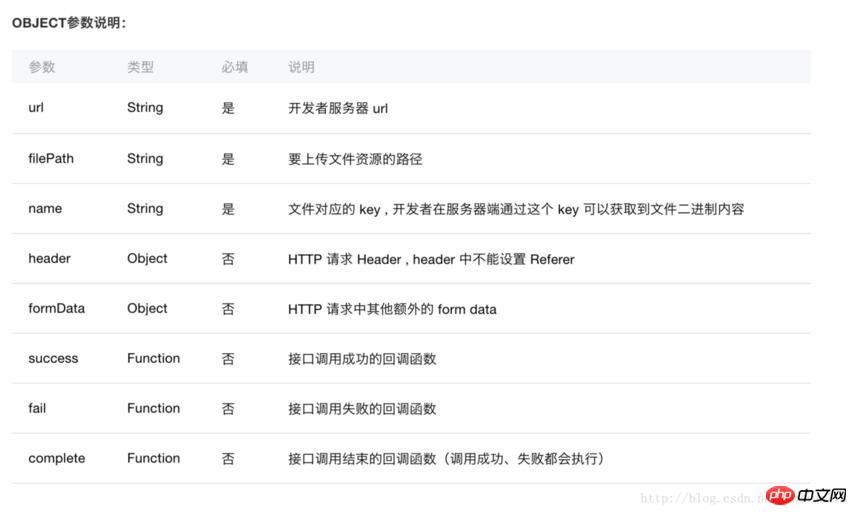
Passwx.uploadFile(OBJECT) You can upload local resource files to the server.
The principle is that the client initiates an HTTPS POST request, where the content-type is multipart/form-data.
wx.chooseImage({
 success: function(res) {
 var tempFilePaths = res.tempFilePaths
 wx.uploadFile({
  url: 'http://example.weixin.qq.com/upload', //仅为示例,非真实的接口地址
  filePath: tempFilePaths[0],
  name: 'file',
  formData:{
  'user': 'test'
  },
  success: function(res){
  var data = res.data
  //do something
  }
 })
 }
})Sample code
After reading the official document, I wrote a way to upload pictures. So troublesome, the following is the code of the real scenarioimport constant from '../../common/constant';
Page({
data: {
src: "../../image/photo.png", //绑定image组件的src
//略...
},
onLoad: function (options) {
//略...
},
uploadPhoto() {
var that = this;
wx.chooseImage({
count: 1, // 默认9
sizeType: ['compressed'], // 可以指定是原图还是压缩图,默认二者都有
sourceType: ['album', 'camera'], // 可以指定来源是相册还是相机,默认二者都有
success: function (res) {
// 返回选定照片的本地文件路径列表,tempFilePath可以作为img标签的src属性显示图片
var tempFilePaths = res.tempFilePaths;
upload(that, tempFilePaths);
}
})
}
})
function upload(page, path) {
wx.showToast({
icon: "loading",
title: "正在上传"
}),
wx.uploadFile({
url: constant.SERVER_URL + "/FileUploadServlet",
filePath: path[0],
name: 'file',
header: { "Content-Type": "multipart/form-data" },
formData: {
//和服务器约定的token, 一般也可以放在header中
'session_token': wx.getStorageSync('session_token')
},
success: function (res) {
console.log(res);
if (res.statusCode != 200) {
wx.showModal({
title: '提示',
content: '上传失败',
showCancel: false
})
return;
}
var data = res.data
page.setData({ //上传成功修改显示头像
src: path[0]
})
},
fail: function (e) {
console.log(e);
wx.showModal({
title: '提示',
content: '上传失败',
showCancel: false
})
},
complete: function () {
wx.hideToast(); //隐藏Toast
}
})
}Backend code
The backend is written in java. At the beginning, the backend started to use Some frameworks encountered various problems when receiving uploaded images. Later, when pure Servlets were used, there were no problems. Posting the code will save you trouble in the future. Note: The code uses the company's internal framework. It is recommended to modify it before using it.public class FileUploadServlet extends HttpServlet {
private static final long serialVersionUID = 1L;
private static Logger logger = LoggerFactory.getLogger(FileUploadServlet.class);
public FileUploadServlet() {
super();
}
protected void doGet(HttpServletRequest request, HttpServletResponse response) throws ServletException, IOException {
JsonMessage<Object> message = new JsonMessage<Object>();
EOSResponse eosResponse = null;
String sessionToken = null;
FileItem file = null;
InputStream in = null;
ByteArrayOutputStream swapStream1 = null;
try {
request.setCharacterEncoding("UTF-8");
//1、创建一个DiskFileItemFactory工厂
DiskFileItemFactory factory = new DiskFileItemFactory();
//2、创建一个文件上传解析器
ServletFileUpload upload = new ServletFileUpload(factory);
//解决上传文件名的中文乱码
upload.setHeaderEncoding("UTF-8");
// 1. 得到 FileItem 的集合 items
List<FileItem> items = upload.parseRequest(request);
logger.info("items:{}", items.size());
// 2. 遍历 items:
for (FileItem item : items) {
String name = item.getFieldName();
logger.info("fieldName:{}", name);
// 若是一个一般的表单域, 打印信息
if (item.isFormField()) {
String value = item.getString("utf-8");
if("session_token".equals(name)){
sessionToken = value;
}
}else {
if("file".equals(name)){
file = item;
}
}
}
//session校验
if(StringUtils.isEmpty(sessionToken)){
message.setStatus(StatusCodeConstant.SESSION_TOKEN_TIME_OUT);
message.setErrorMsg(StatusCodeConstant.SESSION_TOKEN_TIME_OUT_MSG);
}
String userId = RedisUtils.hget(sessionToken,"userId");
logger.info("userId:{}", userId);
if(StringUtils.isEmpty(userId)){
message.setStatus(StatusCodeConstant.SESSION_TOKEN_TIME_OUT);
message.setErrorMsg(StatusCodeConstant.SESSION_TOKEN_TIME_OUT_MSG);
}
//上传文件
if(file == null){
}else{
swapStream1 = new ByteArrayOutputStream();
in = file.getInputStream();
byte[] buff = new byte[1024];
int rc = 0;
while ((rc = in.read(buff)) > 0) {
swapStream1.write(buff, 0, rc);
}
Usr usr = new Usr();
usr.setObjectId(Integer.parseInt(userId));
final byte[] bytes = swapStream1.toByteArray();
eosResponse= ServerProxy.getSharedInstance().saveHeadPortrait(usr, new RequestOperation() {
@Override
public void addValueToRequest(EOSRequest request) {
request.addMedia("head_icon_media", new EOSMediaData(EOSMediaData.MEDIA_TYPE_IMAGE_JPEG, bytes));
}
});
// 请求成功的场合
if (eosResponse.getCode() == 0) {
message.setStatus(ConstantUnit.SUCCESS);
} else {
message.setStatus(String.valueOf(eosResponse.getCode()));
}
}
} catch (Exception e) {
e.printStackTrace();
} finally{
try {
if(swapStream1 != null){
swapStream1.close();
}
} catch (IOException e) {
e.printStackTrace();
}
try {
if(in != null){
in.close();
}
} catch (IOException e) {
e.printStackTrace();
}
}
PrintWriter out = response.getWriter();
out.write(JSONObject.toJSONString(message));
}
protected void doPost(HttpServletRequest request, HttpServletResponse response) throws ServletException, IOException {
doGet(request, response);
}
} Detailed explanation of the three usage cases of js (with code)
How to use WeChat mini Program to upload pictures
The above is the detailed content of Upload pictures with back-end code in WeChat applet. For more information, please follow other related articles on the PHP Chinese website!
 Mini program path acquisition
 Is python front-end or back-end?
 How to modify the text in the picture
 What to do if the embedded image is not displayed completely
 The difference between front-end and back-end
 Introduction to the main work content of the backend
 How to make ppt pictures appear one by one
 How to make a round picture in ppt


