

This time I will show you how to use HTML5+ajax to create a preview image effect. What are the precautions for HTML5+ajax to create a preview image effect? The following is a practical case, let’s take a look.
1. About image uploading
In the era of XHTML, we can only upload one image at a time using the HTML file control. To upload multiple images at once, the method is to use flash. For example swfupload.js. Unfortunately, there are some complications in using it, such as the flash file needs to be in the same parent folder as the page, and the JavaScript file size is also considerable.
I have previously translated and edited an article on "Ajax Upload Multi-File Upload Plug-in". The highlight of this plug-in is to use a hidden iframe frame page to simulate ajax upload. However, in fact , you can still only upload 1 picture at a time, you can upload it multiple times.
HTML5 is a good thing. One of them is that it supports multiple image uploads, supports ajax upload, supports preview of images before uploading, and supports drag and drop upload of images. It is purely implemented using the file control and has very few JS codes. , it’s hard not to be praised!
2. Demo page
If the browser you have is the latest FireFox or Chrome browser, you can click here: Based on HTML5 Multi-image Ajax upload demo
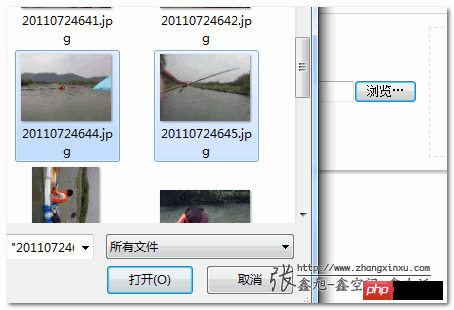
In the demo page, you can click the file control to upload multiple images, as shown below (FireFox 6 screenshot, the same below):
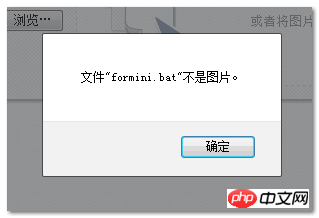
If there are non-image files or the image size is too large, a prompt will pop up:
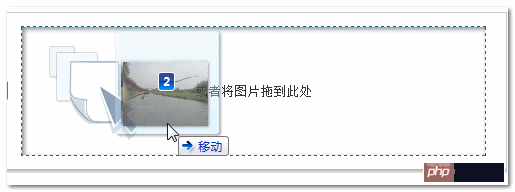
Or you can directly drag the image on the desktop to the area that accepts dragging:
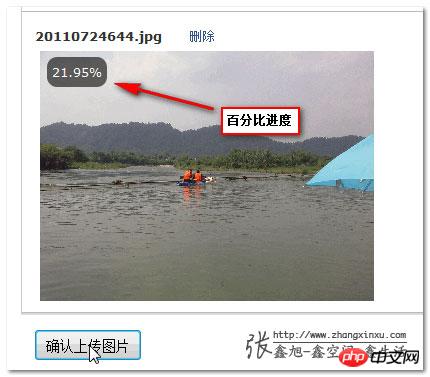
After releasing, the image can be previewed directly (it has not been uploaded to the server yet):
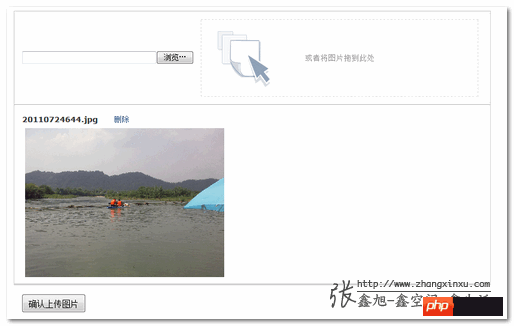
This Pictures can be deleted in advance or uploaded directly. For example, we click the upload button and soon, the picture is uploaded successfully :)!
The page address after uploading is returned, as follows:

At this time, the corresponding upload folder is below Here is this picture:
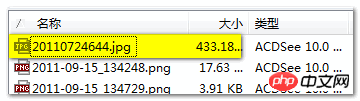
Note: The space on my blog is limited, and I will clean up the picture folder regularly. So, please do not regard this as a free picture hosting. Occasion~~
3. Simple analysis of the core skeleton scriptThe first is a core file for file upload, which was slowly compiled in the previous two nights. The file name is: zxxFile.js (you can right-click... to download)
This file is only a few kilobytes and has about a hundred lines of code. It is mainly responsible for the logic related to file upload (selection, deletion, etc.), native JS, so , compatible with jQuery, YUI, MooYools, etc. zxxFile.js is actually a small skeleton file, and the body needs to be added separately.
zxxFile.js is actually just a small object:
var ZXXFILE = {
  //骨架们...
}The following table shows the attributes (skeleton) of the ZXXFILE object and its corresponding content and meaning.

Additional explanation: The file parameter mentioned many times above refers to the file object object. The attribute values of this object include name, size, type, etc. Then, in zxxFile In .js, it also has an index attribute that facilitates element positioning.
Obviously, only the skeleton can basically do nothing. The reason why the demo page is effective is that it follows the above skeleton and adds flesh and blood according to actual needs. You can directly "right-click - view page source code" to view all related JavaScript. Or read my mother-in-law’s story below.
我们按照上面表格中的骨架进行示意。demo页面借用了比较流行的jQuery库,骨架+血肉 = 插件,当然,demo页面并不是奔着插件去的(虽然只需稍加修改),因为页面的UI显然不够插件的份。也就是说,利用zxxFile.js骨架,配合点你自己属性的JavaScript库就可以书写属于你自己的基于HTML5的多文件Ajax上传插件啦!
四、demo页面的些代码demo页面代码整体逻辑如下:
var params = {
  //血肉们
};
ZXXFILE = $.extend(ZXXFILE, params);
ZXXFILE.init();fileInput首先是file控件元素,如下:
fileInput: $("#fileImage").get(0)因为是DOM元素,所以应用了jQuery的get方法。下面两个参数同。
demo页面中的file控件元素支持多文件选择,其隐藏的玄机就是下面代码中大红高亮的部分:
dragDrop和upButton拖拽区域和上传按钮(默认隐藏):
dragDrop: $("#fileDragArea").get(0),
upButton: $("#fileSubmit").get(0)urlAjax上传地址,没什么好说的,取的是表单的action地址:
url: $("#uploadForm").attr("action")
filter方法对选择的文件进行过滤。file控件什么文件都能选,而demo页面是图片上传相关的demo;空间大小有限,超大尺寸的图片还是挡着为好。显然,要对上传文件进行过滤。于是,就有了如下的过滤脚本:
filter: function(files) {
  var arrFiles = [];
  for (var i = 0, file; file = files[i]; i++) {
    if (file.type.indexOf("image") == 0) {
      if (file.size >= 512000) {
        alert('您这张"'+ file.name +'"图片大小过大,应小于500k');
      } else {
        arrFiles.push(file);
      }
    } else {
      alert('文件"' + file.name + '"不是图片。');
    }
  }
  return arrFiles;
}zxxFile.js会自动对过滤后的文件对象列表进行整合,以准确上传。
onSelect方法文件(这里就是图片)选择后执行的方法。在本实例页面中,onSelect方法的主要任务就是本地图片在浏览器中的预览。本地图片上传之前在浏览器中预览的核心脚本就是:
var reader = new FileReader(), htmlImage;
reader.onload = function(e) {
htmlImage = ' ';
}
reader.readAsDataURL(file);
';
}
reader.readAsDataURL(file);在本demo页面中,该部分完成脚本如下,虽好像有些长度,其实内容就是装载一些HTML代码而已:
onSelect: function(files) {
var html = '', i = 0;
//等待载入gif动画
$("#preview").html('');
var funAppendImage = function() {
file = files[i];
if (file) {
var reader = new FileReader()
reader.onload = function(e) {
html = html + '' + file.name + ''+
'删除
' +
'
'+
'' +
'';
i++;
funAppendImage();
}
reader.readAsDataURL(file);
} else {
//图片相关HTML片段载入
$("#preview").html(html);
if (html) {
//删除方法
$(".upload_delete").click(function() {
ZXXFILE.funDeleteFile(files[parseInt($(this).attr("data-index"))]);
return false;
});
//提交按钮显示
$("#fileSubmit").show();
} else {
//提交按钮隐藏
$("#fileSubmit").hide();
}
}
};
//执行图片HTML片段的载人
funAppendImage();
}细心的你可能发现到上面的HTML元素中基本上都用到了i这个索引,作用是方便后面删除可以找到相应的元素。
然后,还有一个需要注意的就是删除事件——执行了ZXXFILE.funDeleteFile()方法,这是必须的,真正将图片从文件列表中删除,同时用来触发onDelete方法的回调。
onDelete方法图片上传完毕或是删除之时执行飞方法。本实例是让其渐隐:
onDelete: function(file) {
  $("#uploadList_" + file.index).fadeOut();
}onDragOver方法文件拖到拖拽元素上时执行的方法,本实例就是增加了个类名,如下:
onDragOver: function() {
  $(this).addClass("upload_drag_hover");
}onDragLeave方法文件移出元素上时执行的方法,本实例就是去掉了个类名,如下:
onDragLeave: function() {
  $(this).addClass("upload_drag_hover");
}onProgress方法
上传中触发的方法。本demo效果就是图片左上角有个有着圆角黑色半透明背景元素,里面的百分比值不断增加。代码:
onProgress: function(file, loaded, total) {
  var eleProgress = $("#uploadProgress_" + file.index), percent = (loaded / total * 100).toFixed(2) + '%';
  eleProgress.show().html(percent);
}onSuccess方法当前图片上传成功后执行的方法。本demo就是提示返回的图片地址信息:
onSuccess: function(file, response) {
$("#uploadInf").append(""上传成功,图片地址是:" + response + ""
");
}onFailure方法图片上传嗝屁时尿出的方法。本demo为提示,然后图片浅透明:
onFailure: function(file) {
$("#uploadInf").append("图片" + file.name + "上传失败!
");
$("#uploadImage_" + file.index).css("opacity", 0.2);
}onComplete方法当所有图片都上传完毕之后,本实例页面把file控件的value值置空,同时按钮隐藏了:
onComplete: function() {
//提交按钮隐藏
$("#fileSubmit").hide();
//file控件value置空
$("#fileImage").val("");
$("#uploadInf").append("当前图片全部上传完毕,可继续添加上传。
");
}PHP页面相关代码
$fn = (isset($_SERVER['HTTP_X_FILENAME']) ? $_SERVER['HTTP_X_FILENAME'] : false);
if ($fn) {
  file_put_contents(
    'uploads/' . $fn,
    file_get_contents('php://input')
  );
  echo "http://www.zhangxinxu.com/study/201109/uploads/$fn";
  exit();
}以上就是主要的些功能或交互代码。至于CSS样式部分以及HTML代码中的一些细节我就懒得捡芝麻了。您有兴趣可以通过查看源代码观摩观摩。
5. Current application scope of HTML5 file Ajax uploadNot only does IE browser not support it, but the latest Safari browser under win, or Opera do not fully support HTML5's previewable multi-image Ajax upload. So why are we still studying this? At least now there is no bird like this.
Indeed, in some of our external projects, it is too early to use this technology for web pages used by the majority of users. However, for the company's intranet project, it is absolutely OK to apply this. I discovered a very strange problem. Many times, intranet web pages support lower versions of IE, but do not support modern browsers. This is completely on the wrong track.
Recently, our company has started to reform the intranet project and started to develop the intranet based on modern browsers such as Chrome (of course, IE browser can also be used), and internal staff are forced to use Chrome browser. As far as our company is concerned, the response has been very good, whether it is UI effect, interaction or speed experience.
Obviously, at least in our company, if we want to provide a multi-image upload function for intranet editors or secretaries in the future, we can directly use HTML5 file upload, which is what this article is about. Simplicity, speed, and speed will make you realize that development is a happy and valuable thing.
In addition, the demo page of this article is more for examples, and I apologize for any mistakes in it. zxxFile.js has just been released and has not been practiced yet. Your valuable comments are welcome, thank you very much.
I believe you have mastered the method after reading the case in this article. For more exciting information, please pay attention to other related articles on the php Chinese website!
Recommended reading:
Ajax implements the function of file upload with progress bar effect
How to use readyState and status in Ajax
The above is the detailed content of How to create preview image effect with HTML5+ajax. For more information, please follow other related articles on the PHP Chinese website!
 what is h5
 How to modify the text in the picture
 What to do if the embedded image is not displayed completely
 How to implement h5 to slide up and load the next page on the web side
 How to make ppt pictures appear one by one
 How to make a round picture in ppt
 The role of registering a cloud server
 What is Avalanche


![[Web front-end] Node.js quick start](https://img.php.cn/upload/course/000/000/067/662b5d34ba7c0227.png)


