Vue itself does not support ajax interface requests, so we need to install an npm package for interface requests to enable our project to have this function. This article mainly introduces the method of Vue2 configuring the Axios api interface to call files. The editor thinks it is quite good, so I will share it with you now and give it as a reference.
This is actually an important Unix idea, that is, a tool can only do one thing well. When you need additional functions, you need to install the corresponding software to execute it. If you have been a heavy user of jquery before, you may need to understand this idea in depth.
There are many tools that support ajax. Initially, I used the superagent tool. But I found that in the past year, most of the tutorials used the axios interface request tool. In fact, there is no difference at all. But in order to prevent you from having conflicts of ideas after reading my blog post and other articles. Therefore, I switched to the tool axios.
In itself, the tool axios has been well optimized and encapsulated. However, it is still a bit cumbersome to use, so I repackaged it. Of course, more importantly, the tool axios is encapsulated for compatibility with the code I wrote before. However, I packaged it very well and recommend it to everyone.
Encapsulate the axios tool and edit the src/api/index.js file
First of all, if we want to use the axios tool, we must first install the axios tool. Execute the following command to install
npm install axios -D

Due to the poor conditions for overcoming the wall in the dormitory, cnpm is used instead
In this way, we have installed the axios tool.
Do you still remember the system structure we organized in the third blog post? We created a new empty text file src/api/index.js and left it there. Here, we fill in the content for it.
// 配置API接口地址 var root = 'https://cnodejs.org/api/v1' // 引用axios var axios = require('axios') // 自定义判断元素类型JS function toType (obj) { return ({}).toString.call(obj).match(/\s([a-zA-Z]+)/)[1].toLowerCase() } // 参数过滤函数 function filterNull (o) { for (var key in o) { if (o[key] === null) { delete o[key] } if (toType(o[key]) === 'string') { o[key] = o[key].trim() } else if (toType(o[key]) === 'object') { o[key] = filterNull(o[key]) } else if (toType(o[key]) === 'array') { o[key] = filterNull(o[key]) } } return o } /* 接口处理函数 这个函数每个项目都是不一样的,我现在调整的是适用于 https://cnodejs.org/api/v1 的接口,如果是其他接口 需要根据接口的参数进行调整。参考说明文档地址: https://cnodejs.org/topic/5378720ed6e2d16149fa16bd 主要是,不同的接口的成功标识和失败提示是不一致的。 另外,不同的项目的处理方法也是不一致的,这里出错就是简单的alert */ function apiAxios (method, url, params, success, failure) { if (params) { params = filterNull(params) } axios({ method: method, url: url, data: method === 'POST' || method === 'PUT' ? params : null, params: method === 'GET' || method === 'DELETE' ? params : null, baseURL: root, withCredentials: false }) .then(function (res) { if (res.data.success === true) { if (success) { success(res.data) } } else { if (failure) { failure(res.data) } else { window.alert('error: ' + JSON.stringify(res.data)) } } }) .catch(function (err) { let res = err.response if (err) { window.alert('api error, HTTP CODE: ' + res.status) } }) } // 返回在vue模板中的调用接口 export default { get: function (url, params, success, failure) { return apiAxios('GET', url, params, success, failure) }, post: function (url, params, success, failure) { return apiAxios('POST', url, params, success, failure) }, put: function (url, params, success, failure) { return apiAxios('PUT', url, params, success, failure) }, delete: function (url, params, success, failure) { return apiAxios('DELETE', url, params, success, failure) } }
Okay, after we write this file, save it.
Added on October 20, 2017, deleted the return that someone reported in the comments would be wrong. Indeed, this return has no effect. But I really didn't make any mistakes here. It doesn't matter, it's useless in the first place, it's just a bad habit code from the past.
For more information about axios, please refer to the official github: https://github.com/mzabriskie/axios, and Chinese information is available on Baidu.
But that’s it, we can’t use this tool in the vue template file yet, and we need to adjust the main.js file.
Adjust main.js to bind api/index.js file
This time, we did not adjust the main.js file first because the original file was configured It's better, I didn't deliberately want to adjust it.
The original file is as follows:
import Vue from 'vue' import App from './App' import router from './router' Vue.config.productionTip = false /* eslint-disable no-new */ new Vue({ el: '#app', router, template: '
We insert the following code:
// 引用API文件 import api from './api/index.js' // 将API方法绑定到全局 Vue.prototype.$api = api 也就是讲代码调整为: import Vue from 'vue' import App from './App' import router from './router' // 引用API文件 import api from './api/index.js' // 将API方法绑定到全局 Vue.prototype.$api = api Vue.config.productionTip = false /* eslint-disable no-new */ new Vue({ el: '#app', router, template: '
Okay, In this way, we can use our encapsulated api interface to call files in the project.
Test and see if it can be adjusted
Let’s modify the src/page/index.vue file and adjust the code to the following code:
index page
Okay, here is calling the topics list interface of cnodejs.org and printing the results.
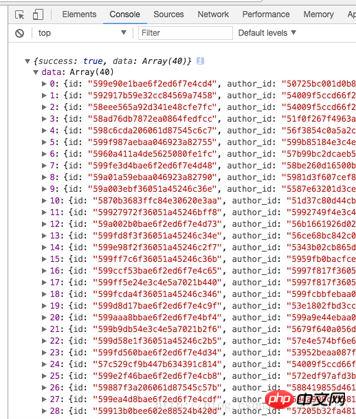
Let’s open the console in the browser and see if there is any output similar to the picture below under the console. If there is, it means that our interface configuration has been successful.

cnodejs.org Interface Data Demonstration
Okay, if you operate it correctly and there is no format error in the code, then the result you should get now is the same as mine. of. If something goes wrong or something else, please check the code carefully to see if there is any problem.
Related recommendations:
The most complete usage of Vue.js
The most detailed vue.js installation tutorial
Detailed explanation of the construction, packaging and publishing of vue project
The above is the detailed content of Detailed example of how Vue2 configures the Axios api interface to call files. For more information, please follow other related articles on the PHP Chinese website!


