


Detailed graphic tutorial on the installation of Oracle 11g server

Oracle 11g provides high performance, scalability, availability and security, and can more easily run on a grid composed of low-cost servers and storage devices. Compared with previous versions, Oracle 11g has unique features characteristics. Next, this article will introduce to you the detailed steps of Oracle 11g server installation with pictures and texts. Friends in need can refer to it. I hope it can help everyone.
Oracle 11g is the latest database software launched in China. Oracle 11g has more than 400 functions. After more than 1,500 hours of testing, the development workload has reached 36,000 people/month, which is equivalent to the continuous development of 1,000 employees. 3 years of research and development. Oracle 11g provides high performance, scalability, availability and security, and can more easily run on a grid composed of low-cost servers and storage devices. Compared with previous versions, Oracle 11g has unique features.
The following will focus on introducing the detailed steps of Oracle 11g server installation with pictures and texts. The specific content is as follows:
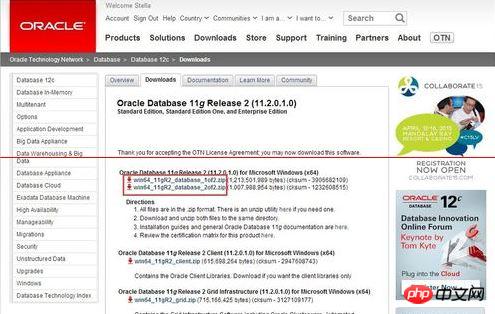
1. You can decide according to the number of bits of your operating system (32-bit or 64-bit). bit), go to the official website to download the corresponding installation program, as shown in the figure below.
One thing to note is that the Oracle installation program is divided into 2 files. After downloading, just unzip the 2 files to the same directory.
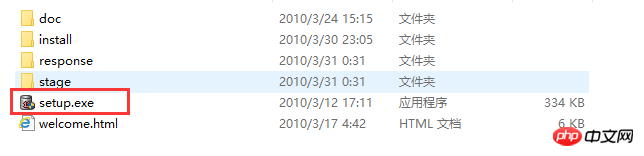
2. After the download is completed, select the two compressed files together, right-click the mouse -> Unzip the files, as shown in the figure below. Extract the two compressed files to the same directory.
It should be noted that it is best not to have irregular characters such as Chinese and spaces in the path name. (Since the editor decompresses it locally and then copies it to the server, the local path does not matter, as long as the path on the server loads this rule.) Open the corresponding decompression path, find the installation file "setup.exe", and double-click to install. As shown in the figure below:
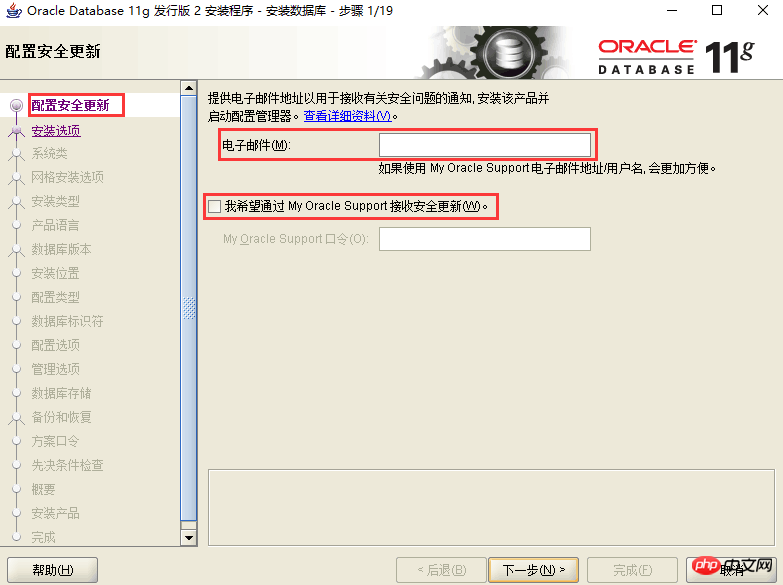
3. Configure security updates. The email can be written or not. Cancel the "I want to receive security updates through My Oracle Support (W)" below, as shown in the figure below, and click Next.
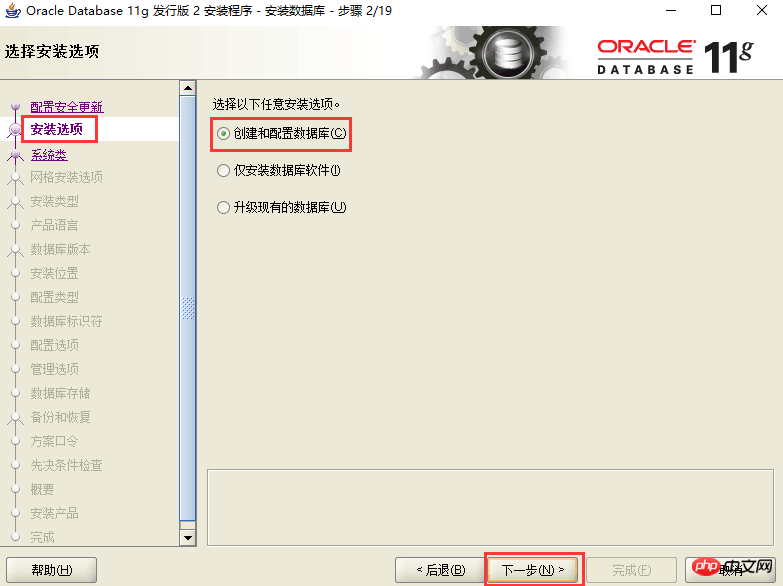
4. Installation options. Directly select the default "Create and configure database", as shown in the figure below, and click Next.
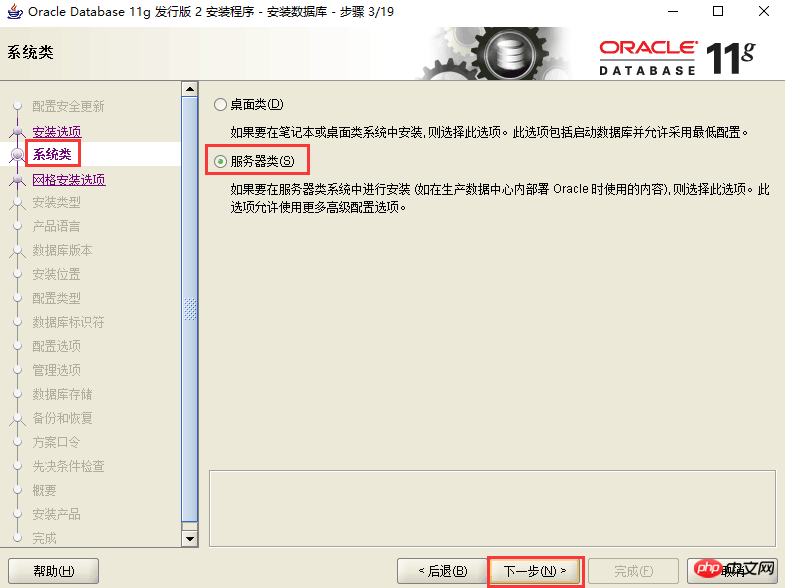
5. System class. Since we are installing a server, select "Server Class", as shown in the figure below, and click Next.
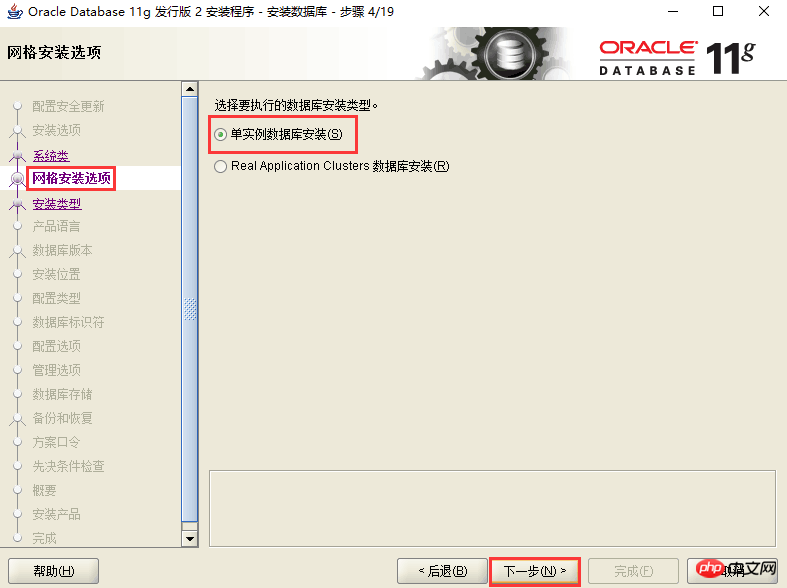
6. Grid installation option. Select "Single instance database installation", as shown in the figure below, and click Next.
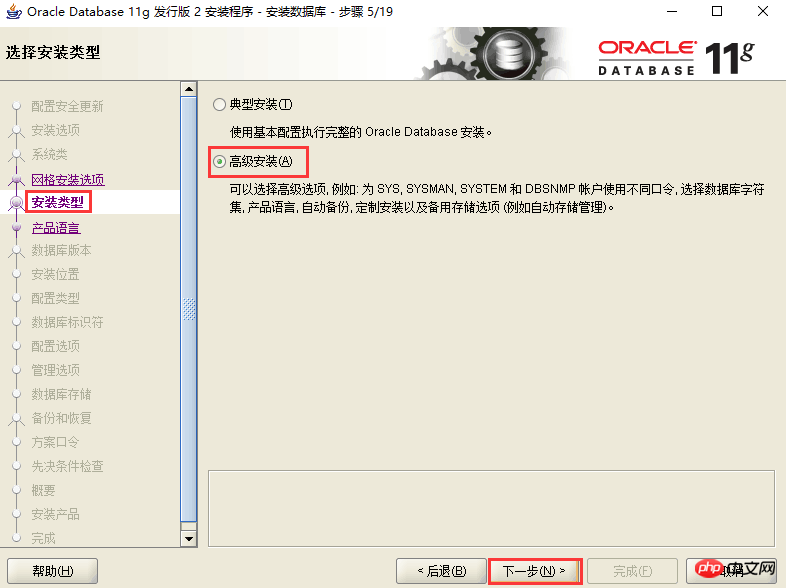
7. Installation type. Select "Advanced Installation" as shown in the figure below and click Next.
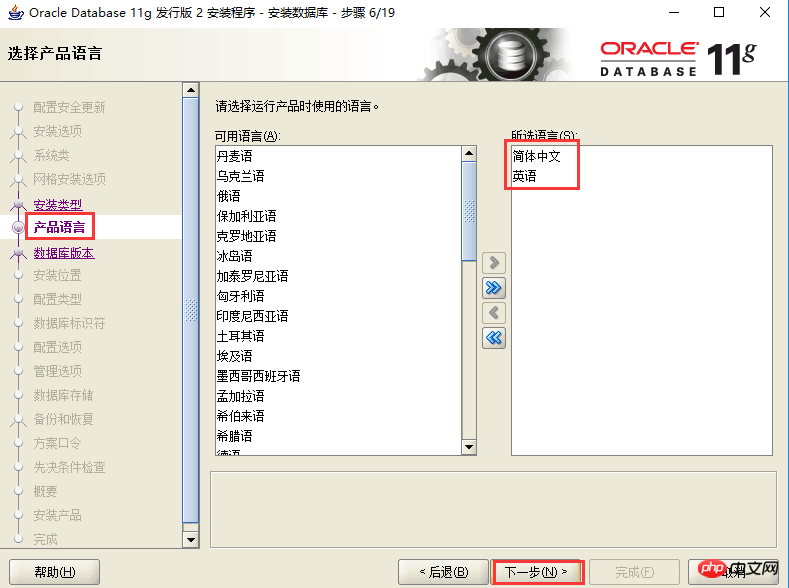
8. Product language. Just leave the default settings (Simplified Chinese, English), as shown in the figure below, and click Next.
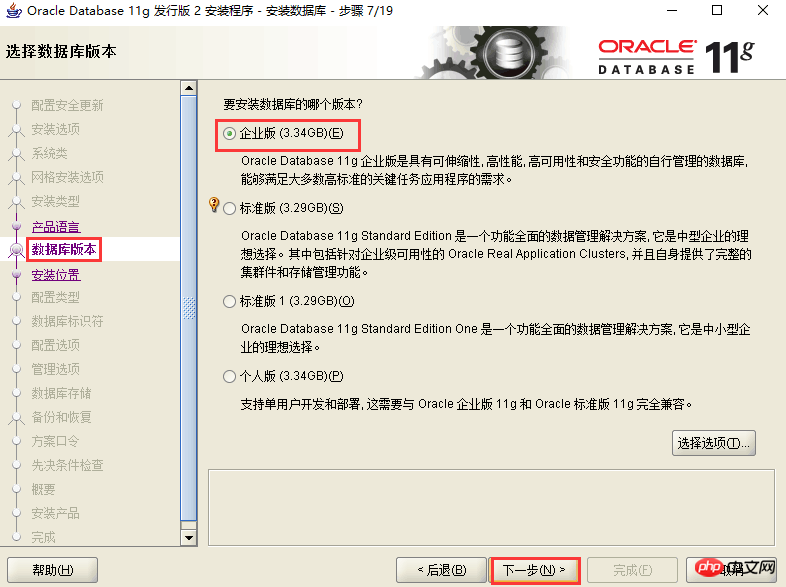
9. Database version. Select "Enterprise Edition" as shown in the figure below, and click Next.
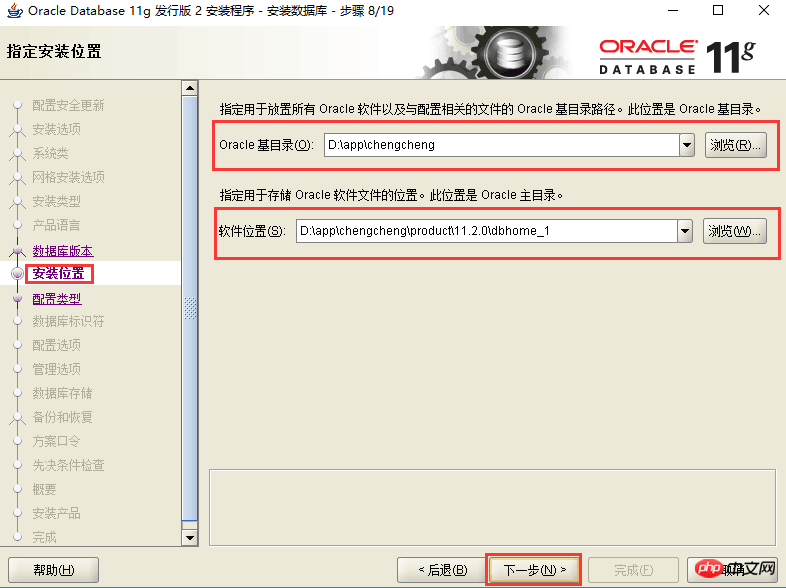
10. Installation location. Fill in the installation path ("Software Location" will be automatically generated), as shown in the figure below, click Next.
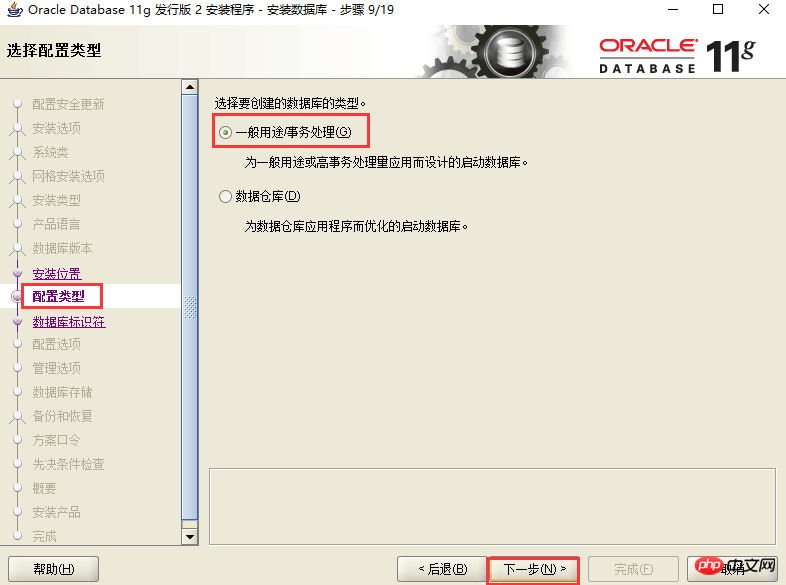
11. Configuration type. Select "General Purpose/Transaction Processing" as shown in the image below and click Next.
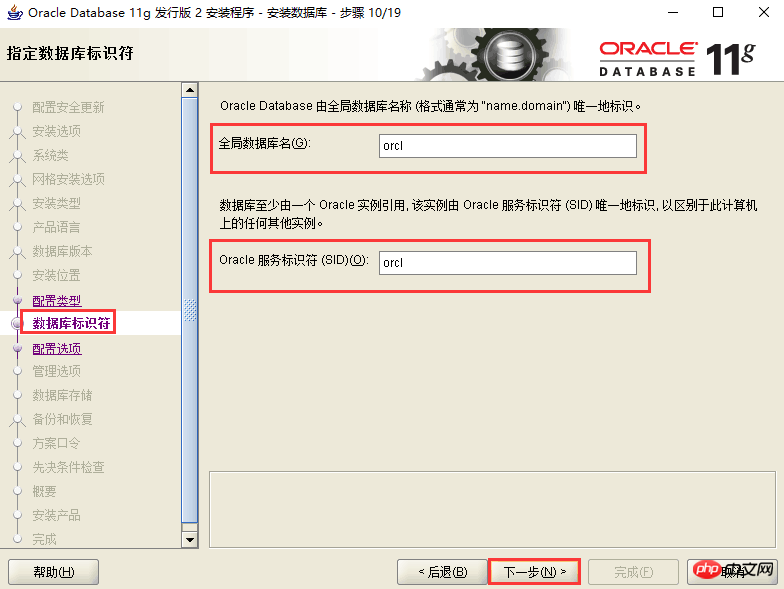
12. Database identifier. Fill in the global database name and SID, as shown in the figure below, and click Next.
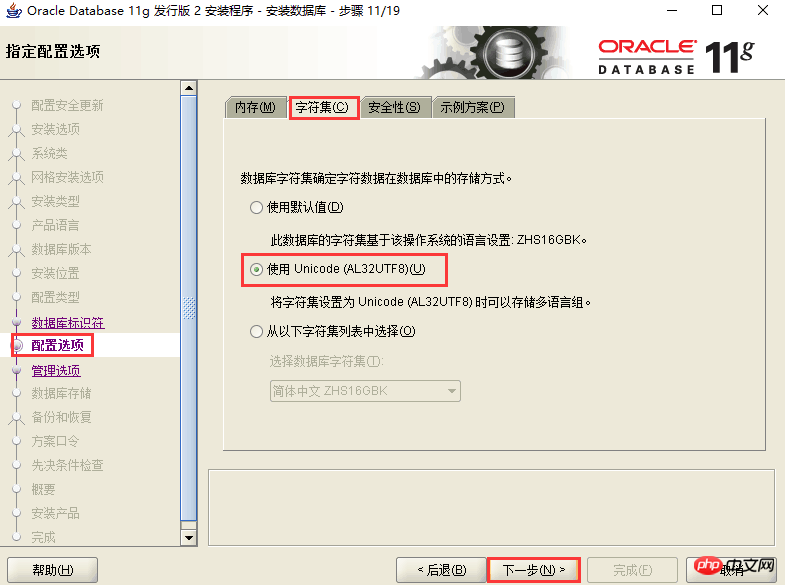
13. Configuration options. Switch to the "Character Set" tab, select "Use Unicode (AL32UTF8)", as shown in the figure below, and click Next.
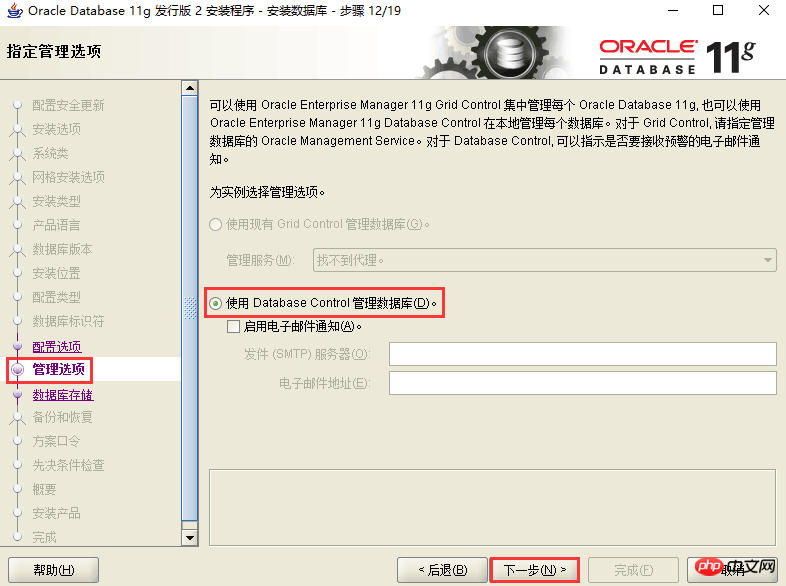
14. Management options. Click Next directly, as shown in the figure below.
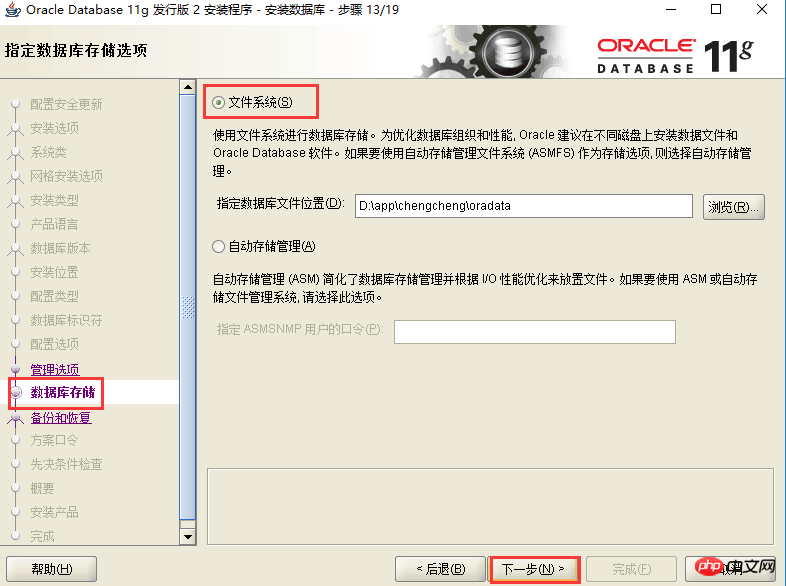
15. Database storage. Click Next directly, as shown in the figure below.
16. Backup and recovery. If you need to back up data, enable automatic backup. The editor here selects "Do not enable automatic backup", as shown in the figure below, and click Next.

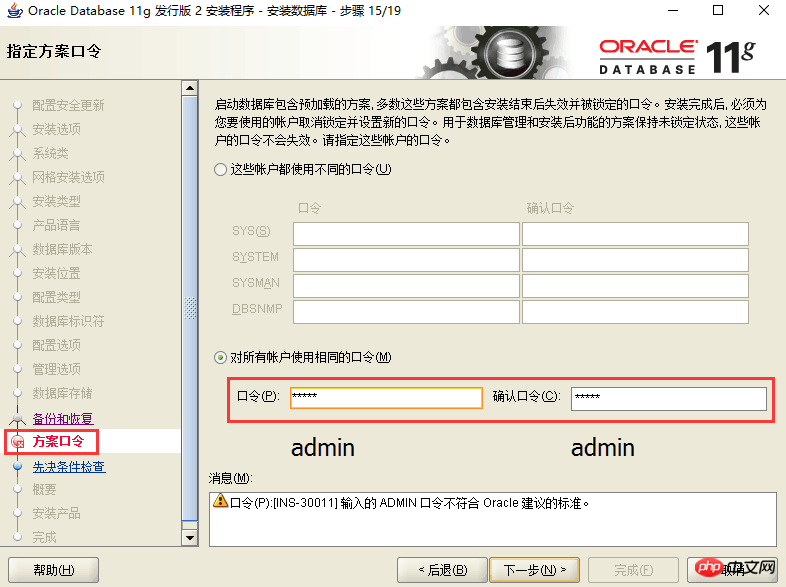
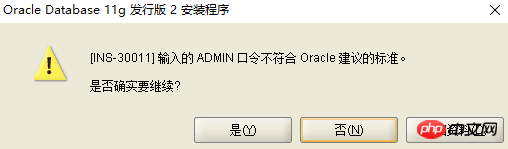
17. Plan password. For the convenience of testing, the same password is used here, and you can decide according to the actual situation during actual deployment.
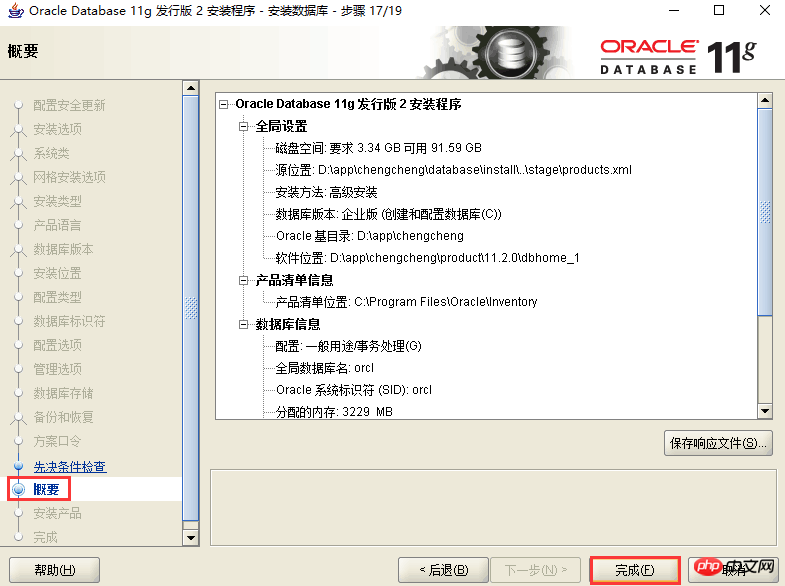
18. Summary. After completing the prerequisite check, click Finish to officially start the installation, as shown in the figure below, click Next.
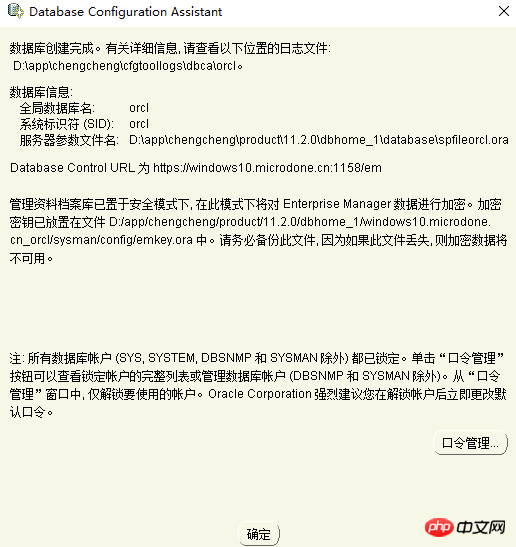
19. Install the product. After the installation is completed, a list of related database configurations will be listed. It is best to save this as a screenshot, as shown in the figure below, and click OK.
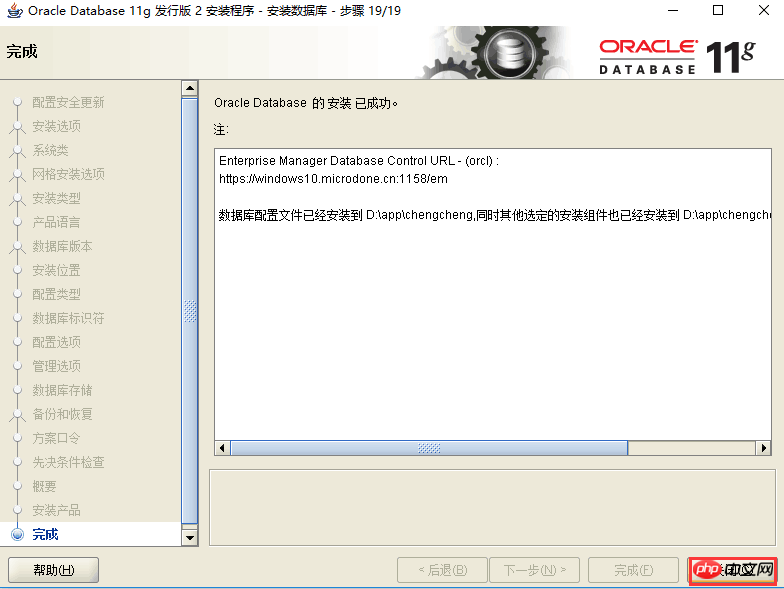
20. Completed. The installation is now complete, click Close.
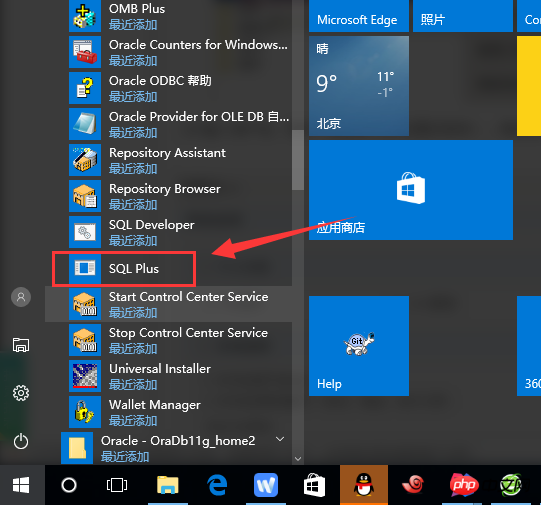
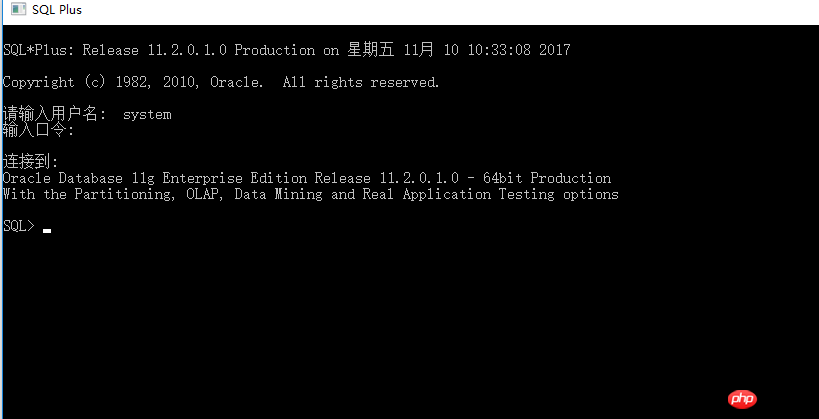
21. Test it. Open Oracle's own SQL PLUS, as shown in the figure below.
22. Enter the user name and password (the password set in step 18), the test is successful! You can enter SQL statements directly! It should be noted that the password entered by Oracle is not displayed here.
Have you all learned it? You can try it yourself.
Related recommendations:
About the usage summary of Contains function in Oracle
Java implements simple function of connecting to oracle/mysql database Example
Graphic code analysis of migrating mysql data to Oracle
The above is the detailed content of Detailed graphic tutorial on the installation of Oracle 11g server. For more information, please follow other related articles on the PHP Chinese website!

Hot AI Tools

Undresser.AI Undress
AI-powered app for creating realistic nude photos

AI Clothes Remover
Online AI tool for removing clothes from photos.

Undress AI Tool
Undress images for free

Clothoff.io
AI clothes remover

AI Hentai Generator
Generate AI Hentai for free.

Hot Article
Hot Tools

Notepad++7.3.1
Easy-to-use and free code editor

SublimeText3 Chinese version
Chinese version, very easy to use

Zend Studio 13.0.1
Powerful PHP integrated development environment

Dreamweaver CS6
Visual web development tools

SublimeText3 Mac version
God-level code editing software (SublimeText3)
Hot Topics
 1384
1384
 52
52

 How to check tablespace size of oracle
Apr 11, 2025 pm 08:15 PM
How to check tablespace size of oracle
Apr 11, 2025 pm 08:15 PM
To query the Oracle tablespace size, follow the following steps: Determine the tablespace name by running the query: SELECT tablespace_name FROM dba_tablespaces; Query the tablespace size by running the query: SELECT sum(bytes) AS total_size, sum(bytes_free) AS available_space, sum(bytes) - sum(bytes_free) AS used_space FROM dba_data_files WHERE tablespace_
 How to get time in oracle
Apr 11, 2025 pm 08:09 PM
How to get time in oracle
Apr 11, 2025 pm 08:09 PM
There are the following methods to get time in Oracle: CURRENT_TIMESTAMP: Returns the current system time, accurate to seconds. SYSTIMESTAMP: More accurate than CURRENT_TIMESTAMP, to nanoseconds. SYSDATE: Returns the current system date, excluding the time part. TO_CHAR(SYSDATE, 'YYY-MM-DD HH24:MI:SS'): Converts the current system date and time to a specific format. EXTRACT: Extracts a specific part from a time value, such as a year, month, or hour.
 How to encrypt oracle view
Apr 11, 2025 pm 08:30 PM
How to encrypt oracle view
Apr 11, 2025 pm 08:30 PM
Oracle View Encryption allows you to encrypt data in the view, thereby enhancing the security of sensitive information. The steps include: 1) creating the master encryption key (MEk); 2) creating an encrypted view, specifying the view and MEk to be encrypted; 3) authorizing users to access the encrypted view. How encrypted views work: When a user querys for an encrypted view, Oracle uses MEk to decrypt data, ensuring that only authorized users can access readable data.
 How to view instance name of oracle
Apr 11, 2025 pm 08:18 PM
How to view instance name of oracle
Apr 11, 2025 pm 08:18 PM
There are three ways to view instance names in Oracle: use the "sqlplus" and "select instance_name from v$instance;" commands on the command line. Use the "show instance_name;" command in SQL*Plus. Check environment variables (ORACLE_SID on Linux) through the operating system's Task Manager, Oracle Enterprise Manager, or through the operating system.
 How to uninstall Oracle installation failed
Apr 11, 2025 pm 08:24 PM
How to uninstall Oracle installation failed
Apr 11, 2025 pm 08:24 PM
Uninstall method for Oracle installation failure: Close Oracle service, delete Oracle program files and registry keys, uninstall Oracle environment variables, and restart the computer. If the uninstall fails, you can uninstall manually using the Oracle Universal Uninstall Tool.
 How to solve the problem of closing oracle cursor
Apr 11, 2025 pm 10:18 PM
How to solve the problem of closing oracle cursor
Apr 11, 2025 pm 10:18 PM
The method to solve the Oracle cursor closure problem includes: explicitly closing the cursor using the CLOSE statement. Declare the cursor in the FOR UPDATE clause so that it automatically closes after the scope is ended. Declare the cursor in the USING clause so that it automatically closes when the associated PL/SQL variable is closed. Use exception handling to ensure that the cursor is closed in any exception situation. Use the connection pool to automatically close the cursor. Disable automatic submission and delay cursor closing.
 How to check invalid numbers of oracle
Apr 11, 2025 pm 08:27 PM
How to check invalid numbers of oracle
Apr 11, 2025 pm 08:27 PM
Oracle Invalid numeric errors may be caused by data type mismatch, numeric overflow, data conversion errors, or data corruption. Troubleshooting steps include checking data types, detecting digital overflows, checking data conversions, checking data corruption, and exploring other possible solutions such as configuring the NLS_NUMERIC_CHARACTERS parameter and enabling data verification logging.
 How to create oracle dynamic sql
Apr 12, 2025 am 06:06 AM
How to create oracle dynamic sql
Apr 12, 2025 am 06:06 AM
SQL statements can be created and executed based on runtime input by using Oracle's dynamic SQL. The steps include: preparing an empty string variable to store dynamically generated SQL statements. Use the EXECUTE IMMEDIATE or PREPARE statement to compile and execute dynamic SQL statements. Use bind variable to pass user input or other dynamic values to dynamic SQL. Use EXECUTE IMMEDIATE or EXECUTE to execute dynamic SQL statements.
