

This is an example written by the company's master and posted on the official website for users to learn. I really didn't know what it was doing at first. It just combined three shape primitives together, and then you can rotate and zoom in at the same time. Shrink these three graphics and click "Animate" to make the middle graphic element rotate around a certain point alone. I really don't know what the "Axis" at the top of the form is used for, and I find it very cumbersome. Moreover, it is a demo on the official website, and there is no explanation. . . So my task today is to completely analyze this example!
First let us take a look at this case:
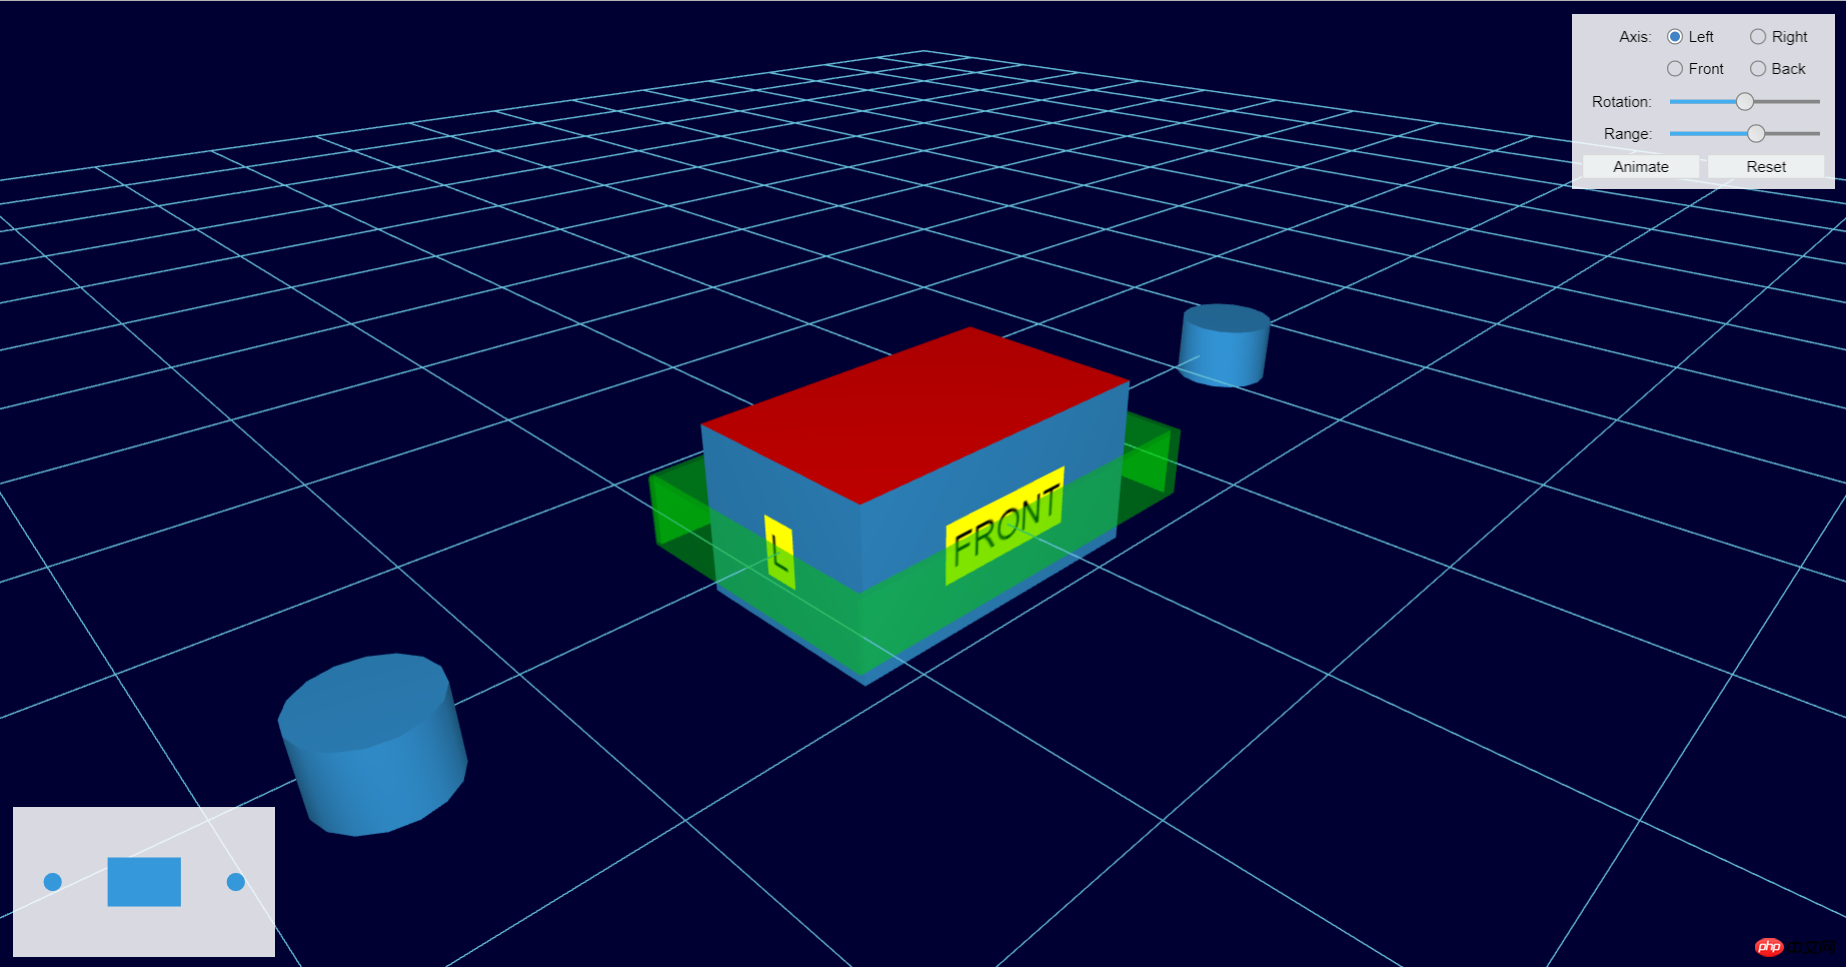
Let’s take a look at how to operate this 3d interactive model. You can directly slide the "Rotation" slider , you will see that the primitives in 3D and 2D in the lower left corner will rotate, then click on any value in "Axis", and then click "Animate", you will see that the primitive in the middle will rotate, and slide the "Range" "Slider bar, this controls the amplitude of your rotation. If you adjust it to "0", it will not rotate. If you adjust it to "30", it will rotate 30 degrees, and so on. Then adjust "Reset" and you will find that instead of completely refreshing the interface, the cylinders on both sides are partially refreshed and reset based on the relationship between the two cylinders and the middle node.
The lower left corner is a top view of the entire 3D scene, so that we can clearly see the moving direction and position of the graphics elements very intuitively.
Maybe you are curious about how this top view is placed? If the primitives in 3D change, will the primitives in this top view also change? How to place the form in the upper right corner and the view in the lower left corner? How to move only 3d two and fix these two here? Or you may have other questions. I will try to answer them clearly here. If you really can't find the answer, you can go to our official website HT for Web to find your question.
Okay, the basic is to lay out the 3D scene first. HT is very detailed in providing methods. Usually it may take a while for us to generate the grid, and it is basic code. Novice developers You can get started quickly~ You can create a 3D scene in just a few lines of code, which is so fast. . .
dm = new ht.DataModel(); g3d = new ht.graph3d.Graph3dView(dm); g3d.setGridVisible(true);//设置网格可视g3d.setGridSize(m);//设置网格大小g3d.setGridGap(w);//设置网格间距g3d.setEye([-200, 150, 200]);//设置camera位置g3d.getView().className = 'main'; document.body.appendChild(g3d.getView());
Since HT sets the style "position:absolute" for all components by default, when we initialize this component, we must write the position in the style and add this component to the list you want to add. In the tag, in this example, the form form, 2d component and 3d component are not dependent on each other, so we can directly add these three to the body. Another thing worth noting is that the root of all HT components Each layer is a p, which is obtained through the getView() function of the component. So if we want to add it to an HTML tag, it must be an HTML tag.
Then place the form form in the upper right corner of the interface. Place it in the upper right corner and directly set the "top", "bottom", "left" and "right" in the style. The same is true for 2D pictures:
formPane = new ht.widget.FormPane(); formPane.setLabelAlign('right'); formPane.getView().className = 'formpane'; document.body.appendChild(formPane.getView()); formPane.addRow(['Rotation:', { id: 'rotation', slider: { min: -180, max: 180, value: 0, step: 1, onValueChanged: function(e){ node.setRotation(this.getValue() * Math.PI / 180); } } }], [60, 0.1]);
Because the form form in this example has a large number of lines and content, I only took an example of a custom line in the form form. The "id" here is just to quickly find this element. Slider is a method to customize the HT form, the slider function. After setting this attribute, HT will automatically build the ht.widger.Slider object based on the attribute value. Specifically For parameters, please refer to the HT for Web form manual.
As for the 2D top view in the lower left corner, this is done by sharing the same datamodel with 3D. As long as we draw the graphics and then add it to the datamodel, no matter what component it is, as long as this datamodel is called You can have all the data in the datamodel:
g2d = new ht.graph.GraphView(dm); g2d.getView().className = 'g2d'; g2d.setEditable(true); document.body.appendChild(g2d.getView()); ht.Default.callLater(g2d.fitContent, g2d, [true, 50, true]);
ht.Default.callLater(func, scope, args, delay) gets the global next number, where func refers to the callback function and scope refers to the function domain , args refers to the function parameter list, and delay is the delay time (milliseconds). This function can call back the g2d.fitContent function when the page is opened, and the scope is only in g2d. The parameter list of this function is the parameters of the fitContent(anim, padding, notZoomIn) function. These three parameters respectively represent "whether to use animation". "The distance between the zoomed primitive area and the topological edge", and "whether to limit the minimum scaling value to 1".
Then add the graphics elements in 3D. I will not intercept all the codes here, but only take a special and interesting graphics element, the transparent graphics element in the middle outer layer:
shape = new ht.Shape(); shape.s({ 'all.reverse.cull': true, 'all.color': 'rgba(0, 255, 0, 0.5)', 'all.transparent': true }); shape.setThickness(2); dm.add(shape); var resetShape = function() { var cs = node.getCorners(10, 10); cs.push(cs[0]); shape.setPoints(cs); g3d.setBoundaries(ht.Default.toBoundaries(cs)); }; resetShape();
This There are a few interesting points:
1. The node.getCorners() method is used here. This is to obtain four points. For 2d, they are the upper left, upper right, lower right, and lower left. Point; for 3D, it means to directly obtain the four "upper left, upper right, lower right, lower left" points on the bottom surface. It took me a while to react to this. . . And based on these four points as the points of the shape.
2. The setBoundaries(boundaries) function is also used here, and the ht.Default.toBoundaries function is used to convert the format that does not conform to the setBoundaries function parameters into the parameter format it requires. Although I think this line has no effect in this example, it still taught me a good lesson in collision testing.
我们在碰撞测试的时候经常要设置g3d.setNear函数,我实在没搞懂这个函数是拿来干嘛的,结果这个例子让我注意到,如果“我”的视线的近端截面位置也就是setNear(1),那么我能看到的就是比表面跟进1的距离,这个函数默认设置为10,就算我们不设置这个值我们也能在3d中看到图元的内部去,刚刚我们介绍的getCorners()函数,其实它还有两个参数xpadding和ypadding,分别代表“水平方向padding”“垂直方向padding”,也就是说,在我们获取四个角的同时,我们还能设置这四个角和边之间的padding。只要将这个值设置得比setNear设置的大,我们就不会看到3d图元的内部中去了。
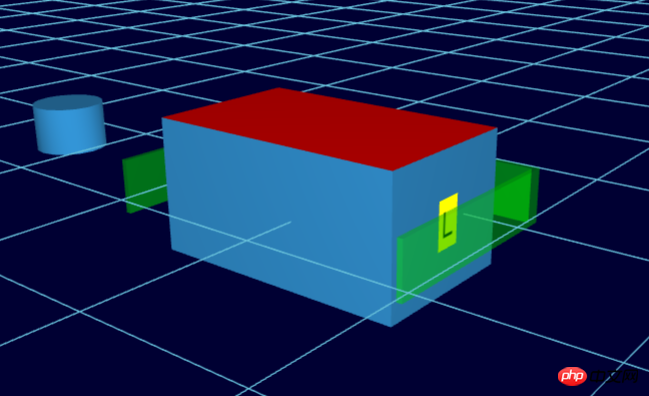
我们还注意到似乎是“废代码”的一行: cs.push(cs[0])。这个完全不是废代码啊,帮了很大忙呢!在HT中,用ht.Shape创建的图元,只要你不手动设置绘制关闭,那么就会停留在你最终绘制的位置,所以我把最后的一个点又和第一个点连起来,那么就是一个封闭的图形了,否则你会看到后面缺了一部分,像这样:
我在其他文章中也提到过HT封装了一些很方便的方法和事件,比如datamodel#md,监听数据的属性的变化,这边我们用了md方法来判断只有中间这个node能够绕着一个点旋转,具体参考HT for Web数据模型手册:
dm.md(function(e){ if(e.data === node){ if(e.property === 'rotation'){ formPane.v('rotation', 180 / Math.PI * e.newValue); } resetShape(); } });
这边我想要说一下“绕着一个点旋转”的功能,这边没有用我们自定义的anchor锚点,但是功能类似,通过获取我form表单上选择的“left、right、front、back”来设置旋转中心点,HT中form表单通过getValue(id)简写成v(id)根据id获取对应item元素值:
formPane.addRow([ { button: { label: 'Animate', onClicked: function(){ var dx = 0, dy = 0, range = formPane.v('range') * Math.PI / 180; if(formPane.v('left')){ dx = -node.getWidth()/2; } if(formPane.v('right')){ dx = node.getWidth()/2; } if(formPane.v('back')){ dy = -node.getHeight()/2; } if(formPane.v('front')){ dy = node.getHeight()/2; } animate(node, range, dx, dy); } } }, { button: { label: 'Reset', onClicked: function(){ node.setRotation(0); } } } ], [0.1, 0.1]);
The above is the detailed content of Implementation of collision effect based on HTML5 and WebGL. For more information, please follow other related articles on the PHP Chinese website!
 What are the production methods of html5 animation production?
 The difference between HTML and HTML5
 Web page editing software
 The difference between paste mask and solder mask
 The difference between shingled disks and vertical disks
 What is the difference between ibatis and mybatis
 What are the computer performance online testing software?
 There are several ways to position CSS position


![[Web front-end] Node.js quick start](https://img.php.cn/upload/course/000/000/067/662b5d34ba7c0227.png)


