

Spring MVC is a follow-up product of SpringFrameWork and has been integrated into Spring Web Flow. Today we will start by writing a Spring MVC HelloWorld. Let us see how to set up a Spring MVC environment and run the program. Friends who are interested can learn together.
What is Spring MVC
Spring MVC is a follow-up product of SpringFrameWork and has been integrated into Spring Web Flow. The Spring framework provides full-featured MVC modules for building web applications. Using Spring's pluggable MVC architecture, when using Spring for WEB development, you can choose to use Spring's SpringMVC framework or integrate other MVC development frameworks, such as Struts1, Struts2, etc.
Today we will start by writing a Spring MVC HelloWorld. Let us see how to set up a Spring mvc environment and run the program.
Software parameters
Eclipse: Mars.1 Release (4.5.1)
Tomcat: 8.0.36
JDK: 1.8.0_60
Spring-framework: 4.0.4.RELEASE
##New project
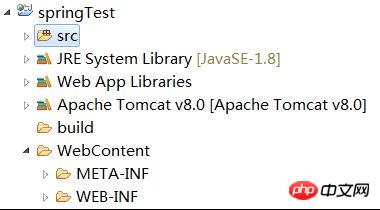
File-New -Other, select Dynamic web project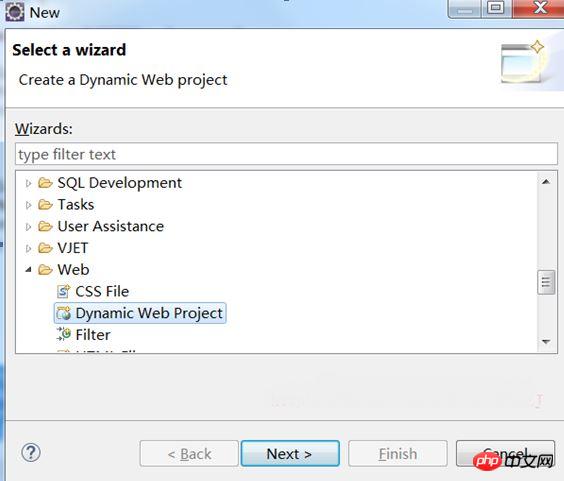 ## After the project is built, the directory structure is as follows:
Import jar package We develop based on the Spring mvc framework and need to rely on the following spring jar package:
spring-aop-4.0.4.RELEASE.jar spring-beans-4.0.4.RELEASE.jar spring-context-4.0.4.RELEASE.jar spring-core-4.0.4.RELEASE.jar spring-expression-4.0.4.RELEASE.jar spring-web-4.0.4.RELEASE.jar spring-webmvc-4.0.4.RELEASE.jar commons-logging-1.1.1.jar(用来打印log)
Configuration files and writing code
##web.xml(WEB-INF下)
<?xml version="1.0" encoding="UTF-8"?>
<web-app xmlns:xsi="http://www.w3.org/2001/XMLSchema-instance"
xmlns="http://java.sun.com/xml/ns/javaee"
xsi:schemaLocation="http://java.sun.com/xml/ns/javaee http://java.sun.com/xml/ns/javaee/web-app_2_5.xsd"
id="WebApp_ID" version="2.5">
<!-- 配置DispatchcerServlet -->
<servlet>
<servlet-name>springDispatcherServlet</servlet-name>
<servlet-class>org.springframework.web.servlet.DispatcherServlet</servlet-class>
<!-- 配置Spring mvc下的配置文件的位置和名称 -->
<init-param>
<param-name>contextConfigLocation</param-name>
<param-value>classpath:springmvc.xml</param-value>
</init-param>
<load-on-startup>1</load-on-startup>
</servlet>
<servlet-mapping>
<servlet-name>springDispatcherServlet</servlet-name>
<url-pattern>/</url-pattern>
</servlet-mapping>
</web-app>Note: 1. For line12-15 For configuring the location and name of the spring mvc configuration file, here is a description of a new springmvc.xml configuration file
Springmvc.xml (under scr)
 <?xml version="1.0" encoding="UTF-8"?>
 <beans xmlns="http://www.springframework.org/schema/beans"
  xmlns:xsi="http://www.w3.org/2001/XMLSchema-instance"
  xmlns:context="http://www.springframework.org/schema/context"
  xmlns:mvc="http://www.springframework.org/schema/mvc"
  xsi:schemaLocation="http://www.springframework.org/schema/beans http://www.springframework.org/schema/beans/spring-beans.xsd
   http://www.springframework.org/schema/context http://www.springframework.org/schema/context/spring-context-4.0.xsd
   http://www.springframework.org/schema/mvc http://www.springframework.org/schema/mvc/spring-mvc-4.0.xsd">
   <!-- 配置自动扫描的包 -->
   <context:component-scan base-package="com.jackie.springmvc"></context:component-scan>
   <!-- 配置视图解析器 如何把handler 方法返回值解析为实际的物理视图 -->
   <bean class="org.springframework.web.servlet.view.InternalResourceViewResolver">
    <property name = "prefix" value="/WEB-INF/views/"></property>
    <property name = "suffix" value = ".jsp"></property>
   </bean>
</beans>Note: 1. line12 represents the scope of spring monitoring, which is under com.jackie.springmvc
HelloWorld.java(com.jackie.springmvc.handlers下)
 package com.jackie.springmvc.handlers;
 import org.springframework.stereotype.Controller;
 import org.springframework.web.bind.annotation.RequestMapping;
 @Controller
 public class HelloWorld {
  /**
  * 1. 使用RequestMapping注解来映射请求的URL
  * 2. 返回值会通过视图解析器解析为实际的物理视图, 对于InternalResourceViewResolver视图解析器,会做如下解析
  * 通过prefix+returnVal+suffix 这样的方式得到实际的物理视图,然后会转发操作
  * "/WEB-INF/views/success.jsp"
  * @return
  */
  @RequestMapping("/helloworld")
  public String hello(){
   System.out.println("hello world");
   return "result";
  }
}1. First, add "Controller" in front of the class " annotation, indicating that it is a spring controller. Here a method hello()
will be written. 2. There is a @RequestMapping above the hello method, which is used to match the path of the request. For example, the matching request path here is " http://localhost:8080/springTest/springmvc/helloworld", that is, when the tomcat service is started and this URL is entered in the browser, if there is a break point in this method, it will jump into this method. 3. The result of this return is not random. The returned string is matched with line15-18 in springmvc.xml above. Prefix and suffix are declared in springmvc.xml, and they are sandwiched here The thing between the two is the string returned here, so after executing this method, we can get the request resource path "/WEB-INF/views/success.jsp". This success.jsp needs to be created by us Index.jsp (under WebContent)
 <%@ page language="java" contentType="text/html; charset=ISO-8859-1"
  pageEncoding="ISO-8859-1"%>
 <!DOCTYPE html PUBLIC "-//W3C//DTD HTML 4.01 Transitional//EN" "http://www.w3.org/TR/html4/loose.dtd">
 <html>
 <head>
 <meta http-equiv="Content-Type" content="text/html; charset=ISO-8859-1">
 <title>Insert title here</title>
 </head>
 <body>
 <a href="helloworld" rel="external nofollow" >hello world</a>
 </body>
 </html>
When accessing index.jsp, a hyperlink will be displayed on the page. After clicking the hyperlink, the address in the url will jump, starting from "http://localhost:8080/springTest/index .jsp" jumps to "http://localhost:8080/springTest/helloworld", and this url request will enter the hello method in HelloWorld because it matches "/helloworld" on this method.
Success.jsp (under WEB-INF/views)
<%@ page language="java" contentType="text/html; charset=ISO-8859-1"
  pageEncoding="ISO-8859-1"%>
 <!DOCTYPE html PUBLIC "-//W3C//DTD HTML 4.01 Transitional//EN" "http://www.w3.org/TR/html4/loose.dtd">
 <html>
 <head>
 <meta http-equiv="Content-Type" content="text/html; charset=ISO-8859-1">
 <title>Insert title here</title>
 </head>
 <body>
 <h4>Success Page</h4>
 </body>
 </html>
So far, we have completed the development of the HelloWorld program based on the Spring mvc framework, including the dependent jar packages, configuration files, controller code writing and display page writing, etc.
除此以外,再介绍下整个配置过程中遇到的一些小问题:
1. tomcat服务器的添加
从前面的介绍可以看出,我们的程序是通过浏览器发请求来获取想要的页面,那么这里就免不了要有一个web服务器,这里就是tomcat。
首先你需要下载个tomcat,然后在eclipse->windows->preference->servers中绑定这个tomcat服务器;
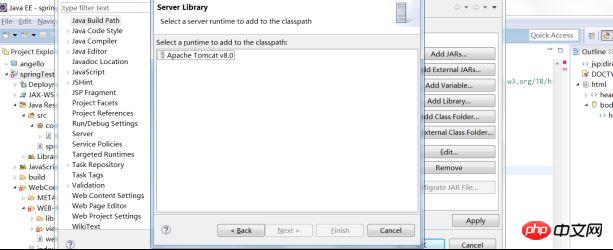
其次你需要在你新建的spring mvc项目中添加tomcat的支持,否则在新建的jsp文件中会提示报错“The superclass javax.servlet.http.HttpServlet was not found on the Java Build Path”
右键项目->build path->configure build path->add library->server runtime, 选择你的tomcat即可
有了tomcat服务器,你就可以在index.jsp上右键run on server,选择你的tomcat服务器,这样就可以启动tomcat服务,帮助你完成网页的请求和响应操作。
2. spring mvc如何访问静态资源
关于使用spring mvc处理静态资源,比如html(发现之前的springmvc.xml中
最后发现是需要让spring明确要处理静态资源,原来的web.xml中只有
<servlet-mapping>
  <servlet-name>springDispatcherServlet</servlet-name>
  <url-pattern>/</url-pattern>
 </servlet-mapping>
其匹配的都是controller中类似@RequestMapping("/springmvc/helloworld")这样的注解配置的请求,而对于类似html/css/jpg等资源的访问就会得不到,所以需要在web.xml中加入以下类型的支持
<servlet-mapping>
  <servlet-name>default</servlet-name>
  <url-pattern>*.css</url-pattern>
 </servlet-mapping>
 <servlet-mapping>
  <servlet-name>default</servlet-name>
  <url-pattern>*.gif</url-pattern>
 </servlet-mapping>
 <servlet-mapping>
  <servlet-name>default</servlet-name>
  <url-pattern>*.jpg</url-pattern>
 </servlet-mapping>
 <servlet-mapping>
  <servlet-name>default</servlet-name>
  <url-pattern>*.js</url-pattern>
 </servlet-mapping>
 <servlet-mapping>
  <servlet-name>default</servlet-name>
  <url-pattern>*.html</url-pattern>
 </servlet-mapping>
这样就可以保证spring 能够拦截并处理静态资源
这里将HelloWorld.java中的hello方法改为:
@RequestMapping("/helloworld")
 public String hello(){
  System.out.println("hello world");
  return "Jackie";
}Springmvc.xml改为:
class="org.springframework.web.servlet.view.InternalResourceViewResolver">
   <property name = "prefix" value="/WEB-INF/views/"></property>
   <property name = "suffix" value = ".jpg"></property>
</bean>
The above is the detailed content of A brief introduction to Spring MVC. For more information, please follow other related articles on the PHP Chinese website!


![[Web front-end] Node.js quick start](https://img.php.cn/upload/course/000/000/067/662b5d34ba7c0227.png)


