This tutorial continues from Part6. We will continue to complete this voting application. This section will focus on how to use Django to automatically generate a backend management website.
After registering Question through admin.site.register(Question), Django can automatically build a default form . If you need to customize the appearance and functionality of your admin form. You can do this through configuration during registration.
Now let’s try reordering the fields on the form. Just replace the line admin.site.register(Question) with:
# polls/admin.pyfrom django.contrib import adminfrom .models import Questionclass QuestionAdmin(admin.ModelAdmin):fields = ['pub_date', 'question_text']

admin.site.register(Question, QuestionAdmin)
You can refer to the above form to create a model class and pass it in as the second parameter admin.site.register(). And this operation can be performed at any time.
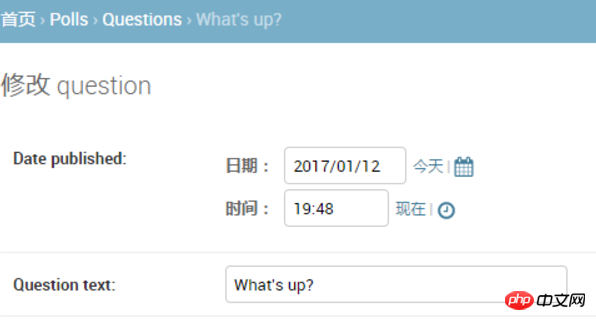
After the above modification, the "Publication date" field will be in front of the "Question" field:

The current form only has two fields and you may not see anything. But for a form with many fields, it is very important to design an intuitive and reasonable sorting method. And when there is a lot of field data, the form can also be divided into multiple field sets:
# polls/admin.pyfrom django.contrib import adminfrom .models import Questionclass QuestionAdmin(admin.ModelAdmin):fieldsets = [
        (None,               {'fields': ['question_text']}),
        ('Date information', {'fields': ['pub_date']}),
    ]

admin.site.register(Question, QuestionAdmin)The first element of each tuple in the field set is the title of the field set. It makes the page look like the following:

Now the Question management page is available, but a Question should have multiple Choices . At this time, the management page is not displayed. Now there are two ways to solve this problem. One is to register Choice to the admin interface just like the Question just now. The code looks like this:
# polls/admin.pyfrom django.contrib import adminfrom .models import Choice, Question# ...admin.site.register(Choice)
Now Choice can also be seen on the admin page, where the "Add choice" form should look like this:

In this form , The Question field is a select box that contains all Question instances in the current database. Django automatically displays all foreign key relationships as a select box in the admin site. In our example, only one question object currently exists.
Please note the green plus sign in the picture, which is connected to the Question model. Every object that contains a foreign key relationship will have this green plus sign. Click it, and a form for adding a Question will pop up, similar to Question's own add form. After filling in the relevant information and clicking save, Django will automatically save the Question in the database and use it as the associated foreign key object of the current Choice. In layman's terms, it means creating a new Question and using it as the foreign key of the current Choice.
However, to be honest, the efficiency of this creation method is not very good. If you can add some Choice directly when creating the Question object, the operation will become simpler.
删除Choice模型对register()方法的调用。然后,编辑Question的注册代码如下:
# polls/admin.pyfrom django.contrib import adminfrom .models import Choice, Questionclass ChoiceInline(admin.StackedInline):model = Choice
    extra = 3class QuestionAdmin(admin.ModelAdmin):fieldsets = [
        (None,               {'fields': ['question_text']}),
        ('Date information', {'fields': ['pub_date'], 'classes': ['collapse']}),
    ]
    inlines = [ChoiceInline]

admin.site.register(Question, QuestionAdmin)上面的代码告诉Django:Choice对象将在Question管理页面进行编辑,默认情况,请提供3个Choice对象的编辑区域。
现在”增加question”页面变成了这样:

它的工作机制是:这里有3个插槽用于关联Choices,而且每当你重新返回一个已经存在的对象的“Change”页面,你又将获得3个新的额外的插槽可用。
在3个插槽的最后,还有一个“Add another Choice”链接。点击它,又可以获得一个新的插槽。如果你想删除新增的插槽,点击它右上方的X图标即可。但是,默认的三个插槽不可删除。下面是新增插槽的样子:

但是现在还有个小问题。上面页面中插槽纵队排列的方式需要占据大块的页面空间,看起来很不方便。为此,Django提供了一种扁平化的显示方式,你仅仅只需要将ChoiceInline继承的类改为admin.TabularInline:
# polls/admin.pyclass ChoiceInline(admin.TabularInline):#...
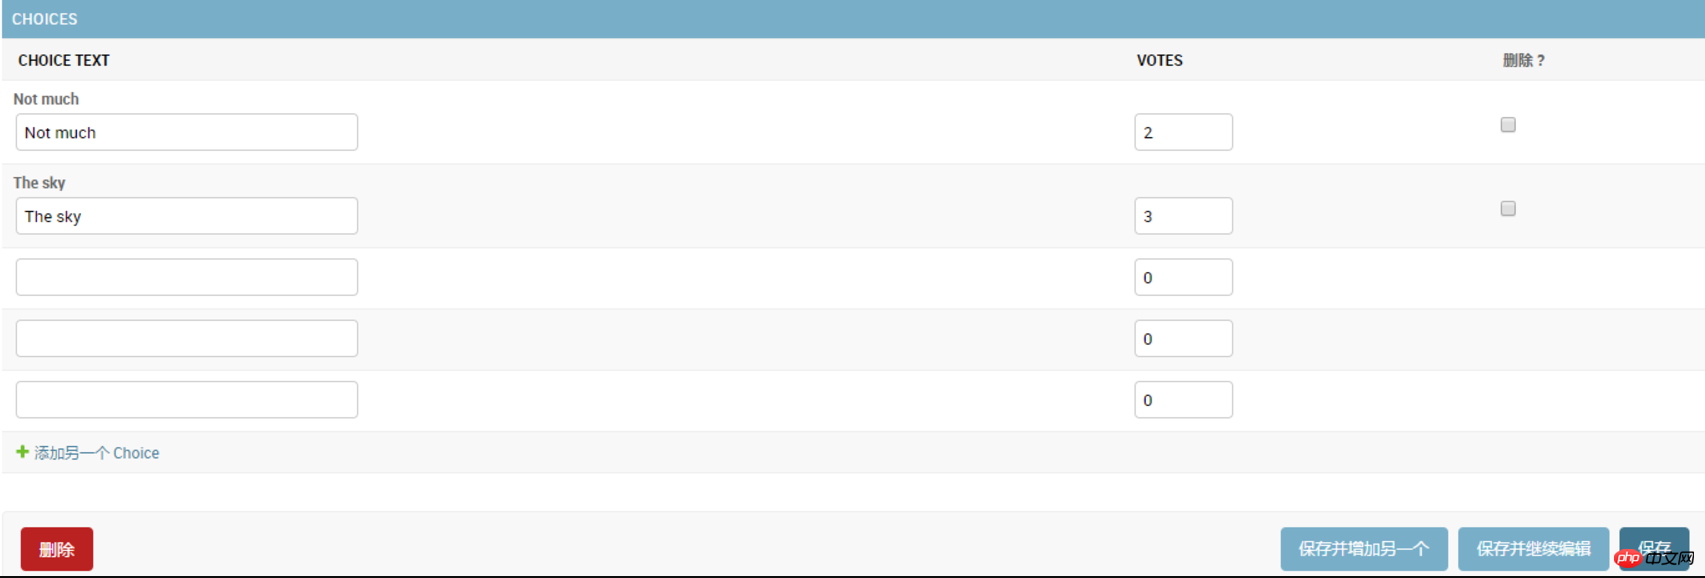
使用TabularInline代替`StackedInline``,相关的对象将以一种更紧凑的表格形式显示出来:
注意,这样多了一个”删除”选项,它允许你删除已经存在的Choice.
现在Question的管理页面看起来已经差不多了,下面来看看修改列表页面,也就是显示了所有question的页面,即下图这个页面:
Django默认只显示str()方法指定的内容。如果我们想要同时显示一些别的内容,可以使用list_display属性,它是一个由多个字段组成的元组,其中的每一个字段都会按顺序显示在页面上,代码如下:
# polls/admin.pyclass QuestionAdmin(admin.ModelAdmin):# ...list_display = ('question_text', 'pub_date') 同时,还可以把Part2中的was_published_recently()方法也加入进来:
# polls/admin.pyclass QuestionAdmin(admin.ModelAdmin):# ...list_display = ('question_text', 'pub_date', 'was_published_recently') 现在question的修改列表页面看起来像这样:
你可以点击其中一列的表头来让列表按照这列的值来进行排序,但是was_published_recently这列的表头不行,因为Django不支持按照随便一个方法的输出进行排序。另请注意,默认情况下,was_published_recently的列标题是方法的名称(下划线替换为空格),内容则是输出的字符串表示形式。
可以通过给方法提供一些属性来改进输出的样式,就如下面所示:
# polls/models.pyclass Question(models.Model):# ...def was_published_recently(self):now = timezone.now()return now - datetime.timedelta(days=1) <p style="margin: 0px 0px 1.2em !important;"> 关于这些方法属性的更多信息,请参见list_display。<br> <br> 我们还可以对显示结果进行过滤,通过使用<code style="font-size: 0.85em; font-family: Consolas, Inconsolata, Courier, monospace; margin: 0px 0.15em; padding: 0px 0.3em; white-space: pre-wrap; border: 1px solid #eaeaea; background-color: #f8f8f8; border-radius: 3px; display: inline;">list_filter</code>属性。在<code style="font-size: 0.85em; font-family: Consolas, Inconsolata, Courier, monospace; margin: 0px 0.15em; padding: 0px 0.3em; white-space: pre-wrap; border: 1px solid #eaeaea; background-color: #f8f8f8; border-radius: 3px; display: inline;">QuestionAdmin</code>中添加下面的代码:</p><pre class="brush:php;toolbar:false">list_filter = ['pub_date']
它添加了一个“过滤器”侧边栏,这样就可以通过pubdate字段来过滤显示question:
过滤器显示的筛选类型取决与你过滤的字段,由于pub_data是DateTimeField,所以Django就自动给出了“今天”、“过去7天”、“本月”、“今年”这几个选项。
这一切进展顺利。再添加一些搜索功能:
search_fields = ['question_text']
这行代码在修改列表的顶部添加了一个搜索框。 当进行搜索时,Django将在question_text字段中进行搜索。 你在search_fields中使用任意数量的字段,但由于它在后台使用LIKE进行查询,尽量不要添加太多的字段,不然会降低数据库查询能力。
修改列表自带分页功能,默认每页展示100条数据。
很明显,在每一个admin页面坐上顶端都显示“Django 管理”是感觉很荒诞,它仅仅是个占位文本。利用Django的模板系统,可以易修改它。
它可以用Django的模板系统轻松改变。 Django的管理站点是用Django自己制作出来的,它的界面代码使用的是Django自己的模板系统。
在项目的路劲下(包含manage.py的目录)创建一个名为templates目录。Templates可以放在你的文件系统中Django所能访问到的任何地方。(运行Web服务器的用户即是运行Django的用户)。然而,但是作为一个好的习惯,最好把模板放在本项目目录下。
在配置文件中(mysite/settings.py)在TEMPLATES中添加一个DIRS选项:
# mysite/settings.pyTEMPLATES = [
    {'BACKEND': 'django.template.backends.django.DjangoTemplates','DIRS': [os.path.join(BASE_DIR, 'templates')],'APP_DIRS': True,'OPTIONS': {'context_processors': ['django.template.context_processors.debug','django.template.context_processors.request','django.contrib.auth.context_processors.auth','django.contrib.messages.context_processors.messages',
            ],
        },
    },
] DIRS是在加载Django模板时检查的文件系统目录列表;它是一个搜索路径。
模板组织方式:就像静态文件一样,我们可以把所有的模板都放在一起,形成一个大大的模板文件夹,并且工作正常。但是不建议这样!最好每一个模板都应该存放在它所属应用的模板目录内(例如polls/templates)而不是整个项目的模板目录(templates),因为这样每个应用才可以被方便和正确的重用。请参考如何重用apps]()。
接下来,在刚才创建的templates中创建一个admin目录,将admin/base_site.html模板文件拷贝到该目录内。这个html文件来自Django源码,它位于django/contrib/admin/templates目录内。
如何找到Django源文件: 在命令行中运行下面代码:
python -c "import django; print(django.__path__)"
然后替换文件中的{{ site_header|default:_('Django administration') }}(包括两个大括号),换成你想要命名的名字即可。编辑完成后应该类似下面的代码片段:
{% block branding %}
<h1><a>Polls Administration</a></h1>
{% endblock %}这里仅仅是使用这种方法来教您如何覆盖模板。在实际的项目中,您可以使用django.contrib.admin.AdminSite。siteheader属性更容易实现这个特殊的定制。
There are many texts similar to this in this template file {% block branding %}, {{ title }}. {% and {{ are both part of Django template syntax. When Django renders admin/base_site.html, this template language will be used to generate the final html page, just like in Part 3.
Note that any default template for a Django admin site can be overridden. To rewrite a template file, just do the same thing as rewriting base_site.html - copy it from the default directory to your custom directory, and then modify it.
Smart readers may ask: But DIRS is empty by default, how does Django find the default admin template? The answer is, because APP_DIRS is set to `True``, Django will automatically look for the templates/ subdirectory under each application path (don't forget that django.contrib.admin is also an application).
Our voting application is not too complex, so there is no need to customize the admin template. But if it gets more complicated and some functionality requires modification of Django's standard admin template, then it's wiser to modify the template than the project's template. This way, you can add your voting app to any new project and be sure to find the custom templates it needs. For more information on how Django loads template files, see the documentation for Template Loading (0%).
In a similar situation, you may want to customize the Django admin home page. By default, the home page of the management site displays all apps in INSTALLED_APPS and registered in the admin application, sorted in alphabetical order.
To customize the home page of the management site, you need to rewrite the admin/index.html template, just like the previous method of modifying the base_site.html template, copy it from the source code directory to your specified within the directory. Edit the file and you will see that a app_listtemplate variable is used in the file. This variable contains all installed Django applications. You can hard-code a link to the admin page of the specified object, using any method you think is good to replace this app_list.
Django 1.10 Chinese Documentation-First Application Part1-Request and Response
Django 1.10 Chinese Documentation -The first application Part2-Model and management site
Django 1.10 Chinese documentation-The first application Part3-View and template
Django 1.10 Chinese Documentation - The First Application Part 4 - Forms and Common Views
Django 1.10 Chinese Documentation - The First Application Part 5 - Testing
Django 1.10 Chinese Documentation-The First Application Part6-Static File
Django 1.10 Chinese Documentation-The First Application Part7-Customized Management Site
Document address
The above is the detailed content of Django 1.10 Chinese Documentation-Customized Management Site. For more information, please follow other related articles on the PHP Chinese website!


