1. Background
In daily work, after agreeing on the interface format with the back-end; the usual development method is to create a new json file yourself, manually simulate a batch of data, and carry out ajax call.
However, if the interface provided by the backend is not under the same domain name, you need to change the ordinary ajax call to jsonp form.
2. Function introduction
So I thought that I could use node.js to build a simple http service for daily development. . Provide jsonp/json calls respectively.
This is also the first time I come into contact with node, so I will make detailed records from node installation, webstorm configuration environment, node module introduction, etc.
##2. Node installationThe code has been uploaded to github, address:
Download the installation package for the corresponding platform from the node official website. When installing on Windows, be sure to select all components.
After the installation is completed, open the cmd command and enter node -v. If the following prompt appears, the installation is successful.
C:\Users\IEUser>node -v
v6.10.0
This means that my node version is 6.10.0.
1. Through file->settings, open the configuration window and locate Node. js and NPM Options
## For  node installation directory\node_modules\npm
# 3, detect whether it can be used normally.
 1) Create a new test.js file and enter a line of code console.log('hello!');
2) Configure node environment
① Click Edit Configuration
## ②Click the + sign and select node.js

③ Set ## separately #Name, javascript file, click OK.

④ Click the small triangle in the upper right corner to start the program, and you can see hello output on the console.

0. Overall An idea

① Determine whether the user's parameters are complete
# ② Detect whether the corresponding json file exists## ③ Output the corresponding results
1. Code structure# Node-jsonp .json
## # The corresponding json file is stored in the json folder; getjson.js is the starting file of the node service.
2、涉及到的node模块有:
HTTP 提供HTTP服务器与客户端,可以搭建一个http服务,捕获和响应请求等。
URL 用于 URL 处理与解析
querystring 用于解析与格式化 URL 查询字符串
fs 用于操作文件
Path 用于处理文件与目录的路径
3、新建一个起始文件 getjson.js,引用这些模块。
var http = require('http');var url=require('url');var querystring = require('querystring');var fs=require('fs');var path=require('path');
4、使用http.createServer方法,启动一个http服务,并且监听3000端口。这个端口号随意,只要别跟其他端口冲突。
http.createServer(function(request, response){}).listen(3000);
5、其他代码就不多作解释了,大家一看就懂。getjson.js完整代码如下:


1 /** 2 * node.js的入口文件. 3 * 必须的参数:file - 文件名称; callback - jsonp形式调用 4 * 返回jsonp形式 5 */ 6 var http = require('http'); 7 var url=require('url'); 8 var querystring = require('querystring'); 9 var fs=require('fs');10 var path=require('path');11 12 function writeMsg(response,msg){13 response.writeHead(200, {'Content-Type': 'text/plain;charset=utf-8;'});14 response.write(msg);15 response.end();16 }17 18 19 http.createServer(function(request, response){20 //获取url的query21 var arg = url.parse(request.url).query;22 //转换为json形式23 var arg_json = querystring.parse(arg);24 //输出的内容25 var content = '';26 var filepath = arg_json.file;27 var callback =arg_json.callback;28 29 if(filepath){30 //file -- 本地的json文件路径31 filepath = path.resolve('./json/'+filepath);32 //判断文件是否存在33 if(!fs.existsSync(filepath)){34 content='error:文件不存在';35 writeMsg(response,content);36 }else{37 fs.readFile(filepath,'utf-8',function(err,data){38 if(err){39 console.log(err);40 content='error:文件读取失败';41 writeMsg(response,content);42 }else{43 //读取成功44 if(callback){45 //callback -- jsonp形式46 response.writeHead(200, {'Content-Type': 'application/javascript;charset=utf-8;'});47 content = callback+'('+data+');';48 response.write(content);49 response.end();50 return false;51 }52 else{53 //callback -- jsonp形式54 response.writeHead(200, {'Content-Type': 'text/json;charset=utf-8;'});55 response.write(data);56 response.end();57 return false;58 }59 }60 });61 }62 }else{63 content='error:参数错误';64 writeMsg(response,content);65 }66 67 68 }).listen(3000);
使用方式可以分为两种:
1、在webstorm中运行
直接点击右上角的小三角,就可以运行此服务。
点击控制台左侧的红色正方形,可以关闭服务。

2、在cmd命令中运行
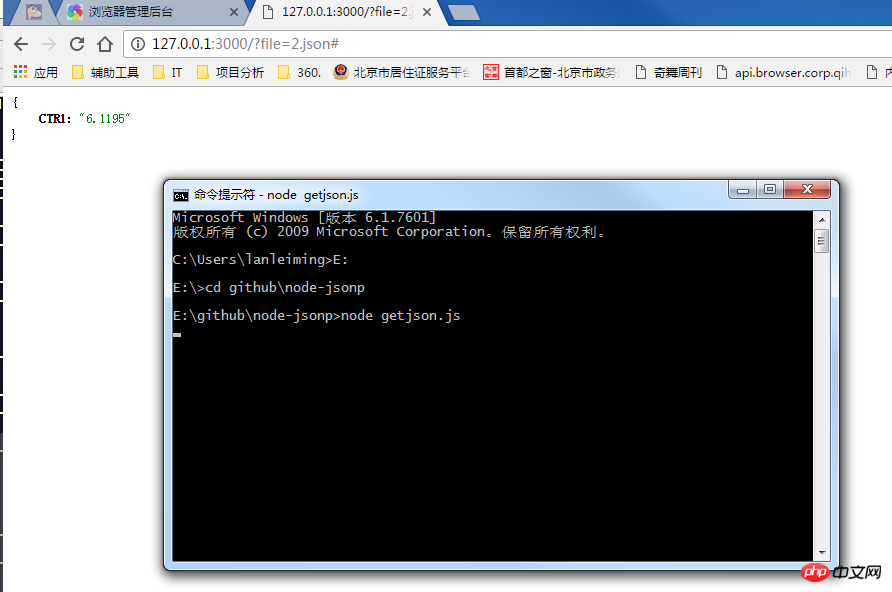
先定位到getjson.js文件所在的目录,使用命令: node getjson.js 就可以运行此服务。
按住 ctrl+c,就可以退出服务。

3、测试下自己的服务
新建一个demo.html页面,引用jquery文件,调用下自己的服务。
<!DOCTYPE html><html><head><title></title></head><body><script src="http://apps.bdimg.com/libs/jquery/2.1.4/jquery.min.js?1.1.11"></script><script>$(function(){
        $.post('http://127.0.0.1:3000/?file=2.json',function(ret) {
                   document.write(JSON.stringify(ret));
                },'jsonp');
    });</script></body></html>

如果不想用 localhost 或者127.0.0.1 来访问的话,可以在 hosts 中映射下即可。
用记事本打开C:\Windows\System32\drivers\etc\hosts文件,新增一行。
127.0.0.1 www.getjson.com
我把本地的请求,映射到www.getjson.com这个域名下了,当然你也可以改成任意你想要的域名。
然后就可以在浏览器中输入::3000/?file=2.json 来访问你的服务了。
阮一峰的node教程
node.js相关的api
浅试webstorm配置node.js开发环境
node.js遍历文件生产文件列表
The above is the detailed content of Detailed introduction to node in js. For more information, please follow other related articles on the PHP Chinese website!


