


This article mainly introduces you to the detailed tutorial of installing Anaconda and python on Windows. It is very good and has reference value. Friends who need it can refer to it
When it comes to digital image processing programming, most people may I think of matlab, but matlab also has its own shortcomings:
1. It is not open source and expensive.
2. The software capacity is large. Generally, it is 3G or above, and higher versions can even reach 5G or above.
3. It can only be used for research and is not easy to convert into software.
Therefore, we use the Python scripting language here for digital image processing.
To use Python, you must first install python, usually version 2.7 or above. Whether it is a Windows system or a Linux system, the installation is very simple.
To use python for various development and scientific calculations, you also need to install the corresponding packages. This is very similar to matlab, except that it is called a toolbox in matlab, and it is called a library or package in python. There are actually many digital image processing packages developed based on python scripting language, such as PIL, Pillow, OpenCV, scikit-image, etc.
Comparing these packages, PIL and Pillow only provide the most basic digital image processing, with limited functions; OpenCV is actually a C++ library that only provides a python interface, and the update speed is very slow. Up to now, python has developed to version 3.5, while opencv only supports version 2.7 of python; scikit-image is an image processing package based on scipy. It processes images as numpy arrays, just like matlab. Therefore, we finally chose scikit-image performs digital image processing.
1. Required installation packages
Because scikit-image is based on scipy for calculations, it is certain to install numpy and scipy. To display images, you also need to install the matplotlib package. To sum up, the required packages are:
Python >= 2.6
Numpy >= 1.6.1
Cython >= 0.21
Six >=1.4
SciPy >=0.9
Matplotlib >= 1.1.0
NetworkX >= 1.8
Pillow >= 1.7.8
dask[array] >= 0.5.0
Comparatively, it is very troublesome to install, especially scipy, which is basically impossible to install on Windows.
But don’t be afraid, we just need to choose an integrated installation environment. We recommend Anaconda. It integrates all the above required packages, so we actually only need to install it from beginning to end. Anaconda software is enough, nothing else needs to be installed.
2. Download and install anaconda
First go to www.continuum.io/downloads to download anaconda. The current version is python2 .7 version and python3.5 version, download the corresponding version and anaconda of the corresponding system. It is actually an sh script file, about 280M.
This series takes windows7+python3.5 as an example, so we download the version in the red box as shown below:
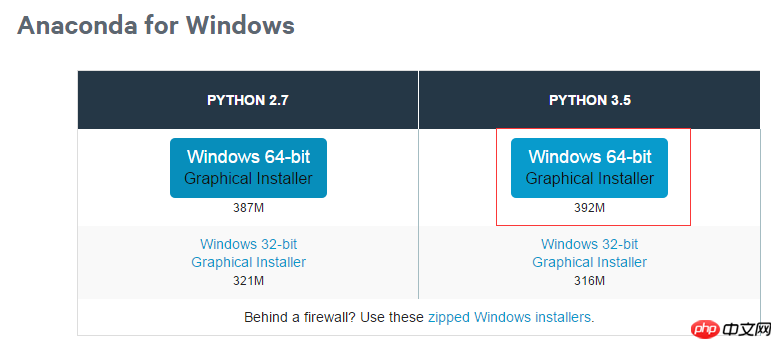
The name is: Anaconda3-2.4. 1-Windows-x86_64.exe
is an executable exe file. Once the download is complete, you can install it by double-clicking it.
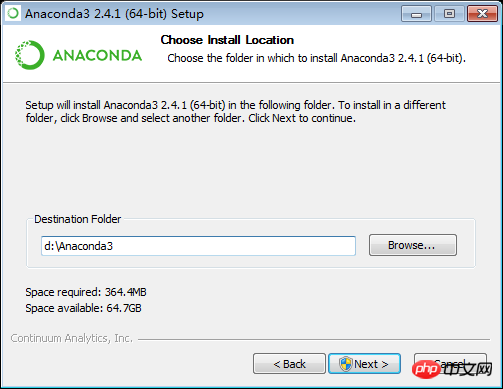
When installing, assume that we install in the root directory of drive D, such as:
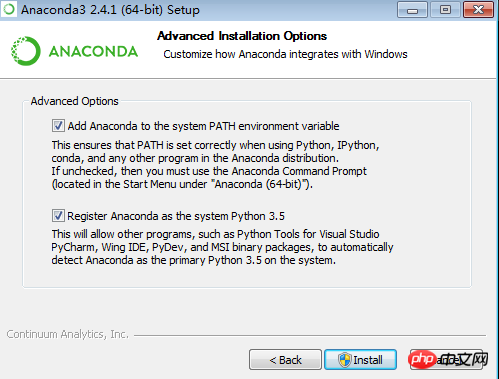
and select both options and write the installation path Enter environment variables.
Then just wait for the installation to complete.
After the installation is completed, open the windows command prompt:
Enter conda list to check which libraries are currently installed. The commonly used numpy and scipy are among them. If you have any packages that have not been installed, you can run
conda install *** to install them. (*** is the name of the required package)
If a package version is not the latest, run conda update *** to update it.
3. Simple test
anaconda comes with an editor spyder, we can use this editor to write code in the future .
Spyder.exe is placed in the scripts in the installation directory. For example, mine is D:/Anaconda3/scripts/spyder.exe. Just double-click it to run it. We can right-click and send to desktop shortcut, which will be more convenient to run in the future.
We simply write a program to test whether the installation is successful. This program is used to open a picture and display it. First prepare a picture, then open spyder and write the following code:
from skimage import io
img=io.imread('d:/dog.jpg')
io.imshow(img)
Change d:/dog.jpg to your picture location
Then click the green in the toolbar above Triangle is run, and finally
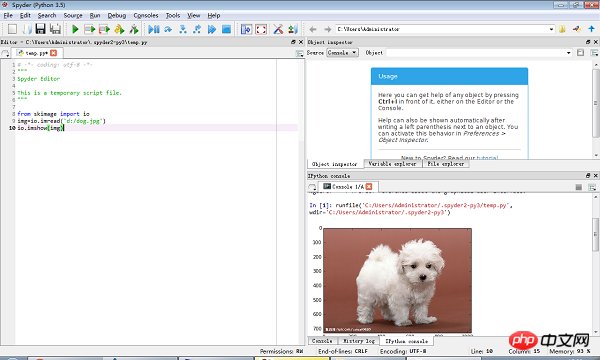
# is displayed. If the "Ipython console" in the lower right corner can display a picture, it means that our running environment is successfully installed.
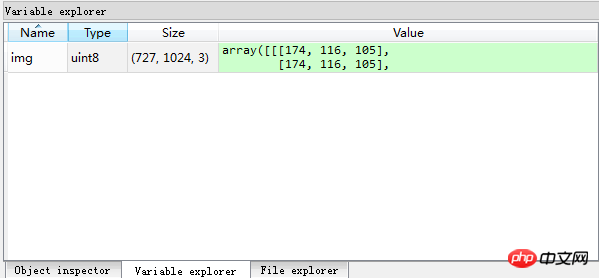
We can select "variable explorer" in the upper right corner to view image information, such as
We can save this program, pay attention to the python script file The suffix is py.
4. Submodule of skimage package
skimage包的全称是scikit-image SciKit (toolkit for SciPy) ,它对scipy.ndimage进行了扩展,提供了更多的图片处理功能。它是由python语言编写的,由scipy 社区开发和维护。skimage包由许多的子模块组成,各个子模块提供不同的功能。主要子模块列表如下:
| 子模块名称 | 主要实现功能 |
| io | 读取、保存和显示图片或视频 |
| data | 提供一些测试图片和样本数据 |
| color | 颜色空间变换 |
| filters | 图像增强、边缘检测、排序滤波器、自动阈值等 |
| draw | 操作于numpy数组上的基本图形绘制,包括线条、矩形、圆和文本等 |
| transform | 几何变换或其它变换,如旋转、拉伸和拉东变换等 |
| morphology | 形态学操作,如开闭运算、骨架提取等 |
| exposure | 图片强度调整,如亮度调整、直方图均衡等 |
| feature | 特征检测与提取等 |
| measure | 图像属性的测量,如相似性或等高线等 |
| segmentation | 图像分割 |
| restoration | 图像恢复 |
| util | 通用函数 |
用到一些图片处理的操作函数时,需要导入对应的子模块,如果需要导入多个子模块,则用逗号隔开,如:
from skimage import io,data,color
The above is the detailed content of Detailed explanation of installation examples of Anaconda and python on windows. For more information, please follow other related articles on the PHP Chinese website!


![[Web front-end] Node.js quick start](https://img.php.cn/upload/course/000/000/067/662b5d34ba7c0227.png)


