


This section is mainly canvasexamples of various usages. First, I will solve a problem I had in the process of applying canvas drawing. I believe everyone may have encountered it.
The following code draws a 100*100 rectangle on canvas:
<!doctype html>
<html>
<head>
<meta charset="utf-8">
<title>canvas基础练习</title>
<style>
    .myCanvas{
    border:1px solid #f00;
     width:200px;
      height:200px;
       }
       </style>
       <script>
    window.onload = function(){
        var canvas = document.getElementById("myCanvas1");
        var context = canvas.getContext("2d");
        //设置矩形填充颜色为红色
        context.fillStyle = "red";
        //从(10,10)位置绘制100*100的正方形
        context.fillRect(10,10,100,100);
    };
    </script>
    </head>
    <body>
    <canvas class="myCanvas" id="myCanvas1">
            你的浏览器不支持canvas。    </canvas>
            </body>
</html>The running results are as follows: 
Huh? Strange, what we drew is obviously a square, why did it become a rectangle? Check the code, there is no problem!
Let’s try to change the code! Remove the width and height attributes in the style:
<!doctype html>
<html>
<head>
<meta charset="utf-8">
<title>canvas基础练习</title>
<style>
    .myCanvas{
        border:1px solid #f00;
    }
</style>

<script>
    window.onload = function(){
        var canvas = document.getElementById("myCanvas1");
        var context = canvas.getContext("2d");

        //设置矩形填充颜色为红色
        context.fillStyle = "red";
        //从10,10位置绘制100*100的正方形
        context.fillRect(10,10,100,100);
    };
</script>
</head>

<body>
    <canvas class="myCanvas" id="myCanvas1">
            你的浏览器不支持canvas。
    </canvas>
</body>

</html> and look at the running results: 
It’s normal!
Compare the differences between the two codes. The second code only removes the width and height attributes from the style, and the others are exactly the same.
Later, after consulting the information, I found that the default canvas size of canvas is 300px*150px, which is equivalent to a picture. The width and height attributes set by css are equivalent to stretching this image.
In this way, it is not difficult for us to find out: the first picture is actually the result of stretching the second picture 300px*150px to 200px*200px.
So how to correctly set the size of the canvas without causing image deformation?
There are two methods:
//第一种:在html标签中静态设置
<canvas width="200" height="200" id="myCanvas">

//第二种:使用Js代码动态设置
var canvas = document.getElementById("myCanvas1");
var canvas.width = 200;
var canvas.height = 200;<!doctype html>
<html>
<head>
<meta charset="utf-8">
<title>canvas基础练习</title>
<style>
.myCanvas{
border:1px solid #f00;
}
</style>
<script>
var canvasWidth;
var canvasHeight;
//获取canvas的宽和高存放于全局变量备用,并返回canvas的context对象
function getContextById(elementId){
var canvas = document.getElementById(elementId);
canvasWidth = canvas.width;
canvasHeight = canvas.height;
var context = canvas.getContext("2d");
return context;
}
function drawPath(){
var context = getContextById("myCanvas");
//清除画布
context.clearRect(0,0,canvasWidth,canvasHeight);
context.beginPath();
/*绘制弧线,使用arc(x,y,radius,startAngle,endAngle,counterclockwise)方法
以(x,y)为圆心绘制一条弧线,弧线半径为radius,起始和结束角度(用弧度表示)分别为startAngle
和endAngle。最后一个参数表示是否按逆时针方向计算,值为false表示顺时针方向计算。
*/
context.arc(130,130,90,0,2*Math.PI,false);
/*arcTo(x1,y1,x2,y2,radius):从上一点开始绘制一条弧线,到(x2,y2)为止,并且以给
定的半径radius穿过(x1,y1)
*/
context.arcTo(310,220,400,130,80)
/*bezierCurveTo(c1x,c1y,c2x,c2y,x,y):从上一点开始绘制一条曲线,到(x,y)为
止,并且以(c1x,c1y)和(c2x,c2y)为控制的。
*/
context.bezierCurveTo(320,210,400,250,310,300);
/*lineTo(x,y):从上一点开始绘制一条直线,到(x,y)为止*/
context.lineTo(0,300);
context.moveTo(130,220);
context.lineTo(100,300);
/*quadraticCurveTo(cx,cy,x,y):从上一点开始绘制一条二次曲线,到(x,y)为止,并且
以(cx,cy)作为控制点
*/
context.quadraticCurveTo(40,380,130,400);
context.lineTo(450,400);
/*rect(x,y,width,height):从点(x,y)开始绘制一个矩形路径*/
context.rect(80,80,100,100)
context.strokeStyle="rgba(0,0,255,0.5)";
//最后必须调用stroke()方法,这样才能把图像绘制到画布上。
context.stroke();
}
</script>
</head>
<body>
<canvas width="500" height="500" class="myCanvas" id="myCanvas">
你的浏览器不支持canvas。
</canvas>
<div>
<button onClick="drawPath()">绘制</button>
</div>
</body>
</html>Run effect: 
<!doctype html>
<html>
<head>
<meta charset="utf-8">
<title>canvas基础练习</title>
<style>
    .myCanvas{
        border:1px solid #f00;
    }
</style>

<script>
    var canvasWidth = 300;
    var canvasHeight = 300;
    //获取canvas的宽和高存放于全局变量备用,并返回canvas的context对象
    function getContextById(elementId){
        var canvas = document.getElementById(elementId);
        canvasWidth = canvas.width;
        canvasHeight = canvas.height;
        var context = canvas.getContext("2d");
        return context;
    }

    function drawText(){
        var context = getContextById("myCanvas");
        //清除画布
        context.clearRect(0,0,canvasWidth,canvasHeight);

        //开始路径
        context.beginPath();
        //绘制外圆
        context.arc(100,100,99,0,2*Math.PI,false);
        //绘制内圆
        //context.moveTo(194,100);//将绘图游标移动到(x,y),不画线
        context.arc(100,100,94,0,2*Math.PI,false);
        //绘制分针
        context.moveTo(100,100);
        context.lineTo(100,15);
        //绘制时针
        context.moveTo(100,100);
        context.lineTo(35,100);
        context.strokeStyle="rgba(0,0,255,0.5)";
        //最后必须调用stroke()方法,这样才能把图像绘制到画布上。
        context.stroke();

        //绘制文本
        context.font="bold 14px Arial";
        context.textAlign="center";
        context.textBaseline="middle";//文本的基线
        context.fillText("3",200-15,100);
        context.fillText("6",100,200-15);
        context.fillText("9",15,100);
        context.fillText("12",100,15);
        context.strokeStyle="rgba(0,0,255,0.5)";
        //最后必须调用stroke()方法,这样才能把图像绘制到画布上。
        context.stroke();
    }

</script>
</head>

<body>
    <canvas width="200" height="200" class="myCanvas" id="myCanvas">
            你的浏览器不支持canvas。
    </canvas>
    <div>
        <button onClick="drawText()">绘制</button>
    </div>
</body>

</html>Run effect As follows: 
<!doctype html>
<html>
<head>
<meta charset="utf-8">
<title>canvas基础练习</title>
<style>
    .myCanvas{
        border:1px solid #f00;
    }
</style>

<script>
    var canvasWidth = 300;
    var canvasHeight = 300;
    //获取canvas的宽和高存放于全局变量备用,并返回canvas的context对象
    function getContextById(elementId){
        var canvas = document.getElementById(elementId);
        canvasWidth = canvas.width;
        canvasHeight = canvas.height;
        var context = canvas.getContext("2d");
        return context;
    }

    function drawText(){
        var context = getContextById("myCanvas");
        //清除画布
        context.clearRect(0,0,canvasWidth,canvasHeight);

        //开始路径
        context.beginPath();
        //绘制外圆
        context.arc(100,100,99,0,2*Math.PI,false);
        //绘制内圆
        //context.moveTo(194,100);//将绘图游标移动到(x,y),不画线
        context.arc(100,100,94,0,2*Math.PI,false);

        //绘制文本
        context.font="bold 14px Arial";
        context.textAlign="center";
        context.textBaseline="middle";//文本的基线
        context.fillText("3",200-15,100);
        context.fillText("6",100,200-15);
        context.fillText("9",15,100);
        context.fillText("12",100,15);
        context.strokeStyle="rgba(0,0,255,0.5)";
        //最后必须调用stroke()方法,这样才能把图像绘制到画布上。
        context.stroke();

        //变换原点,将圆心变换为画布坐标原点
        /*translate(x,y):将坐标原点移动到(x,y)。执行这个变换后,坐标(0,0)会变成之
        前由(x,y)表示的点
        */
        context.translate(100,100);

        //旋转1个弧度
        context.rotate(1);

        //绘制分针
        context.moveTo(0,0);
        context.lineTo(0,-85);
        //绘制时针
        context.moveTo(0,0);
        context.lineTo(-65,0);
        context.strokeStyle="rgba(0,0,255,0.5)";

        //最后必须调用stroke()方法,这样才能把图像绘制到画布上。
        context.stroke();

        //将原点恢复到原画布原点
        context.translate(-100,-100);
    }

</script>
</head>

<body>
    <canvas width="200" height="200" class="myCanvas" id="myCanvas">
            你的浏览器不支持canvas。
    </canvas>
    <div>
        <button onClick="drawText()">绘制</button>
    </div>
</body>

</html>Running effect: 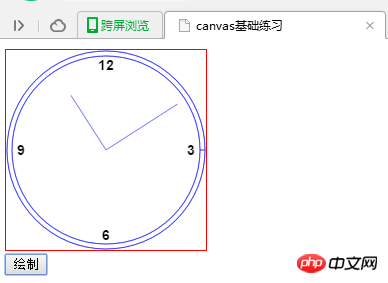
<!DOCTYPE html>
<html>
<head>
    <meta http-equiv="Content-Type" content="text/html; charset=utf-8" />
    <title>canvas绘图</title>
</head>

<body>
    <canvas id="myCanvas" width="400" height="400" style="border:#0F0 solid 1px">A Drawing of something</canvas>
    <script>
        var drawing=document.getElementById("myCanvas");
        //确定浏览器支持<canvas>元素
        if(drawing.getContext){
            //取得绘图上下文对象的引用,“2d”是取得2D上下文对象
            var context=drawing.getContext("2d");
            //设置阴影
            context.shadowColor="rgba(0,0,0,0.5)"//设置阴影颜色
            context.shadowOffsetX=15;//设置形状或路径x轴方向的阴影偏移量,默认值为0;
            context.shadowOffsetY=15;//设置形状或路径y轴方向的阴影偏移量,默认值为0;
            context.shadowBlur=10;//设置模糊的像素数,默认值为0,即不模糊。
            //绘制红色填充矩形
            context.fillStyle="red";
            context.fillRect(10,10,100,100);
            //绘制半透明的蓝色矩形
            context.fillStyle="rgba(0,0,255,1)";
            context.fillRect(60,60,100,100);
        }
    </script>
</body>
</html>
The above is the detailed content of Detailed explanation of HTML5 canvas (3). For more information, please follow other related articles on the PHP Chinese website!
 What are the production methods of html5 animation production?
 The difference between HTML and HTML5
 What does browser mean
 Telecom cdma
 Does inflation rate have an impact on digital currencies?
 Can windows.old be deleted?
 How to solve 0xc000035
 How to solve the problem of not being able to create a new folder in Win7


![[Web front-end] Node.js quick start](https://img.php.cn/upload/course/000/000/067/662b5d34ba7c0227.png)


