The example in this article explains the implementation principle of js image carousel effect and shares it with everyone for your reference. The specific content is as follows
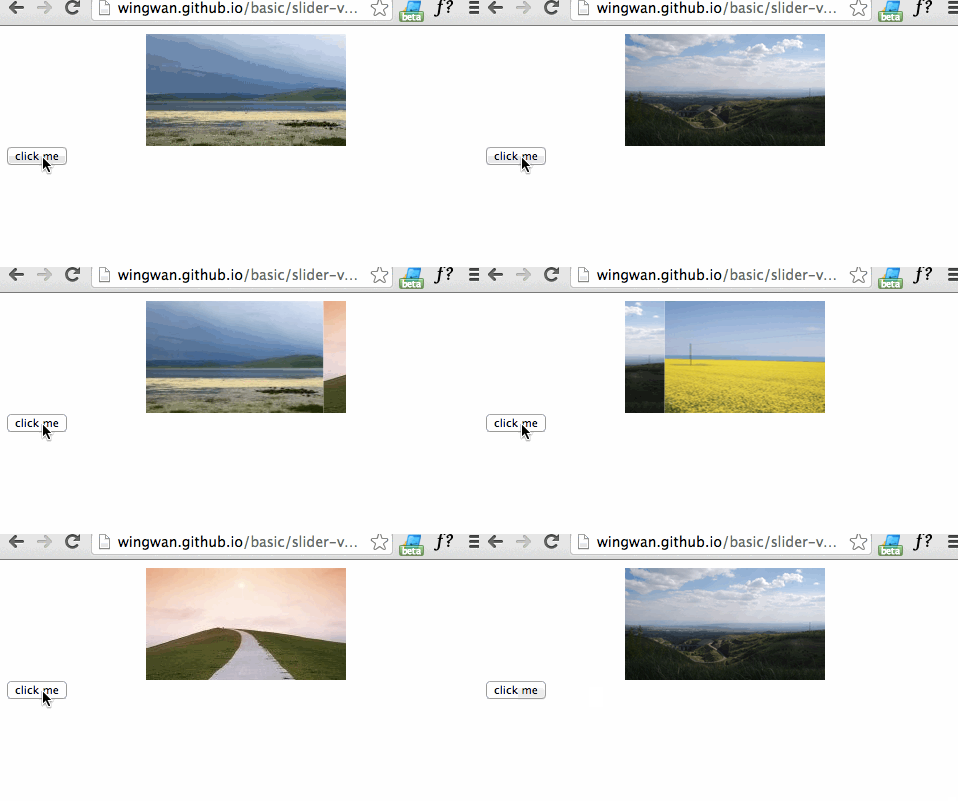
Two image carousel implementation solutions, let’s first look at the effect comparison:
Option 1:

Principle: Arrange the pictures in a row, scroll from left to right into the field of view, when scrolling to the last picture, scroll from right to left and return to the first picture. The disadvantage of this is that when scrolling to the last picture, there will be a reverse direction, causing the entire scrolling process to be incoherent.
Option 2:

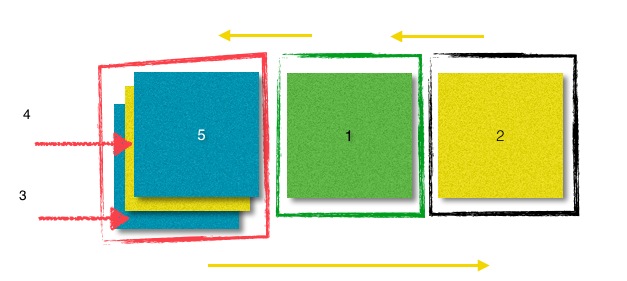
Implementation principle diagram

Principle:
1. In the carousel process, there are several key elements: a stage (green frame), waiting area (black frame), queuing area (red frame) and two arrays A and B. A is used to save the pictures that are being displayed and will be displayed next, such as pictures 1 and 2; B is used to save pictures waiting in line to appear, such as pictures 5, 4, and 3.
2. At each step of the carousel, what needs to be done is as follows:
What A needs to do is to move its first element to the left, and move the second element to the left into the display area; then shift the first element just out of A, and splice it into B's first position.
What B needs to do is to move its last element to the waiting area (that is, where Figure 2 is currently located) and wait; then pop the last element out of B and push it to A. .
Code:
<!DOCTYPE html>
<html>
<head>
  <meta charset="utf-8">
  <title>图片轮播-v2</title>
  <style>

    ul{
      margin: 0;
      padding: 0;
      list-style: none;

    }

    .sliderWrap{
      width: 200px;
      height: 112px;
      overflow: hidden;
      margin: 0 auto;
    }
    .sliderWrap ul{
      position: relative;
      width: 1000px;
      transition: left .5s ease;
      left: 0;
    }
    .sliderWrap li{
      position: relative;
      float: left;
    }
    .sliderWrap ul li img{
      width: 100%;
    }
  </style>
</head>
<body>
<div class="sliderWrap">
  <ul id="slider">
    <li><img src="images/slider/slider1.jpg" alt=""></li>
    <li><img src="images/slider/slider2.jpg" alt=""></li>
    <li><img src="images/slider/slider3.jpg" alt=""></li>
    <li><img src="images/slider/slider4.jpg" alt=""></li>
  </ul>
</div>
<input type="button" value="click me" id="next"/>
<script>
  /**
   * 图片轮播
   * @type {Element}
   */
  var btn = document.getElementById("next");
  var dom = document.getElementById("slider");
  var liArr = dom.getElementsByTagName("li");

  var curWidth = 200;
  var ulWidth = curWidth * liArr.length;
  var show = [];
  var circle = [];

  var goAway = "translate(-" + curWidth +"px, 0) translateZ(0px)";
  var goIn = "translate(0, 0) translateZ(0px)";
  var goPre = "translate(" + curWidth +"px, 0) translateZ(0px)";

  //保证所有li在ul中能在一行内放下
  dom.style.width = ulWidth + "px";

  for(var i = 0, len = liArr.length; i < len; i++){
    var curLi = liArr[i];

    curLi.setAttribute("data-index", i);
    curLi.style.width = curWidth + "px";

    if(i == 0){
      curLi.style.left = 0;
      show.push(curLi);
    }else{
      curLi.style.left = - curWidth * i + "px";
      if(i > 1){
        translate(curLi, goAway, '')
        circle.push(curLi);
      }else{
        show.push(curLi);
        translate(curLi, goPre, '');
      }
    }


  }

  circle.reverse();

  btn.onclick = function(){
    //已展示的图片滚粗
    var showFirst = show.shift();
    translate(showFirst, goAway, "300ms");

    //正在展示的图片
    translate(show[0], goIn, "300ms");
    circle.splice(0, 0, showFirst);

    //准备好下一个将要展示的图片
    var nextPre = circle.pop();
    translate(nextPre, goPre, "0ms");
    show.push(nextPre);

  };

  function translate(dom, goType, time){
    dom.style.transform =
        dom.style.webkitTransform =
            dom.style.mozTransform =
                dom.style.msTransform =
                    dom.style.oTransform = goType;

    dom.style.transitionDuration =
        dom.style.webkitTransitionDuration =
            dom.style.mozTransitionDuration =
                dom.style.msTransitionDuration =
                    dom.oTransitionDuration = time;


  }

</script>
</body>
</html>
The above is the implementation principle and detailed code of js image carousel effect. I hope it will be helpful for everyone to learn javascript programming.


