
In this article, I will not cover the ASP.NET login series controls and membership-related topics. I just want to use a relatively primitive way to explain how to implement the identity authentication process in ASP.NET.
ASP.NET Identity Authentication Basics
Before starting today’s content, I want to clarify two of the most basic questions first:
1. How to determine whether the current request is initiated by a logged-in user?
2. How to get the login name of the currently logged in user?
In the standard ASP.NET identity authentication method, the answers to the above two questions are:
1. If Request.IsAuthenticated is true, it means that it is a logged in user.
2. If you are a logged-in user, access HttpContext.User.Identity.Name to get the login name (all are instance attributes).
Next, this article will focus on the above two questions, please continue reading.
ASP.NET identity authentication process
In ASP.NET, the entire identity authentication process can actually be divided into two stages: authentication and authorization.
1. Authentication stage: Identify whether the currently requested user is an identifiable (logged in) user.
2. Authorization phase: Whether to allow the current request to access the specified resource.
These two stages are represented by the AuthenticateRequest and AuthorizeRequest events in the ASP.NET pipeline.
In the authentication phase, ASP.NET will check the current request and try to construct an HttpContext.User object for us to use in subsequent processing based on the authentication method set in web.config. During the authorization phase, it is checked whether the resource accessed by the current request is allowed to be accessed, because some protected page resources may require specific users or user groups to access. Therefore, even a logged-in user may not be able to access certain pages. When it is found that the user cannot access a page resource, ASP.NET will redirect the request to the login page.
We can specify both the protected page and the login page in web.config. For specific methods, please refer to the following article.
In ASP.NET, Forms authentication is implemented by FormsAuthenticationModule, and URL authorization check is implemented by UrlAuthorizationModule.
How to implement login and logout
I introduced earlier that Request.IsAuthenticated can be used to determine whether the current user is a logged-in user, so what is the process like? What was achieved?
In order to answer this question, I prepared a simple sample page with the following code:
<fieldset><legend>用户状态</legend><form action="<%= Request.RawUrl %>" method="post">
 <% if( Request.IsAuthenticated ) { %>
  当前用户已登录,登录名:<%= Context.User.Identity.Name.HtmlEncode() %> <br />
  <input type="submit" name="Logon" value="退出" />
 <% } else { %>
  <b>当前用户还未登录。</b>
 <% } %>
</form></fieldset>Page display The effect is as follows:
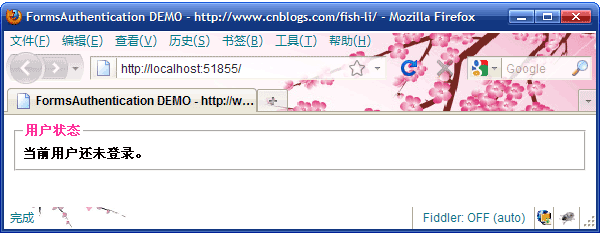
#According to the previous code, I think it is correct to see that this page is displayed now. Yes, I am not logged in yet (this has not been implemented at all) Function).
I will add some code below to implement user login. Page code:
<fieldset><legend>普通登录</legend><form action="<%= Request.RawUrl %>" method="post">
 登录名:<input type="text" name="loginName" style="width: 200px" value="Fish" />
 <input type="submit" name="NormalLogin" value="登录" />
</form></fieldset>
The current page display effect:
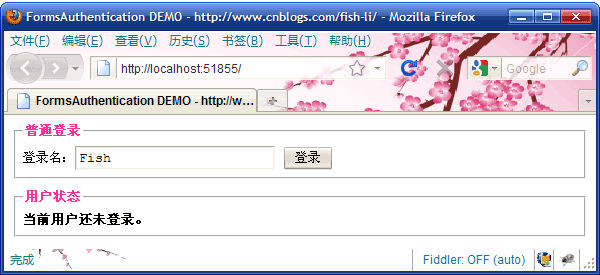
Log in Implementation code for logging out:
public void Logon()
{
 FormsAuthentication.SignOut();
}

public void NormalLogin()
{
 // -----------------------------------------------------------------
 // 注意:演示代码为了简单,这里不检查用户名与密码是否正确。
 // -----------------------------------------------------------------

 string loginName = Request.Form["loginName"];
 if( string.IsNullOrEmpty(loginName) )
  return;

 FormsAuthentication.SetAuthCookie(loginName, true);

 TryRedirect();
}Now, I can try the login function. After clicking the login button, the page will display as follows:
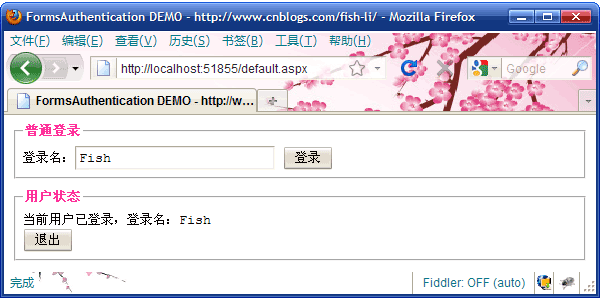
As can be seen from the display of the picture, the NormalLogin() method I wrote earlier can indeed realize user login.
Of course, I can also click the exit button at this time, and then return to the display of picture 2.
Writing this, I think it is necessary to summarize the method of implementing login and logout in ASP.NET:
1. Login: Call the FormsAuthentication.SetAuthCookie() method and pass a login Just name.
2. Logout: Call the FormsAuthentication.SignOut() method.
Protect restricted pages
In an ASP.NET website, some pages will be allowed to be accessed by all users, including some not logged in users, but some pages must It can only be accessed by logged-in users, and some pages may require specific users or members of user groups to access. Such pages can also be called [restricted pages]. They generally represent more important pages and contain some important operations or functions.
In order to protect access to restricted pages, ASP.NET provides a simple way: you can specify which users or user groups (roles) are allowed to access restricted resources in web.config, or you can Set to deny access.
For example, the website has a page: MyInfo.aspx, which requires that the visitor to this page must be a logged-in user, then you can configure it in web.config like this:
<location path="MyInfo.aspx">
 <system.web>
  <authorization>
   <deny users="?"/>
  </authorization>
 </system.web>
</location>
为了方便,我可能会将一些管理相关的多个页面放在Admin目录中,显然这些页面只允许Admin用户组的成员才可以访问。对于这种情况,我们可以直接针对一个目录设置访问规则:
<location path="Admin">
 <system.web>
  <authorization>
   <allow roles="Admin"/>
   <deny users="*"/>
  </authorization>
 </system.web>
</location>
这样就不必一个一个页面单独设置了,还可以在目录中创建一个web.config来指定目录的访问规则,请参考后面的示例。
在前面的示例中,有一点要特别注意的是:
1. allow和deny之间的顺序一定不能写错了,UrlAuthorizationModule将按这个顺序依次判断。
2. 如果某个资源只允许某类用户访问,那么最后的一条规则一定是
在allow和deny的配置中,我们可以在一条规则中指定多个用户:
1. 使用users属性,值为逗号分隔的用户名列表。
2. 使用roles属性,值为逗号分隔的角色列表。
3. 问号 (?) 表示匿名用户。
4. 星号 (*) 表示所有用户。
登录页不能正常显示的问题
有时候,我们可能要开发一个内部使用的网站程序,这类网站程序要求 禁止匿名用户的访问,即:所有使用者必须先登录才能访问。因此,我们通常会在网站根目录下的web.config中这样设置:
<authorization>
 <deny users="?"/>
</authorization>
对于我们的示例,我们也可以这样设置。此时在浏览器打开页面时,呈现效果如下:
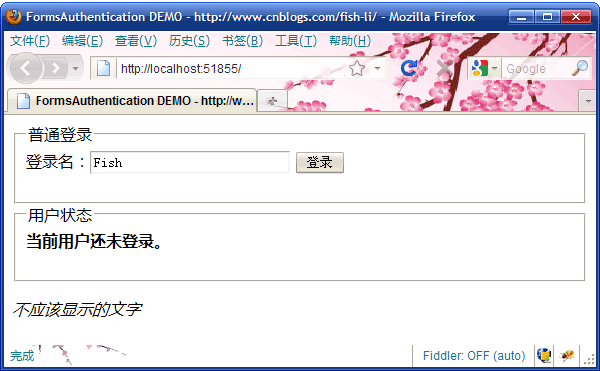
从图片中可以看出:页面的样式显示不正确,最下边还多出了一行文字。
这个页面的完整代码是这样的(它引用了一个CSS文件和一个JS文件):
<%@ Page Language="C#" CodeFile="Default.aspx.cs" Inherits="_Default" %>
<html xmlns="http://www.w3.org/1999/xhtml">
<head>
 <title>FormsAuthentication DEMO - //m.sbmmt.com/;/title>
 <link type="text/css" rel="Stylesheet" href="css/StyleSheet.css" />
</head>
<body>
 <fieldset><legend>普通登录</legend><form action="<%= Request.RawUrl %>" method="post">
  登录名:<input type="text" name="loginName" style="width: 200px" value="Fish" />
  <input type="submit" name="NormalLogin" value="登录" />
 </form></fieldset>

 <fieldset><legend>用户状态</legend><form action="<%= Request.RawUrl %>" method="post">
  <% if( Request.IsAuthenticated ) { %>
   当前用户已登录,登录名:<%= Context.User.Identity.Name.HtmlEncode() %> <br />

   <% var user = Context.User as MyFormsPrincipal<UserInfo>; %>
   <% if( user != null ) { %>
    <%= user.UserData.ToString().HtmlEncode() %>
   <% } %>

   <input type="submit" name="Logon" value="退出" />
  <% } else { %>
   <b>当前用户还未登录。</b>
  <% } %>
 </form></fieldset>

 <p id="hideText"><i>不应该显示的文字</i></p>
 <script type="text/javascript" src="js/JScript.js"></script>
</body>
</html>页面最后一行文字平时不显示是因为JScript.js中有以下代码:
document.getElementById("hideText").setAttribute("style", "display: none");这段JS代码能做什么,我想就不用再解释了。虽然这段JS代码没什么价值,但我主要是想演示在登录页面中引用JS的场景。
根据前面图片,我们可以猜测到:应该是CSS和JS文件没有正确加载造成的。为了确认就是这样原因,我们可以打开FireBug再来看一下页面加载情况:
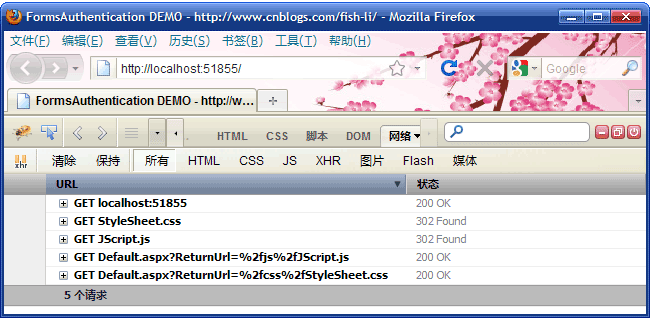
根据FireBug提供的线索我们可以分析出,页面在访问CSS, JS文件时,其实是被重定向到登录页面了,因此获得的结果肯定也是无意义的,所以就造成了登录页的显示不正确。
还记得【授权】吗?
是的,现在就是由于我们在web.config中设置了不允许匿名用户访问,因此,所有的资源也就不允许匿名用户访问了,包括登录页所引用的CSS, JS文件。当授权检查失败时,请求会被重定向到登录页面,所以,登录页本身所引用的CSS, JS文件最后得到的响应内容其实是登录页的HTML代码,最终导致它们不能发挥作用,表现为登录页的样式显示不正确,以及引用的JS文件也不起作用。
不过,有一点比较奇怪:为什么访问登录页面时,没有发生重定向呢?
原因是这样的:在ASP.NET内部,当发现是在访问登录面时,会设置HttpContext.SkipAuthorization = true (其实是一个内部调用),这样的设置会告诉后面的授权检查模块:跳过这次请求的授权检查。 因此,登录页总是允许所有用户访问,但是CSS文件以及JS文件是在另外的请求中发生的,那些请求并不会要跳过授权模块的检查。
为了解决登录页不能正确显示的问题,我们可以这样处理:
1. 在网站根目录中的web.config中设置登录页所引用的JS, CSS文件都允许匿名访问。
2. 也可以直接针对JS, CSS目录设置为允许匿名用户访问。
3. 还可以在CSS, JS目录中创建一个web.config文件来配置对应目录的授权规则。可参考以下web.config文件:
<?xml version="1.0"?>
<configuration>
 <system.web>
  <authorization>
   <allow users="*"/>
  </authorization>
 </system.web>
</configuration>
第三种做法可以不修改网站根目录下的web.config文件。
注意:在IIS中看到的情况就和在Visual Studio中看到的结果就不一样了。 因为,像js, css, image这类文件属于静态资源文件,IIS能直接处理,不需要交给ASP.NET来响应,因此就不会发生授权检查失败,所以,如果这类网站部署在IIS中,看到的结果又是正常的。
认识Forms身份认证
前面我演示了如何用代码实现登录与注销的过程,下面再来看一下登录时,ASP.NET到底做了些什么事情,它是如何知道当前请求是一个已登录用户的?
在继续探索这个问题前,我想有必要来了解一下HTTP协议的一些特点。
HTTP是一个无状态的协议,无状态的意思可以理解为: WEB服务器在处理所有传入请求时,根本就不知道某个请求是否是一个用户的第一次请求与后续请求,或者是另一个用户的请求。 WEB服务器每次在处理请求时,都会按照用户所访问的资源所对应的处理代码,从头到尾执行一遍,然后输出响应内容, WEB服务器根本不会记住已处理了哪些用户的请求,因此,我们通常说HTTP协议是无状态的。
虽然HTTP协议与WEB服务器是无状态,但我们的业务需求却要求有状态,典型的就是用户登录,在这种业务需求中,要求WEB服务器端能区分某个请求是不是一个已登录用户发起的,或者当前请求是哪个用户发出的。在开发WEB应用程序时,我们通常会使用Cookie来保存一些简单的数据供服务端维持必要的状态。既然这是个通常的做法,那我们现在就来看一下现在页面的Cookie使用情况吧,以下是我用FireFox所看到的Cookie列表:
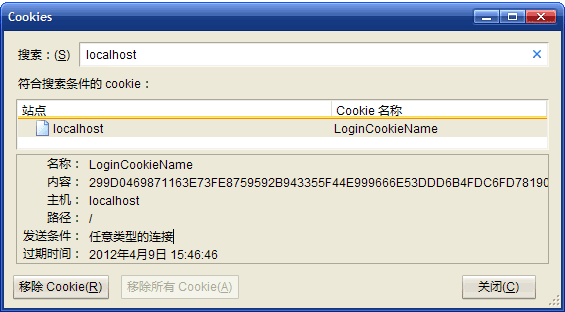
这个名字:LoginCookieName,是我在web.config中指定的:
<authentication mode="Forms" >
 <forms cookieless="UseCookies" name="LoginCookieName" loginUrl="~/Default.aspx"></forms>
</authentication>
在这段配置中,我不仅指定的登录状态的Cookie名,还指定了身份验证模式,以及Cookie的使用方式。
为了判断这个Cookie是否与登录状态有关,我们可以在浏览器提供的界面删除它,然后刷新页面,此时页面的显示效果如下:
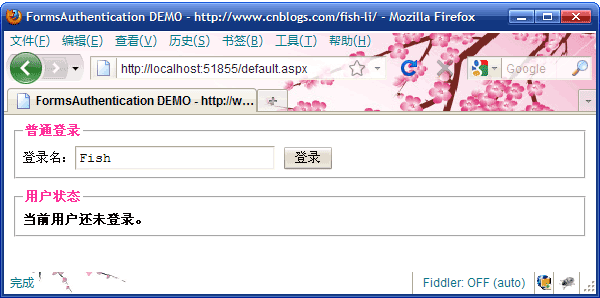
此时,页面显示当前用户没有登录。
为了确认这个Cookie与登录状态有关,我们可以重新登录,然后再退出登录。
发现只要是页面显示当前用户未登录时,这个Cookie就不会存在。
事实上,通过SetAuthCookie这个方法名,我们也可以猜得出这个操作会写一个Cookie。
注意:本文不讨论无Cookie模式的Forms登录。
从前面的截图我们可以看出:虽然当前用户名是 Fish ,但是,Cookie的值是一串乱码样的字符串。
由于安全性的考虑,ASP.NET对Cookie做过加密处理了,这样可以防止恶意用户构造Cookie绕过登录机制来模拟登录用户。如果想知道这串加密字符串是如何得到的,那么请参考后文。
小结:
1. Forms身份认证是在web.config中指定的,我们还可以设置Forms身份认证的其它配置参数。
2. Forms身份认证的登录状态是通过Cookie来维持的。
3. Forms身份认证的登录Cookie是加密的。
理解Forms身份认证
经过前面的Cookie分析,我们可以发现Cookie的值是一串加密后的字符串,现在我们就来分析这个加密过程以及Cookie对于身份认证的作用。
登录的操作通常会检查用户提供的用户名和密码,因此登录状态也必须具有足够高的安全性。在Forms身份认证中,由于登录状态是保存在Cookie中,而Cookie又会保存到客户端,因此,为了保证登录状态不被恶意用户伪造, ASP.NET采用了加密的方式保存登录状态。为了实现安全性,ASP.NET采用【Forms身份验证凭据】(即FormsAuthenticationTicket对象)来表示一个Forms登录用户,加密与解密由FormsAuthentication的Encrypt与Decrypt的方法来实现。
用户登录的过程大致是这样的:
1. 检查用户提交的登录名和密码是否正确。
2. 根据登录名创建一个FormsAuthenticationTicket对象。
3. 调用FormsAuthentication.Encrypt()加密。
4. 根据加密结果创建登录Cookie,并写入Response。
在登录验证结束后,一般会产生重定向操作,那么后面的每次请求将带上前面产生的加密Cookie,供服务器来验证每次请求的登录状态。
每次请求时的(认证)处理过程如下:
1. FormsAuthenticationModule尝试读取登录Cookie。
2. 从Cookie中解析出FormsAuthenticationTicket对象。过期的对象将被忽略。
3. 根据FormsAuthenticationTicket对象构造FormsIdentity对象并设置HttpContext.Usre
4. UrlAuthorizationModule执行授权检查。
在登录与认证的实现中,FormsAuthenticationTicket和FormsAuthentication是二个核心的类型,前者可以认为是一个数据结构,后者可认为是处理前者的工具类。
UrlAuthorizationModule是一个授权检查模块,其实它与登录认证的关系较为独立,因此,如果我们不使用这种基于用户名与用户组的授权检查,也可以禁用这个模块。
由于Cookie本身有过期的特点,然而为了安全,FormsAuthenticationTicket也支持过期策略,不过,ASP.NET的默认设置支持FormsAuthenticationTicket的可调过期行为,即:slidingExpiration=true 。这二者任何一个过期时,都将导致登录状态无效。
FormsAuthenticationTicket的可调过期的主要判断逻辑由FormsAuthentication.RenewTicketIfOld方法实现,代码如下:
public static FormsAuthenticationTicket RenewTicketIfOld(FormsAuthenticationTicket tOld)
{
 // 这段代码是意思是:当指定的超时时间逝去大半时将更新FormsAuthenticationTicket对象。

 if( tOld == null )
  return null;

 DateTime now = DateTime.Now;
 TimeSpan span = (TimeSpan)(now - tOld.IssueDate);
 TimeSpan span2 = (TimeSpan)(tOld.Expiration - now);
 if( span2 > span )
  return tOld;

 return new FormsAuthenticationTicket(tOld.Version, tOld.Name,
  now, now + (tOld.Expiration - tOld.IssueDate),
  tOld.IsPersistent, tOld.UserData, tOld.CookiePath);
}
Request.IsAuthenticated可以告诉我们当前请求是否已经过身份验证,我们来看一下这个属性是如何实现的:

public bool IsAuthenticated
{
 get
 {
  return (((this._context.User != null)
   && (this._context.User.Identity != null))
   && this._context.User.Identity.IsAuthenticated);
 }
}从代码可以看出,它的返回结果基本上来源于对Context.User的判断。
另外,由于User和Identity都是二个接口类型的属性,因此,不同的实现方式对返回值也有影响。
由于可能会经常使用HttpContext.User这个实例属性,为了让它能正常使用, DefaultAuthenticationModule会在ASP.NET管线的PostAuthenticateRequest事件中检查此属性是否为null,如果它为null,DefaultAuthenticationModule会给它一个默认的GenericPrincipal对象,此对象指示一个未登录的用户。
我认为ASP.NET的身份认证的最核心部分其实就是HttpContext.User这个属性所指向的对象。为了更好了理解Forms身份认证,我认为自己重新实现User这个对象的接口会有较好的帮助。
实现自定义的身份认证标识
前面演示了最简单的ASP.NET Forms身份认证的实现方法,即:直接调用SetAuthCookie方法。不过调用这个方法,只能传递一个登录名。但是有时候为了方便后续的请求处理,还需要保存一些与登录名相关的额外信息。虽然知道ASP.NET使用Cookie来保存登录名状态信息,我们也可以直接将前面所说的额外信息直接保存在Cookie中,但是考虑安全性,我们还需要设计一些加密方法,而且还需要考虑这些额外信息保存在哪里才能方便使用,并还要考虑随登录与注销同步修改。因此,实现这些操作还是有点繁琐的。
为了保存与登录名相关的额外的用户信息,我认为实现自定义的身份认证标识(HttpContext.User实例)是个容易的解决方法。
理解这个方法也会让我们对Forms身份认证有着更清楚地认识。
这个方法的核心是(分为二个子过程):
1. 在登录时,创建自定义的FormsAuthenticationTicket对象,它包含了用户信息。
2. 加密FormsAuthenticationTicket对象。
3. 创建登录Cookie,它将包含FormsAuthenticationTicket对象加密后的结果。
4. 在管线的早期阶段,读取登录Cookie,如果有,则解密。
5. 从解密后的FormsAuthenticationTicket对象中还原我们保存的用户信息。
6. 设置HttpContext.User为我们自定义的对象。
现在,我们还是来看一下HttpContext.User这个属性的定义:
// 为当前 HTTP 请求获取或设置安全信息。
//
// 返回结果:
//  当前 HTTP 请求的安全信息。
public IPrincipal User { get; set; }由于这个属性只是个接口类型,因此,我们也可以自己实现这个接口。
考虑到更好的通用性:不同的项目可能要求接受不同的用户信息类型。所以,我定义了一个泛型类。
public class MyFormsPrincipal<TUserData> : IPrincipal
 where TUserData : class, new()
{
 private IIdentity _identity;
 private TUserData _userData;

 public MyFormsPrincipal(FormsAuthenticationTicket ticket, TUserData userData)
 {
  if( ticket == null )
   throw new ArgumentNullException("ticket");
  if( userData == null )
   throw new ArgumentNullException("userData");

  _identity = new FormsIdentity(ticket);
  _userData = userData;
 }

 public TUserData UserData
 {
  get { return _userData; }
 }

 public IIdentity Identity
 {
  get { return _identity; }
 }

 public bool IsInRole(string role)
 {
  // 把判断用户组的操作留给UserData去实现。

  IPrincipal principal = _userData as IPrincipal;
  if( principal == null )
   throw new NotImplementedException();
  else
   return principal.IsInRole(role);
}与之配套使用的用户信息的类型定义如下(可以根据实际情况来定义):
public class UserInfo : IPrincipal
{
 public int UserId;
 public int GroupId;
 public string UserName;

 // 如果还有其它的用户信息,可以继续添加。

 public override string ToString()
 {
  return string.Format("UserId: {0}, GroupId: {1}, UserName: {2}, IsAdmin: {3}",
   UserId, GroupId, UserName, IsInRole("Admin"));
 }

 #region IPrincipal Members

 [ScriptIgnore]
 public IIdentity Identity
 {
  get { throw new NotImplementedException(); }
 }

 public bool IsInRole(string role)
 {
  if( string.Compare(role, "Admin", true) == 0 )
   return GroupId == 1;
  else
   return GroupId > 0;
 }

 #endregion
}注意:表示用户信息的类型并不要求一定要实现IPrincipal接口,如果不需要用户组的判断,可以不实现这个接口。
登录时需要调用的方法(定义在MyFormsPrincipal类型中):
/// <summary>
/// 执行用户登录操作
/// </summary>
/// <param name="loginName">登录名</param>
/// <param name="userData">与登录名相关的用户信息</param>
/// <param name="expiration">登录Cookie的过期时间,单位:分钟。</param>
public static void SignIn(string loginName, TUserData userData, int expiration)
{
 if( string.IsNullOrEmpty(loginName) )
  throw new ArgumentNullException("loginName");
 if( userData == null )
  throw new ArgumentNullException("userData");

 // 1. 把需要保存的用户数据转成一个字符串。
 string data = null;
 if( userData != null )
  data = (new JavaScriptSerializer()).Serialize(userData);


 // 2. 创建一个FormsAuthenticationTicket,它包含登录名以及额外的用户数据。
 FormsAuthenticationTicket ticket = new FormsAuthenticationTicket(
  2, loginName, DateTime.Now, DateTime.Now.AddDays(1), true, data);


 // 3. 加密Ticket,变成一个加密的字符串。
 string cookieValue = FormsAuthentication.Encrypt(ticket);


 // 4. 根据加密结果创建登录Cookie
 HttpCookie cookie = new HttpCookie(FormsAuthentication.FormsCookieName, cookieValue);
 cookie.HttpOnly = true;
 cookie.Secure = FormsAuthentication.RequireSSL;
 cookie.Domain = FormsAuthentication.CookieDomain;
 cookie.Path = FormsAuthentication.FormsCookiePath;
 if( expiration > 0 )
  cookie.Expires = DateTime.Now.AddMinutes(expiration);

 HttpContext context = HttpContext.Current;
 if( context == null )
  throw new InvalidOperationException();

 // 5. 写登录Cookie
 context.Response.Cookies.Remove(cookie.Name);
 context.Response.Cookies.Add(cookie);
}这里有必要再补充一下:登录状态是有过期限制的。Cookie有 有效期,FormsAuthenticationTicket对象也有 有效期。这二者任何一个过期时,都将导致登录状态无效。按照默认设置,FormsAuthenticationModule将采用slidingExpiration=true的策略来处理FormsAuthenticationTicket过期问题。
登录页面代码:
<fieldset><legend>包含【用户信息】的自定义登录</legend> <form action="<%= Request.RawUrl %>" method="post">
 <table border="0">
 <tr><td>登录名:</td>
  <td><input type="text" name="loginName" style="width: 200px" value="Fish" /></td></tr>
 <tr><td>UserId:</td>
  <td><input type="text" name="UserId" style="width: 200px" value="78" /></td></tr>
 <tr><td>GroupId:</td>
  <td><input type="text" name="GroupId" style="width: 200px" />
  1表示管理员用户
  </td></tr>
 <tr><td>用户全名:</td>
  <td><input type="text" name="UserName" style="width: 200px" value="Fish Li" /></td></tr>
 </table>
 <input type="submit" name="CustomizeLogin" value="登录" />
</form></fieldset>
登录处理代码:
public void CustomizeLogin()
{
 // -----------------------------------------------------------------
 // 注意:演示代码为了简单,这里不检查用户名与密码是否正确。
 // -----------------------------------------------------------------

 string loginName = Request.Form["loginName"];
 if( string.IsNullOrEmpty(loginName) )
  return;


 UserInfo userinfo = new UserInfo();
 int.TryParse(Request.Form["UserId"], out userinfo.UserId);
 int.TryParse(Request.Form["GroupId"], out userinfo.GroupId);
 userinfo.UserName = Request.Form["UserName"];

 // 登录状态100分钟内有效
 MyFormsPrincipal<UserInfo>.SignIn(loginName, userinfo, 100);

 TryRedirect();
}显示用户信息的页面代码:
<fieldset><legend>用户状态</legend><form action="<%= Request.RawUrl %>" method="post">
 <% if( Request.IsAuthenticated ) { %>
  当前用户已登录,登录名:<%= Context.User.Identity.Name.HtmlEncode() %> <br />

  <% var user = Context.User as MyFormsPrincipal<UserInfo>; %>
  <% if( user != null ) { %>
   <%= user.UserData.ToString().HtmlEncode() %>
  <% } %>

  <input type="submit" name="Logon" value="退出" />
 <% } else { %>
  <b>当前用户还未登录。</b>
 <% } %>
</form></fieldset>为了能让上面的页面代码发挥工作,必须在页面显示前重新设置HttpContext.User对象。
为此,我在Global.asax中添加了一个事件处理器:
protected void Application_AuthenticateRequest(object sender, EventArgs e)
{
 HttpApplication app = (HttpApplication)sender;
 MyFormsPrincipal<UserInfo>.TrySetUserInfo(app.Context);
}
TrySetUserInfo的实现代码:

/// <summary>
/// 根据HttpContext对象设置用户标识对象
/// </summary>
/// <param name="context"></param>
public static void TrySetUserInfo(HttpContext context)
{
 if( context == null )
  throw new ArgumentNullException("context");

 // 1. 读登录Cookie
 HttpCookie cookie = context.Request.Cookies[FormsAuthentication.FormsCookieName];
 if( cookie == null || string.IsNullOrEmpty(cookie.Value) )
  return;

 try {
  TUserData userData = null;
  // 2. 解密Cookie值,获取FormsAuthenticationTicket对象
  FormsAuthenticationTicket ticket = FormsAuthentication.Decrypt(cookie.Value);

  if( ticket != null && string.IsNullOrEmpty(ticket.UserData) == false )
   // 3. 还原用户数据
   userData = (new JavaScriptSerializer()).Deserialize<TUserData>(ticket.UserData);

  if( ticket != null && userData != null )
   // 4. 构造我们的MyFormsPrincipal实例,重新给context.User赋值。
   context.User = new MyFormsPrincipal<TUserData>(ticket, userData);
 }
 catch { /* 有异常也不要抛出,防止攻击者试探。 */ }
}在多台服务器之间使用Forms身份认证
默认情况下,ASP.NET 生成随机密钥并将其存储在本地安全机构 (LSA) 中,因此,当需要在多台机器之间使用Forms身份认证时,就不能再使用随机生成密钥的方式, 需要我们手工指定,保证每台机器的密钥是一致的。
用于Forms身份认证的密钥可以在web.config的machineKey配置节中指定,我们还可以指定加密解密算法:
<machineKey
 decryption="Auto" [Auto | DES | 3DES | AES]
 decryptionKey="AutoGenerate,IsolateApps" [String]
/>
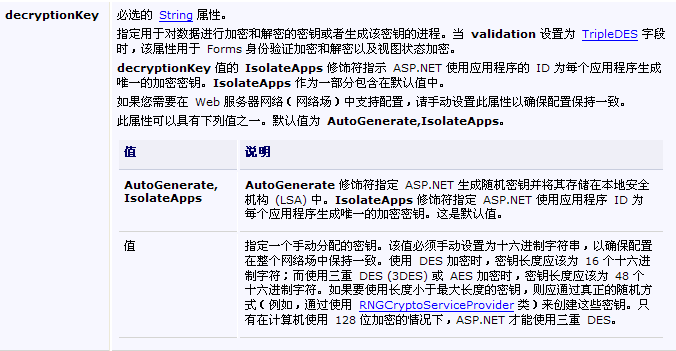
关于这二个属性,MSDN有如下解释:
在客户端程序中访问受限页面
这一小节送给所有对自动化测试感兴趣的朋友。
有时我们需要用代码访问某些页面,比如:希望用代码测试服务端的响应。
如果是简单的页面,或者页面允许所有客户端访问,这样不会有问题,但是,如果此时我们要访问的页面是一个受限页面,那么就必须也要像人工操作那样:先访问登录页面,提交登录数据,获取服务端生成的登录Cookie,接下来才能去访问其它的受限页面(但要带上登录Cookie)。
注意:由于登录Cookie通常是加密的,且会发生变化,因此直接在代码中硬编码指定登录Cookie会导致代码难以维护。
在前面的示例中,我已在web.config为MyInfo.aspx设置过禁止匿名访问,如果我用下面的代码去调用:
private static readonly string MyInfoPageUrl = "http://localhost:51855/MyInfo.aspx";

static void Main(string[] args)
{
 // 这个调用得到的结果其实是default.aspx页面的输出,并非MyInfo.aspx
 HttpWebRequest request = MyHttpClient.CreateHttpWebRequest(MyInfoPageUrl);
 string html = MyHttpClient.GetResponseText(request);

 if( html.IndexOf("<span>Fish</span>") > 0 )
  Console.WriteLine("调用成功。");
 else
  Console.WriteLine("页面结果不符合预期。");
}此时,输出的结果将会是:
页面结果不符合预期。
如果我用下面的代码:
private static readonly string LoginUrl = "http://localhost:51855/default.aspx";
private static readonly string MyInfoPageUrl = "http://localhost:51855/MyInfo.aspx";

static void Main(string[] args)
{
 // 创建一个CookieContainer实例,供多次请求之间共享Cookie
 CookieContainer cookieContainer = new CookieContainer();

 // 首先去登录页面登录
 MyHttpClient.HttpPost(LoginUrl, "NormalLogin=aa&loginName=Fish", cookieContainer);

 // 此时cookieContainer已经包含了服务端生成的登录Cookie

 // 再去访问要请求的页面。
 string html = MyHttpClient.HttpGet(MyInfoPageUrl, cookieContainer);

 if( html.IndexOf("<span>Fish</span>") > 0 )
  Console.WriteLine("调用成功。");
 else
  Console.WriteLine("页面结果不符合预期。");

 // 如果还要访问其它的受限页面,可以继续调用。
}此时,输出的结果将会是:
调用成功。
说明:在改进的版本中,我首先创建一个CookieContainer实例,它可以在HTTP调用过程中接收服务器产生的Cookie,并能在发送HTTP请求时将已经保存的Cookie再发送给服务端。在创建好CookieContainer实例之后,每次使用HttpWebRequest对象时,只要将CookieContainer实例赋值给HttpWebRequest对象的CookieContainer属性,即可实现在多次的HTTP调用中Cookie的接收与发送,最终可以模拟浏览器的Cookie处理行为,服务端也能正确识别客户的身份。
ASP.NET Forms身份认证就说到这里,如果您对ASP.NET Windows身份认证有兴趣,那么请继续关注相关文章。
更多ASP.NET Forms身份认证详解相关文章请关注PHP中文网!


