这时,我们肯定会经常遇到这样一个困扰:操作服务器时因某事中断,回头继续操作的时候肯定会ifconfg确认下是否是我要操作的服务器,因为无法从表象识别。
所以,我们很有必要将这个PS1命令行提示符优化一下。每个运维攻城狮肯定都有自己的习惯,不过我还是推荐一个服务器批量管理中比较使用的PS1格式吧!
PS1是神马?PS1是linux里头的一个默认的环境变量,至于当前系统的PS1是如何设置的,你可以使用命令“env|grep PS1”来查看 。
其实PS1就是用来设置命令提示符格式的环境变量。
下面贴一下PS1的配置参数:
\d :代表日期,格式为weekday month date,例如:"Mon Aug 1" \H :完整的主机名称。例如:我的机器名称为:fc4.linux,则这个名称就是fc4.linux \h :仅取主机的第一个名字,如上例,则为fc4,.linux则被省略 \t :显示时间为24小时格式,如:HH:MM:SS \T :显示时间为12小时格式 \A :显示时间为24小时格式:HH:MM \u :当前用户的账号名称 \v :BASH的版本信息 \w :完整的工作目录名称。家目录会以 ~代替 \W :利用basename取得工作目录名称,所以只会列出最后一个目录 \# :下达的第几个命令 \$ :提示字符,如果是root时,提示符为:# ,普通用户则为:$
当然,为了更好的识别,我们还可以加入一些颜色设置,这个就不赘述了,百度一下shell颜色即可,当然记得参考下文的PS1进行自定义。
为了更好的区分服务器,我建议使用如下格式:
[username@ipaddress /pwd ]#|$ 比如: [root@192.168.1.1 /data/ ]
所以PS1可以如下设置:
export PS1='\[\e[32m\][\u@192.168.1.1:\[\e[m\]\[\e[33m\]\w\[\e[m\]\[\e[32m\]]\[\e[m\]\$ '
但是机器太多,这个IP总不能每次手动修改,所以还是写个脚本来修改吧!(当然,你也可以先获取IP,赋值变量加入到PS1)
脚本很简单:
#!/bin/sh ######################################################################### # Update PS1 like [root@192.168.1.113 /data]# # ######################################################################### #先判断网卡是否存在,我这边eth1是内网网卡 ifconfig eth1 >/dev/null 2>&1 if [[ $? != 0 ]] then echo 'interface eth1 not exsit!'; exit 1 fi #Centos/Redhat 7 ifconfig显示的结果不是 inet addr: 而是 inet 直接加IP,所以这里需要判断下: function Get_eth1IP() { if [[ $1 -eq 7 ]] then #for centos 7 eth1_IP=$(ifconfig eth1 |awk '/inet / {print $2}'|awk '{print $1}') else eth1_IP=$(ifconfig eth1 |awk -F":" '/inet addr:/ {print $2}'|awk '{print $1}') fi } test -f /etc/redhat-release && grep 7 /etc/redhat-release >/dev/null 2>&1 && Get_eth1IP 7 test -f /etc/centos-release && grep 7 /etc/redhat-release >/dev/null 2>&1 && Get_eth1IP 7 || Get_eth1IP echo $eth1_IP | grep -E "[0-9]{1,3}\.[0-9]{1,3}\.[0-9]{1,3}\.[0-9]{1,3}" >/dev/null 2>&1 if [[ $? != 0 ]] then echo 'eth1_IP is empty!' exit 1 fi function Export() { echo "export PS1='\[\e[32m\][\u@${eth1_IP}:\[\e[m\]\[\e[33m\]\w\[\e[m\]\[\e[32m\]]\[\e[m\]\\$ '">>${1} && \ echo -e "\033[32m Update \033[0m \033[33m${1}\033[33m \033[32mSuccess! Please relogin your system for refresh... \033[0m" } function home_env() { if [[ ! -z $1 ]] then home=$1 else home=/root fi #有的用户可能会在家目录下自定义一些配置,即 .proflie这个隐藏文件,所以也需要更新 test -f $home/.profile && ( sed -i '/export PS1=/d' $home/.profile Export $home/.profile ) } #获取当前用户id,如果是root组的则可以操作/etc/profile userid=$(id | awk '{print $1}' | sed -e 's/=/ /' -e 's/(/ /' -e 's/)/ /'|awk '{print $2}') if [[ $userid = 0 ]] then #for all sed -i '/export PS1=/d' /etc/profile Export /etc/profile #for root home_env #如果其他用户需要修改,只要开启一下三行,并将other修改成用户名 #id other >/dev/null 2>&1 && ( # home_env ~other #) else #for userself home_env ~ fi
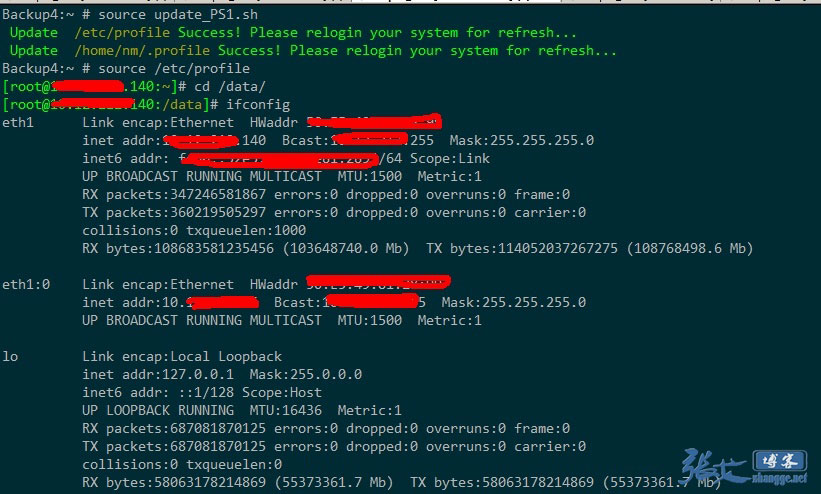
好了,最后直接 source ./update_PS1.sh 即可看到效果:

重新登陆或source /etc/profile,就可以看到效果了:

这样设置之后,就能清晰的知道现在操作的是服务器是哪一台,而不至于混淆。
更多Linuxs practical implementation method of PS1 command prompt format in batch server management相关文章请关注PHP中文网!


