This article will introduce the basic graphics in Canvas.
The basis of graphics - Path
In Canvas, all basic graphics are based on paths. That is to say, when we call the lineTo, rect and other methods of 2dContext, we actually add them to the existing context path collection. Add some path points, and when you finally use the fill or stroke method to draw, these path points will be used to fill or draw lines.
Before each time you start drawing a path, you should use the context.beginPath() method to tell the Context object to start drawing a new path. Otherwise, the next drawn path will overlap with the previously drawn path. When filling or drawing a border, Problems will arise. After drawing the path, you can directly use the context.closePath() method to close the path, or close the path manually. In addition, if the path is not closed when filling, the Context will automatically call the closePath method to close the path.
Basic path method
1. beginPath, closePath
These two methods have been introduced before, and are used to notify Context to start a new path and close the current path respectively.
When using paths in Canvas, you should maintain a good habit and call the beginPath method every time before starting to draw a path. Otherwise, the drawn effect will be ugly and the performance will be seriously affected.
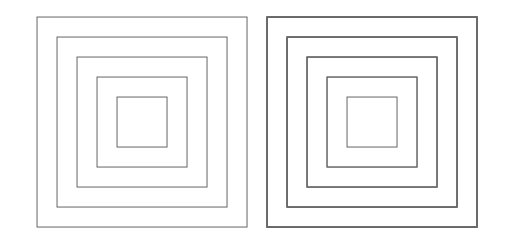
In the picture below, the graphic on the left calls beginPath once before each rectangle is drawn to clear the previous path and start drawing a new path again, while the graphic on the back only calls beginPath once before drawing all graphics. To clear the path, therefore, although the border color used here is #666, the color of the graphic on the right is darker than that on the left, because every time stroke is used to draw the border, the previous path will be drawn again, and the superimposed color will be Deeper than before.

<canvas id="canvas" width="500"    style="max-width:90%"></canvas>
<script type="text/javascript">
var canvas = document.getElementById("canvas");
var ctx = canvas.getContext("2d");
ctx.strokeStyle = "#666";
function useBeginPath() {
for (var i = 0; i < 5; ++i) {
ctx.beginPath();
ctx.rect(10 + i*20, 10 + i*20, 210 - i*40, 210 - i*40);
ctx.stroke();
}
}
function notUseBeginPath() {
ctx.beginPath();
for (var i = 0; i < 5; ++i) {
ctx.rect(240 + i*20, 10 + i*20, 210 - i*40, 210 - i*40);
ctx.stroke();
}
}
useBeginPath();
notUseBeginPath();
</script>When the number of paths in the Context is small, the performance is acceptable if the display effect is not considered. However, if the number of paths in the Context is large, beginPath is not used before starting to draw a new path, because every Every time you draw, you have to redraw the previous path, and the performance will drop exponentially.
Therefore, unless there are special needs, beginPath must be called to start a new path every time before starting to draw a path.
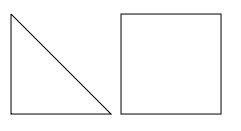
2. Move and straight line moveTo, lineTo, rect

<canvas id="canvas" width="500"    style="max-width:90%"></canvas>
<script type="text/javascript">
var canvas = document.getElementById("canvas");
var ctx = canvas.getContext("2d");
ctx.beginPath();
ctx.moveTo(10, 10);
ctx.lineTo(110,110);
ctx.lineTo(10, 110);
ctx.lineTo(10, 10);
ctx.stroke();
ctx.beginPath();
ctx.rect(120, 10, 100, 100);
ctx.stroke();
</script>void moveTo(in float x, in float y);
When drawing a path in Canvas, it is generally not necessary to specify a starting point. The default starting point is The end point of the last drawn path, so if you need to specify the starting point, you need to use the moveTo method to specify the location to move to.
void lineTo(in float x, in float y);
lineTo method draws a direct path to the specified location. After calling the lineTo method, the starting point of drawing inside the Context will move to the end point of the straight line.
void rect(in float x, in float y, in float w, in float h); The
rect method is used to draw a rectangular path, specifying the upper left corner position, width and height through parameters. After calling rect , the drawing starting point of Context will move to the upper left corner of the rectangle drawn by rect . The
rect method is a little different from the arc method to be introduced later and other path methods. They use parameters to specify the starting point, rather than using the starting point maintained internally by Context.
3. Curve arcTo, arc, quadraticCurveTo, bezierCurveTo
void arcTo(in float x1, in float y1, in float x2, in float y2, in float radius);
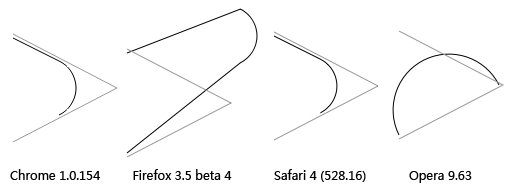
According to the WHATWG document, this method is to draw An arc that is tangent to two rays. One of the two rays is drawn through the Context and the end point is (x1, y1). The other one is through (x2, y2) and the end point is (x1, y1). , this arc is the smallest arc tangent to these two rays. After calling the arcTo method, add the tangent point between the arc and the ray (x1, y1)-(x2, y2) to the current path as the starting point for the next drawing.
In testing, it was found that Firefox and Opera currently do not support this method well, and only Chrome and Safari 4 can draw the correct path.

图中的的两条灰色直线是偏移 4 个像素后的两条射线所在的位置。
<canvas id="canvas" width="500"    style="max-width:90%"></canvas>
<script type="text/javascript">
var canvas = document.getElementById("canvas");
var ctx = canvas.getContext("2d");
ctx.beginPath();
ctx.strokeStyle = "#000";
ctx.translate(200, 200);
ctx.moveTo(10, 10);
ctx.arcTo(110, 60, 10, 110, 30);
ctx.stroke();
ctx.beginPath();
ctx.strokeStyle = "#999";
ctx.moveTo(10, 6);
ctx.lineTo(114, 60);
ctx.lineTo(10, 114);
ctx.stroke();
</script>void arc(in float x, in float y, in float radius, in float startAngle, in float endAngle, in boolean anticlockwise);
arc 方法用来绘制一段圆弧路径,通过圆心位置、起始弧度、终止弧度来指定圆弧的位置和大小,这个方法也不依赖于 Context 维护的绘制起点。而在画圆弧时的旋转方向则由最后一个参数 anticlockwise 来指定,如果为 true 就是逆时针,false 则为顺时针。
void quadraticCurveTo(in float cpx, in float cpy, in float x, in float y);
quadraticCurveTo 方法用来绘制二次样条曲线路径,参数中 cpx 与 cpy 指定控制点的位置,x 和 y 指定终点的位置,起点则是由 Context 维护的绘制起点。
void bezierCurveTo(in float cp1x, in float cp1y, in float cp2x, in float cp2y, in float x, in float y);
bezierCurveTo 方法用来绘制贝塞尔曲线路径,它与 quadraticCurveTo 相似,不过贝塞尔曲线有两个控制点,因此参数中的 cp1x, cp1y, cp2x, cp2y 用来指定两个控制点的位置,而 x 和 y 指定绺的位置。

<canvas id="canvas" width="500"    style="max-width:90%"></canvas>
<script type="text/javascript">
var canvas = document.getElementById("canvas");
var ctx = canvas.getContext("2d");
ctx.translate(10, 10);
ctx.beginPath();
ctx.arc(50, 50, 50, 0, Math.PI, true);
ctx.stroke();
// quadraticCurveTo
ctx.beginPath();
ctx.strokeStyle = "#000";
ctx.moveTo(110, 50);
ctx.quadraticCurveTo(160, 0, 210, 50);
ctx.stroke();
ctx.beginPath();
ctx.strokeStyle = "red";
ctx.moveTo(110, 50);
ctx.lineTo(160, 0);
ctx.lineTo(210, 50);
ctx.stroke();
// bezierCurveTo
ctx.beginPath();
ctx.strokeStyle = "#000";
ctx.moveTo(220, 50);
ctx.bezierCurveTo(250, 0, 280, 10, 320, 50);
ctx.stroke();
ctx.beginPath();
ctx.strokeStyle = "red";
ctx.moveTo(220, 50);
ctx.lineTo(250, 0);
ctx.lineTo(280, 10);
ctx.lineTo(320, 50);
ctx.stroke();
</script>4. fill, stroke, clip
fill 与 stroke 这两个方法很好理解,分别用来填充路径与绘制路径线条。
clip 方法用来给 Canvas 设置一个剪辑区域,在调用 clip 方法之后的代码只对这个设定的剪辑区域有效,不会影响其他地方,这个方法在要进行局部更新时很有用。默认情况下,剪辑区域是一个左上角在 (0, 0),宽和高分别等于 Canvas 元素的宽和高的矩形。

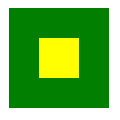
在画这个图时,虽然两次都是使用 fillRect(0, 0, 100, 100) 填充了一个 100x100 大小矩形,但是显示的结果却是第二次填充的只是中间的一小块,这是因为在两次填充之间使用 clip 方法设定了剪辑区域,这样第二次填充时只会影响到所设定的中间那一小部分区域。
<canvas id="canvas" width="500"    style="max-width:90%"></canvas>
<script type="text/javascript">
var canvas = document.getElementById("canvas");
var ctx = canvas.getContext("2d");
ctx.translate(10, 10);
// fill a green rectangle
ctx.fillStyle = "green";
ctx.fillRect(0, 0, 100, 100);
// set the clipping region
ctx.beginPath();
ctx.rect(30, 30, 40, 40);
ctx.clip();
ctx.stroke();
// fill a yellow rectangle
ctx.fillStyle = "yellow";
ctx.fillRect(0, 0, 100, 100);
</script>5. clearRect, fillRect, strokeRect
这三个方法并不是路径方法,而是用来直接处理 Canvas 上的内容,相当于 Canvas 的背景,调用这三个方法也不会影响 Context 绘图的起点。
要清除 Canvas 上的所有内容时,可以直接调用 context.clearRect(0, 0, width, height) 来直接清除,而不需要使用路径方法绘制一个与 Canvas 同等大小的矩形路径再使用 fill 方法去清除。
结语
通过 Canvas 的路径方法,可以使用 Canvas 处理一些简单的矢量图形,这样在缩放时也不会失真。不过 Canvas 的路径方法也不是很强大,至少连个椭圆的路径都没有……
这篇写得有点长了,Cnavas 中路径相关的内容就写这么多,后面再讲讲 Canvas 其他的东西。
以上就是HTML5 Canvas 起步(2) - 路径的内容,更多相关内容请关注PHP中文网(m.sbmmt.com)!


