Detailed explanation of the steps to install MySQL under Linux system
This article introduces the installation process and installation screenshots of MySql using officially compiled binary files under Linux system. This installation method is fast and the installation steps are simple!
The following are The records of my work introduce the installation process and installation screenshots of MySql using officially compiled binary files under the Linux system. This installation method is fast and the installation steps are simple!
Friends who need it can follow the steps below Install, you can quickly install MySql, I hope it can help everyone:)!
1. Download the binary installation package of the Linux version of mysql:
Address: http://dev.mysql.com/download...
Here I am Rename the installation package to: tingyun-mysql-5.6.22.tar.gz
Note: You don’t need to rename it according to your own needs
2. Unzip the installation package:
Unzip the installation package at the location where you need to install it : The execution command is as follows:
cd /opt
tar –xPf tingyun-mysql-5.6.22.tar.gz
The screenshot is as follows:
3. Create the mysql installation directory and modify the directory permissions:
The execution command is as follows:
Create the mysql directory: mkdir mysql
Open the mysql directory: cd mysql
Create the data directory: mkdir data
Note: Because the mysql service process mysqld will access the data directory when it is running, you need to create the data directory
Execute the following command in the mysql directory: used to set the owner of the directory to the mysql user :
chown mysql:mysql /opt/mysql –R
The screenshot is as follows:

5. Start mysql
Enter the init.d directory and execute the command:
cd /etc/init.d/
 mysqld restart
If you don’t want to restart, you can start it manually and execute the following command:
service mysqld start
You can also directly Execute the following command in the mysql directory:
/etc/init.d/mysqld restart
The screenshot is as follows:

6. Create a soft link for mysql
Execute the following command:
ln –s /opt/mysql/bin/mysql /user/bin
The screenshot is as follows:

7. Modify the mysql configuration
Execute the following command to edit:
vim .bash_profile
Instructions: Configure the directory using ./mysql (such as ./mysql in the bin directory)
(1) Write
export PATH=$PATH:/usr/local/mysql/bin(你的安装bin目录)
at the bottom of the bash_profile file Execute: wq command to save and exit
(2) Execute the source command to make the system configuration take effect:
source /.bash_profile
The screenshot is as follows:

8. Security Configuration Wizard
After Mysql is installed, you need to configure mysql securely according to the security configuration:
Execute as follows Command to configure security for the mysql root user:
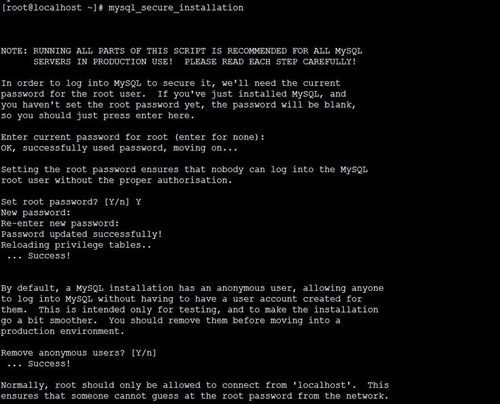
mysql_secure_installation
Set a new password, select "Y", and enter the new password twice (the second time is used as a confirmation password).
Delete anonymous users, select "Y"
The screenshot is as follows:

You can also set a password for the root user in the following way:
Execute the following command:
mysql –uroot –pnbs2o13
The screenshot is as follows:

View The content of the mysql installation directory is as follows:
 9. Test after mysql installation:
(1) Check whether mysql has been started:
Use any of the following three commands:
netstat -tl | grep mysql
ps -aux | grep mysqld
netstat -lntup|grep 3306
When the mysql related processes are printed out on the screen, you will see something similar to the following:
cp 0 0 *:mysql *:* LISTEN
Indicates that mysql has been started successfully!
(2) To use mysql, you need the following command to enter mysql:
mysql -u root -p
(3) View version:
select version();
At this point, mysql has been installed and tested successfully, you can use it with confidence:)


