

 Mobile Game Tutorial
Mobile Game Guide
Dead Island 2: My Mailman Was A Zombie Quest Walkthrough
Mobile Game Tutorial
Mobile Game Guide
Dead Island 2: My Mailman Was A Zombie Quest Walkthrough
Dead Island 2: My Mailman Was A Zombie Quest Walkthrough

Dead Island 2 has several 'Lost and Found' quests which can be described as treasure hunts, with the rewards tending to be worth the completion of said quests. While you are out there beating zombies to a pulp, having a brand-new weapon you collect from some of these hunts will be a benefit for the rest of your playthrough.

My Mailman Was a Zombie is one of the earlier Lost and Found quests but has a few requirements before you can begin it. A rare rifle awaits you as a reward for this quest, so we recommend you complete it while you progress in the story.
How To Start The 'My Mailman Was A Zombie' Quest

To start the quest, you first need to have completed the Serengeti Siren story quest, which is the one where you meet up with Sam B to get guns. At the start of the Flushed quest, you will be at Emma Jaunt's mansion again in Bel-Air, which is ideal as this is the map on which the mailman Lost and Found quest takes place.
We also completed the #Clickbait and The Death Of The Party side quests in the area before coming across this Lost and Found quest.
Follow the Alpine Drive road (or Access Road 782) from Emma Jaunt's mansion, taking the necessary shortcuts until you reach close to the GOAT Pen as shown in the map above.
You will notice a van tucked away down below the side of another nearby mansion owned by Curtis Sinclair. It is here where you can find a 'Signature Required' note next to a large crate. Pick up the note and the quest will start.
My Mailman Was A Zombie Package Locations

The note informs you of several locations where the Mailman (Wayne) has to deliver packages, which is exactly where you will also need to make some pit stops to check out the packages and try to find keys to the crate. The locations are as follows:
- 59 Alpine Drive: The GOAT Pen
- 143 Glitterati Corner: Mr. and Mrs. Doe
- 70 Alpine Drive: Colt Swanson
The easiest order to visit these package spots is as listed above. This will keep you on the correct path to the final packages at Colt Swanson's mansion, and you can grab the other two on the way.
GOAT Pen Packages

The first set of packages is very simple to find since you just need to walk forward from the locked crate's location, and you can follow the driveway leading down to the GOAT Pen. As you approach the bottom side door, there will be a presumably dead zombie lying against a wall and the packages can be seen next to the palm tree.
Go up to the packages and interact with them to have the player character give some dialogue. You are now ready to move on to the next package. Be aware that the zombie next to the package will suddenly come alive and others will run down, so prepare for a short fight after interacting.
Mr. And Mrs. Doe's Packages

Next, you will want to head to near the top left of Bel-Air, which is where Glitterati Corner's road can be found. On the map, the star of the older gentleman (Curtis Sinclair) is exactly where you will need to visit. Outside the driveway, you will notice the packages stacked up against the gate which leads into the house.
Run up and interact with them, and you can now finish off the delivery route undertaken by the mailman by visiting Colt Swanson's mansion.
Colt Swanson Packages

The first mansion you ever find in Bel-Air is the Colt Swanson mansion, and it is here you need to head back to. Go up the left side of the mansion by following the road to the right a bit from your last location and then shortcut through the area.
At the front of the mansion, you will find the garage and this is where you will notice there are no packages to collect, but instead Wayne The Mailman himself is standing in the way.
How To Defeat Wayne The Mailman
To get the keys needed to open up the crate and complete the Lost and Found quest you have to defeat Wayne. This zombie can spew caustic acid at you, so keep your distance
when he bellows up and looks as though he is about to vomit.If you have a spare rifle and bullets, use them on Wayne's head as this will deal with him very quickly. If you are all out of bullets, a weapon with range, like a Pole Saw
, will be a good option. Use an electric star on your Curveball loadout for some assistance too, since it will keep Wayne still for a few moments.An electrified Pole Saw is what we used for the battle, and it came in extremely handy.
The flow of the battle should have you running around Wayne and going in for some jabs behind him when he is in the midst of throwing up acid
.Charged attacks are your best friend here
when you have ample opportunity to get a few strikes in.Heal up with med-kits when you need them and this battle will be over in no time.
When Wayne has fallen, you can grab the mailman's keys and head back to the locked crate to open it
.My Mailman Was A Zombie Quest Rewards

Once you open the crate, the My Mailman Was a Zombie quest will be completed, netting you 2,000 XP and 100 cash for your troubles. Alongside these, the major reward of the quest, a rifle named Raven, will pop out of the chest for you to pick up from the ground
.<script> window.adsNinja = window.adsNinja || {}; window.adsNinja.queue = window.adsNinja.queue || []; window.adsNinja.queue.push(function(){ window.adsNinja.queue.push(function(){ var fallbackContent = ` <video> <source src='https://video.thegamerimages.com/2024/12/dead-island-2-wayne-the-mailman-battle-1735476416.mp4' type='video/mp4'> Your browser does not support the video tag. `; try{ var result = window.adsNinja.monetizeVideo('.emaki-video-player-52d51168b07a6692', JSON.parse(`{\"name\":\"Instream-InContent\",\"groupName\":\"content\"}`), JSON.parse(`{\"trackingId\":\"in-content\",\"playlist\":[{\"title\":\"Dead Island 2 Wayne The Mailman Battle\",\"description\":\"\",\"length\":\"0:46\",\"mimeType\":\"video\/mp4\",\"url\":\"https:\/\/video.thegamerimages.com\/2024\/12\/dead-island-2-wayne-the-mailman-battle-1735476416.mp4\",\"thumbnailLink\":\"https:\/\/static1.thegamerimages.com\/wordpress\/wordpress\/wp-content\/uploads\/wm\/2024\/12\/wayne-the-mailman-dead-island-2-1.jpg?fit=crop&w=1024&h=576\",\"textTracks\":[{\"kind\":\"subtitles\",\"label\":\"English\",\"language\":\"en\",\"url\":\"https:\/\/video.thegamerimages.com\/2024\/12\/dead-island-2-wayne-the-mailman-battle-1735476416-1735476677.vtt\",\"default\":false}]}]}`)); if(!result){ console.warn('Failed to load AdsNinja video player.'); document.getElementById('emaki-video-player-52d51168b07a6692').innerHTML = fallbackContent; } } catch(error){ console.warn('Failed to load AdsNinja video player.'); document.getElementById('emaki-video-player-52d51168b07a6692').innerHTML = fallbackContent; } }); }); </script>This is an excellent rifle for the middle section of the game's story. It has a base power of 235 with Precision Shots and High Caliber perks. There is a slot for an additional perk and, of course, a mod on top of that. The last thing many Zombies will witness before falling is the lens of the Raven rifle that you will now be using.

The above is the detailed content of Dead Island 2: My Mailman Was A Zombie Quest Walkthrough. For more information, please follow other related articles on the PHP Chinese website!

Hot AI Tools

Undresser.AI Undress
AI-powered app for creating realistic nude photos

AI Clothes Remover
Online AI tool for removing clothes from photos.

Undress AI Tool
Undress images for free

Clothoff.io
AI clothes remover

AI Hentai Generator
Generate AI Hentai for free.

Hot Article
Hot Tools

Notepad++7.3.1
Easy-to-use and free code editor

SublimeText3 Chinese version
Chinese version, very easy to use

Zend Studio 13.0.1
Powerful PHP integrated development environment

Dreamweaver CS6
Visual web development tools

SublimeText3 Mac version
God-level code editing software (SublimeText3)
Hot Topics
 1378
1378
 52
52

 R.E.P.O. Energy Crystals Explained and What They Do (Yellow Crystal)
Mar 18, 2025 am 12:07 AM
R.E.P.O. Energy Crystals Explained and What They Do (Yellow Crystal)
Mar 18, 2025 am 12:07 AM
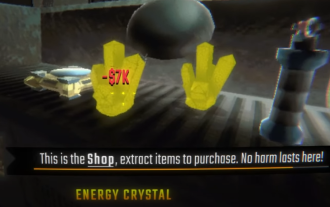
I bought expensive weapons or drones in R.E.P.O. but found that the energy was exhausted and became useless? Don't worry, you don't have to spend $50,000 on replacements, just charge your gear! That strange machine at the back of your truck is not a decoration. Here are how to get energy crystals and use them to keep your gear running continuously to avoid bankruptcy. More Reads: All R.E.P.O. Items How to get energy crystal You can buy energy crystals from the service store between levels. They usually cost between $7,000 and $9,000 — while expensive, they are far cheaper than repurchasing gear. In the first few levels, no purchase is required. You don't need them for the time being, so
 R.E.P.O. Best Graphic Settings
Mar 18, 2025 am 01:33 AM
R.E.P.O. Best Graphic Settings
Mar 18, 2025 am 01:33 AM
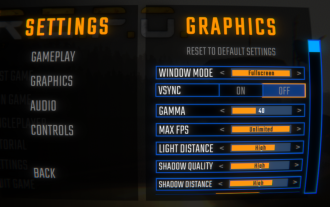
R.E.P.O. Game Screen Setting Guide: How to improve frame rate while ensuring picture quality? This article will guide you to optimize game settings and find the best balance point. Step 1: Full Screen Mode and Frame Rate Adjustment Before adjusting other settings, make sure the game is running in the best mode: Display Mode: Full Screen - Always use Full Screen Mode for optimal performance. Window mode will reduce the frame rate. Vertical Sync (V-Sync): Off - Unless a screen tear occurs, turn off vertical synchronization for a smoother gaming experience. Maximum FPS: Unlimited - If your computer is configured strongly, you can set it to Unlimited. Otherwise, it is recommended to limit it to 60 frames or match your monitor refresh rate. second
 Assassin's Creed Shadows: Seashell Riddle Solution
Mar 28, 2025 am 01:58 AM
Assassin's Creed Shadows: Seashell Riddle Solution
Mar 28, 2025 am 01:58 AM
Assassin's Creed: Shadows boasts a vast world brimming with activities beyond the main storyline. Side missions and various encounters significantly enrich the immersive experience of in-game Japan. One particularly memorable encounter is the Seashe
 R.E.P.O. How to Fix Audio if You Can't Hear Anyone
Mar 17, 2025 pm 06:10 PM
R.E.P.O. How to Fix Audio if You Can't Hear Anyone
Mar 17, 2025 pm 06:10 PM
Can't hear other players' voices in the R.E.P.O. game? Even if your microphone is working properly, it can be a problem caused by audio settings or device conflicts. Here are some effective solutions to help you restore your voice chat functionality. 1. Check the output device Open the audio settings of R.E.P.O. and check the output device settings. If set to "Default", manually select your headset or speaker. Restart the game and test voice chat again. 2. Adjust Windows sound settings If R.E.P.O. does not output the sound to the correct device, check the Windows Sound Settings: Right-click the speaker icon in the taskbar and select Sound Settings. Under "Output",
 R.E.P.O. Chat Commands and How to Use Them
Mar 17, 2025 pm 06:13 PM
R.E.P.O. Chat Commands and How to Use Them
Mar 17, 2025 pm 06:13 PM
R.E.P.O. provides some convenient chat instructions in the game to help you optimize the gaming experience. These instructions do not affect game balance, but are useful for taking clear screenshots or setting up visuals for content creation. How to use chat commands in R.E.P.O. To activate the command, please follow the steps below: Press the “T” key to open the chat window. Enter the “/” symbol, and then enter the command you want to use. Press Enter and the effect will take effect. To cancel the effect, enter the same command again or restart the game. Please note that these commands are only valid in multiplayer games and are not available in single player mode. Available chat commands /cinematic commands remove the game world
 Will R.E.P.O. Have Crossplay?
Mar 18, 2025 am 01:07 AM
Will R.E.P.O. Have Crossplay?
Mar 18, 2025 am 01:07 AM
At present, "R.E.P.O." does not support cross-platform games, and the official has not confirmed whether it will support it in the future. The game is currently only available on PC platforms (early experience through Steam), so console players are temporarily unable to play. Why does R.E.P.O. not support cross-platform games? Released on PC platforms only – The console version of the game has not been announced yet. Early Access Phase – Developers are still refining the game, and cross-platform gaming is not a current priority. Host porting is not confirmed – without a host version, cross-platform gaming is simply impossible. Will cross-platform games be supported in the future? There is no official news on whether R.E.P.O. will launch a console version and whether it will support cross-platform games. However,
 Where to find the Crane Control Keycard in Atomfall
Mar 28, 2025 am 02:17 AM
Where to find the Crane Control Keycard in Atomfall
Mar 28, 2025 am 02:17 AM
In Atomfall, discover hidden keys and passages, including multiple ways to access key locations. This guide focuses on using the Crane Control Keycard for easy, unguarded Entry to Skethermoor Prison, bypassing the need to cooperate with Captain Sims
 Saving in R.E.P.O. Explained (And Save Files)
Mar 19, 2025 am 12:22 AM
Saving in R.E.P.O. Explained (And Save Files)
Mar 19, 2025 am 12:22 AM
Want to save progress in R.E.P.O.? Good news: You can! Bad news: Only under very specific conditions…but this will change soon. Read more about the upcoming update that involves a new save menu and multiple save slots. Save mechanism Complete the game run once, then exit from the menu and do not start another game immediately. If you do it correctly, your progress will be saved to continue from where you last left. If everyone dies, your save will be deleted – no second chance. The game will simply erase your existence as if you never existed. Basically, if you complete a level and want to keep your progress, make sure to stop and exit before jumping into another task. This means
