"Create APIs in 5 minutes with FastAPI. A modern, high-performance Python framework, FastAPI makes it easy to build powerful web applications."
Installation
Install FastAPI and uvicorn (ASGI server) using pip:
pip install fastapi uvicorn
pip install fastapi
Lets create our API
Open notepad and paste the below contents, save the file as data.json (we will adding data to this file using the POST method and will be retrieving records using the GET method
data.json
[
   {
      "name": "John",
      "age": 25
   },
   {  "name": "Smith",
      "age": 27
   }
]
Now create a new python file, name it as app.py and paste the below code
# This section imports necessary modules and classes from the FastAPI library and Python's standard library. It imports FastAPI for creating the web application, HTTPException for raising HTTP exceptions, List for type hints, and json for working with JSON data.

from fastapi import FastAPI, HTTPException
from typing import List
import json

# This creates an instance of the FastAPI class, which will be the main application instance for handling HTTP requests.
app = FastAPI()

# This block reads the content of the "data.json" file using a context manager (with statement) and loads the JSON data into the initial_data variable.
with open("data.json", "r") as file:
    initial_data = json.load(file)

# This line initializes the data variable with the loaded JSON data, effectively creating a list of dictionaries containing user information.
data = initial_data

# This decorator (@app.get(...)) defines a GET endpoint at the "/users" URL. It uses the get_users function to handle the request. The response_model parameter specifies the expected response model, which is a list of dictionaries in this case.
@app.get("/users", response_model=List[dict])
async def get_users():
    return data

# This decorator (@app.post(...)) defines a POST endpoint at the "/users" URL. It uses the create_user function to handle the request. The response_model parameter specifies the expected response model, which is a single dictionary in this case.
# The create_user function attempts to append the received user dictionary to the data list. If successful, it constructs a response dictionary indicating the success. If an exception occurs during the attempt (e.g., due to invalid data), it constructs a response dictionary indicating an error.
@app.post("/users", response_model=dict)
async def create_user(user: dict):
    try:
        data.append(user)
        response_data = {"message": "User created successfully", "user": user}
    except:
        response_data = {"message": "Error creating user", "user": user}
    return response_data

# This function uses a context manager to open the "data.json" file in write mode and then uses json.dump to write the contents of the data list back to the file, formatting it with an indentation of 4 spaces.
def save_data():
    with open("data.json", "w") as file:
        json.dump(data, file, indent=4)

# This decorator (@app.on_event(...)) defines a function that will be executed when the FastAPI application is shutting down. In this case, it calls the save_data function to save the data back to the JSON file before the application exits.
@app.on_event("shutdown")
async def shutdown_event():
    save_data()

# This block checks if the script is being run directly (not imported as a module). If it is, it uses the uvicorn.run function to start the FastAPI application on host "0.0.0.0" and port 8000. This is how you launch the application using the Uvicorn ASGI server.
if __name__ == "__main__":
    import uvicorn
    uvicorn.run(app, host="0.0.0.0", port=8000)
Run the app.py, Uvicorn server will start a new process to handle incoming HTTP requests. once the server is up and running, open Postman, create a new GET request with the URL: http://0.0.0.0:8000/users and click send


You will see a JSON response with the list of users from the data.json file.
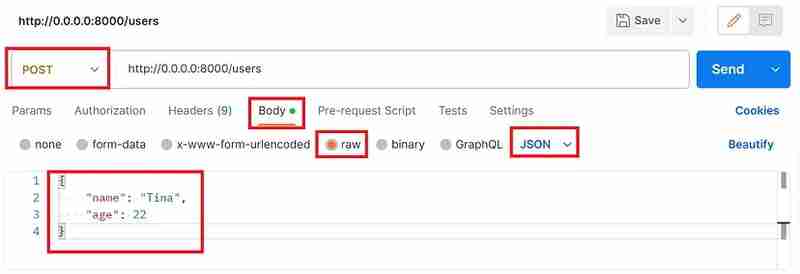
Now lets add an user to this file with POST method. Create a new request, select the POST method, click on body, select raw, select JSON from the dropdown and paste the below JSON as a payload to add a new user
{
    "name": "Tina",
    "age": 22
}

Once you click send, you will get a response back if the user is added successfully with a status code of 200 OK

And that is it, we have successfully created an API with GET/POST method to view and add users to a file. go back to the GET request and click send, you should now see the user Tina also listed in the response of the API.
One amazing thing about FastAPI is that it automatically generates Swagger documentation for your API endpoints, making it easier for developers to understand and use your API effectively.
If you open a browser and type http://localhost:8000/docs you will see a swagger document for the API

Please note, this is just an basic example of creating a quick API with python, you will further need to do more configuration or coding especially in terms of error handling, data validation, and security.
The above is the detailed content of Create API's in inutes with Python. For more information, please follow other related articles on the PHP Chinese website!
 How to solve the problem that the phpstudy port is occupied
 linux view network card
 How to use find command to find files in linux
 What does legacy startup mean?
 How to use abs function
 The difference between JD.com's self-operated flagship store and its official flagship store
 Configure HOSTS file
 How to solve the problem that cad cannot be copied to the clipboard


