


1일차
우리는 전통적인 방식으로 연결 목록에 대해 배우는 것이 아닙니다. 또한 Node 및 LinkedList 클래스가 무엇인지, 그리고 이들 클래스에서 수행할 수 있는 모든 작업도 살펴보겠습니다.
연결된 목록은 노드라는 요소의 모음입니다. 각 노드에는 데이터 요소와 시퀀스의 다음 노드에 대한 참조(또는 링크)가 포함되어 있습니다.
연결된 목록은 요소가 노드에 저장되는 선형 데이터 구조입니다. 각 노드에는 두 부분이 포함됩니다.
배열과 달리 *연결된 목록은 인접한 메모리 위치에 요소를 저장하지 않습니다.
* 대신 각 노드가 다음 노드를 가리키므로 동적 메모리 사용이 가능하고 요소를 쉽게 삽입하거나 삭제할 수 있습니다.
1. 노드 구조: 연결된 목록은 노드로 구성되며 각 노드에는 값과 다음 노드에 대한 참조가 포함됩니다. 노드의 구조와 속성을 탐색하면 연결된 목록이 데이터를 구성하고 저장하는 방법을 이해하는 데 도움이 됩니다.
2. 헤드 및 테일: 연결 리스트의 첫 번째 노드를 헤드라고 하고 마지막 노드를 테일이라고 합니다. 연결된 목록을 효율적으로 탐색하고 조작하려면 헤드 및 테일 노드의 특성과 기능을 이해하는 것이 중요합니다.
동적 크기: 필요에 따라 늘리거나 줄일 수 있습니다.
순차 액세스: 요소에 액세스하려면 첫 번째 노드(헤드)에서 순회해야 합니다.
연결 목록에는 세 가지 기본 형태가 있습니다
1. 단일 연결 목록
2. 이중 연결 목록
3. 순환 연결 목록.
이 글에서는 단일 연결 목록을 살펴보겠습니다.
각 노드에는 다음 노드에 대한 참조가 있습니다.
실제 비유: 화살 – 화살은 한번 발사되면 앞으로만 나아갈 수 있습니다.
한번 발사된 화살은 되돌아오지 못한 채 직선으로 날아갑니다.
마찬가지로, 단일 연결 목록에서는 한 노드에서 다음 노드로 이동하면 뒤로 돌아갈 수 없으며 앞으로만 계속 이동할 수 있습니다.
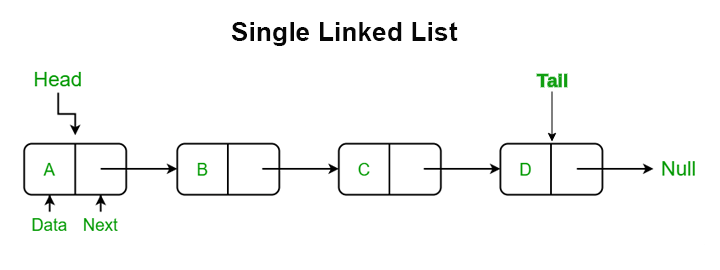
[Data | Next] -> [Data | Next] -> [Data | Next] -> null
Node 클래스를 만들어 보겠습니다
class Node {
  constructor(data) {
    this.data = data;
    this.next = null;
  }
}
Node 클래스를 분해해 보겠습니다.
**Node 클래스는 연결 목록의 각 개별 요소를 나타냅니다. 각 노드에는 두 가지 속성이 포함되어 있습니다.
- 데이터: 노드에 저장된 값(예: 숫자, 문자열 또는 객체)을 보유합니다.
- 다음: 연결된 목록의 다음 노드에 대한 참조(또는 포인터)를 보유합니다. 처음에는 노드가 생성될 때 아직 다른 노드에 연결되지 않았기 때문에 null로 설정됩니다.
생성자(생성자(데이터)):
이는 Node 클래스의 새 인스턴스가 생성될 때 호출되는 JavaScript 클래스의 특수 메소드입니다.
data 매개변수는 새 노드 생성 시 전달되며, 해당 노드의 실제 값을 저장합니다.
this.next = null; 노드가 생성될 때 아직 다른 노드에 연결되지 않았기 때문에 다음 속성을 처음에 null로 설정합니다.
예:
let node1 = new Node(10); // Create a node with the value 10
console.log(node1.data);  // Output: 10
console.log(node1.next);  // Output: null (because it's not linked to any other node yet)
SingleLinkList 클래스를 만들어 보겠습니다
class SinglyLinkedList {
  constructor() {
    this.head = null; // Initially, the list is empty, so the head is null.
    this.size = 0; // The size is initially 0, as there are no nodes in the list.
  }

  // Insert at the beginning
  insertAtBeginning(data) {
    let newNode = new Node(data); // Create a new node with the given data
    newNode.next = this.head; // The new node's next points to the current head
    this.head = newNode; // Update the head to be the new node
    this.size++; // Increment the size of the list
  }
}
SinglyLinkedList 클래스는 전체 연결 목록 구조를 나타냅니다. 여러 Node 객체를 관리하고 노드 삽입, 삭제, 순회 등 목록 작업 방법을 제공합니다.
- 헤드: 연결 리스트의 첫 번째 노드(또는 "헤드")에 대한 참조입니다. 처음에는 목록이 비어 있음을 의미하는 null로 설정되어 있습니다.
- 크기: 현재 연결 목록에 있는 노드 수를 추적합니다. 처음에는 목록이 비어 있으므로 0으로 설정되어 있습니다.
생성자(constructor()):
this.head = null;: This initializes the linked list with no elements, so the head points to null.
this.size = 0;: The size starts as 0 because there are no nodes in the list.
insertAtBeginning(data): for the sake of simplicity, later on, we will Deep Dive into the insertAtBeginning(data) method
let newNode = new Node(data);: This creates a new node with the value passed in as data.
newNode.next = this.head;: This links the new node to the current head (which could be nullif the list is empty or point to an existing node if the list has elements).
this.head = newNode;: This updates the head of the list to point to the new node, making it the first node in the list.
this.size++;: The size of the linked list is increased by 1 as a new node has been added.
let's Test
let list = new SinglyLinkedList();
list.insertAtBeginning(10); // List becomes: 10
list.insertAtBeginning(20); // List becomes: 20 -> 10
console.log(list.head.data); // Output: 20 (since the head is now the first node with value 20)
console.log(list.size);      // Output: 2 (since there are two nodes in the list)
let's jump into the insertAtBeginning(data) method .
class Node {
  constructor(data) {
    this.data = data;   // Store the data value (like 10, 20, etc.)
    this.next = null;   // Initialize the next pointer as null
  }
}

class SinglyLinkedList {
  constructor() {
    this.head = null;   // Initially, the list is empty, so the head is null
    this.size = 0;      // The size of the list starts at 0
  }

  // Insert at the beginning of the list
  insertAtBeginning(data) {
    // Step 1: Create a new node with the given data
    let newNode = new Node(data);

    // Explanation:
    // First time: If we insert 10, the newNode looks like this -> Node { data: 10, next: null }
    // Second time: If we insert 20, the newNode looks like this -> Node { data: 20, next: null }

    // Step 2: Point the new node's next property to the current head of the list
    newNode.next = this.head;

    // Explanation:
    // First time: Since the list is empty (this.head is null), newNode's next is set to null.
    // Second time: this.head is now the node with data 10, so newNode’s next will point to the node with data 10.
    // So it looks like this: Node { data: 20, next: Node { data: 10, next: null } }

    // Step 3: Make the new node the new head of the list
    this.head = newNode;

    // Explanation:
    // First time: Now, the new node becomes the head. The list looks like this: Node { data: 10, next: null }.
    // Second time: The new node (with data 20) becomes the head, and it points to the previous head (which is the node with data 10).

    // Step 4: Increment the size of the list
    this.size++;

    // Explanation:
    // First time: The size is now 1 because there is one node (data 10).
    // Second time: The size becomes 2 because we added another node (data 20).
  }
}

// Example Usage:
let list = new SinglyLinkedList();
list.insertAtBeginning(10);  // First insertion: the list becomes [10]
list.insertAtBeginning(20);  // Second insertion: the list becomes [20 -> 10]

console.log(list);

// Output:
// SinglyLinkedList {
//   head: Node { data: 20, next: Node { data: 10, next: null } },
//   size: 2
// }
The above is the detailed content of Data Structures & Algorithm Linked List. For more information, please follow other related articles on the PHP Chinese website!


![[Web front-end] Node.js quick start](https://img.php.cn/upload/course/000/000/067/662b5d34ba7c0227.png)


