


Hey, I’m Sam, a backend engineer with a lot of experience with Django. I wanted to make the jump and learn some frontend for a full stack app. I quickly experienced the arduous nature of a React-with-Django project and thought the pain was just part of the development process. However, I came across a very cool new full stack framework called Wasp.
Wasp is an amazing dev tool for full stack applications. Combining things like React, Node.js and Prisma, Wasp allows for development to be expedited in ways never before seen.
In this article, I am going to walk through creating a full stack application in Django versus Wasp to prove the simplicity of Wasp against a very conventional full-stack technology. I am also going to make a react frontend connected to Django. The point is to highlight the inefficiencies, difficulties, and issues that can (and will) arise with Django/react that are made vastly simpler via
This article is not intended as a how to, but I do provide some code as to highlight the exhaustive-nature of a Django app.

This part is about the only part where there is significant overlap between Django and Wasp. Both starting from the terminal, let’s make a simple task app (I am assuming you have Django and Wasp installed and in your path).
Django?
django-admin startproject python manage.py starapp Todo
Wasp?
wasp new Todo wasp start
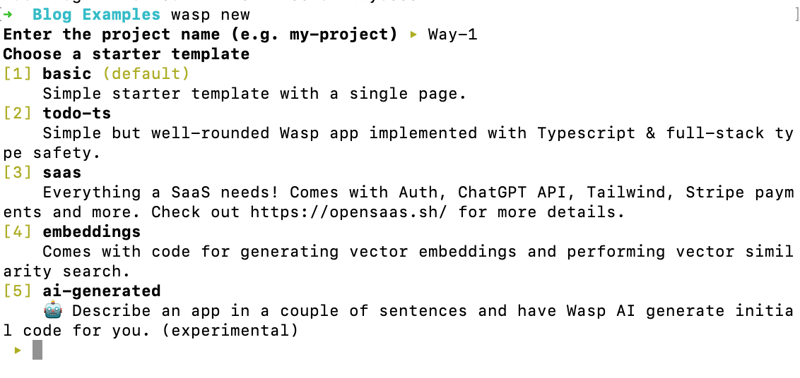
Now Wasp starts hot out of the gate. Check out the menu you are given below. Wasp can either start a basic app for you, or you can select from a multitude of pre-made templates (including a fully functioning SaaS app) or even use an AI-generated app based on your description!

Meanwhile, Django works as a project with apps within the project (again, this is essentially all for backend operations) and there can be many apps to one Django project. Thus, you have to register each app in the Django project settings.
python `manage.py` startapp todo
settings.py:
INSTALLED_APPS [ ... 'Todo' ]
So now we need a database, and this is another area where Wasp really shines. With Django, we need to create a model in the models.py file. Wasp, meanwhile, uses Prisma as it's ORM which allows us to clearly define necessary fields and make database creation simple in an easy to understand way.
Django?
models.py:
from django.db import models class Task(models.Model): title = models.CharField(max_length=200) completed = models.BooleanField(default=False) def __str__(self): return self.title
Wasp?
schema.prisma:
model Task { id Int @id @default(autoincrement()) description String isDone Boolean @default(false) }
Django and Wasp do share similar ways to migrate databases:
Django?
python manage.py makemigrations python manage.py migrate
Wasp?
wasp db migrate-dev
But with Wasp, you can also do some pretty nifty database stuff that Django can't.
Right now we're using SQLite, but how about instantly setting up a development Posgres database? Wasp can do that with:
wasp db start
That's it! With that you've got a docker container running a Postgres instance and it's instantly connected to your Wasp app. ?
Or what if you want to see your database in real time via Prisma’s database studio UI, something not possible without third party extensions with Django. For that, just run:
wasp db studio
Are you starting to see what I mean now?
Routes in Django and Wasp follow a shomewhat similar pattern. However, if you're familiar with React, then Wasp’s system is far superior.
Django works through the backend (views.py, which I will get to later in this article) which do all the CRUD operations. Those view functions are associated to a specific route within an app within a project (I know, a lot), and it can get more complicated if you start using primary keys and IDs. You need to create a urls.py file and direct your specific views file and functions to a route. Those app urls are then connected to the project urls. Phew.
Wasp’s way: define a route and direct it to a component.
Django?
todo/urls.py:
from django.urls import path from . import views urlpatterns = [ path('', views.index, name='index'), path('update//', views.updateTask, name='update_task'), path('delete//', views.deleteTask, name='delete_task'), ]
./urls.py:
from django.contrib import admin from django.urls import path, include urlpatterns = [ path('admin/', admin.site.urls), path('', include('todo.urls')), ]
Wasp?
main.wasp:
route TaskRoute { path: "/", to: TaskPage } page TaskPage { component: import { TaskPage } from "@src/TaskPage" }
Ok, this is where the benefits of Wasp are about to become even more apparent.
Firstly, I am going to revisit the views.py file. This is where magic is going to happen for Django backend. Here is a simple version of what the create, update, and delete functions could look like for our Task/Todo example:
Django?
todo/views.py:
from django.shortcuts import render, redirect from .models import Task from .forms import TaskForm def index(request): tasks = Task.objects.all() form = TaskForm() if request.method == 'POST': form = TaskForm(request.POST) if form.is_valid(): form.save() return redirect('/') context = {'tasks': tasks, 'form': form} return render(request, 'todo/index.html', context) def updateTask(request, pk): task = Task.objects.get(id=pk) form = TaskForm(instance=task) if request.method == 'POST': form = TaskForm(request.POST, instance=task) if form.is_valid(): form.save() return redirect('/') context = {'form': form} return render(request, 'todo/update_task.html', context) def deleteTask(request, pk): task = Task.objects.get(id=pk) if request.method == 'POST': task.delete() return redirect('/') context = {'task': task} return render(request, 'todo/delete.html', context)
app/forms.py:
from django import forms from .models import Task class TaskForm(forms.ModelForm): class Meta: model = Task fields = ['title', 'completed']
Wasp?
main.wasp:
query getTasks { fn: import { getTasks } from "@src/operations", // Tell Wasp that this operation affects the `Task` entity. Wasp will automatically // refresh the client (cache) with the results of the operation when tasks are modified. entities: [Task] } action updateTask { fn: import { updateTask } from "@src/operations", entities: [Task] } action deleteTask { fn: import { deleteTask } from "@src/operations", entities: [Task] }
operations.js:
export const getTasks = async (args, context) => { return context.entities.Task.findMany({ orderBy: { id: 'asc' }, }) } export const updateTask = async ({ id, data }, context) => { return context.entities.Task.update({ where: { id }, data }) } export const deleteTask = async ({ id }, context) => { return context.entities.Task.delete({ where: { id } }) }
So right now, Wasp has a fully functioning backend with middleware configured for you. At this point we can create some React components, and then import and call these operations from the client. That is not the case with Django, unfortunately there is still a lot we need to do to configure React in our app and get things working together, which we will look at below.

At this point we could just create a simple client with HTML and CSS to go with our Django app, but then this wouldn't be a fair comparison, as Wasp is a true full-stack framework and gives you a managed React-NodeJS-Prisma app out-of-the-box. So let's see what we'd have to do to get the same thing set up with Django.
Note that this section is going to highlight Django, so keep in mind that you can skip all the following steps if you just use Wasp. :)
Django?
First thing’s first. Django needs a REST framework and CORS (Cross Origin Resource Sharing):
pip install djangorestframework pip install django-cors-headers
Include Rest Framework and Cors Header as installed apps, CORS headers as middleware, and then also set a local host for the react frontend to be able to communicate with the backend (Django) server (again, there is no need to do any of this initial setup in Wasp as it's all handled for you).
settings.py:
INSTALLED_APPS = [ ... 'corsheaders', ] MIDDLEWARE = [ ... 'corsheaders.middleware.CorsMiddleware', ... ] CORS_ALLOWED_ORIGINS = [ 'http://localhost:3000', ]
And now a very important step, which is to serialize all the data from Django to be able to work in json format for React frontend.
app/serializers.py:
from rest_framework import serializers from .models import Task class TaskSerializer(serializers.ModelSerializer): class Meta: model = Task fields = '__all__'
Now, since we are handling CRUD on the React side, we can change the views.py file:
from rest_framework import viewsets from .models import Task from .serializers import TaskSerializer class TaskViewSet(viewsets.ModelViewSet): queryset = Task.objects.all() serializer_class = TaskSerializer
And now we need to change both app and project URLS since we have a frontend application on a different url than our backend.
urls.py:
from django.contrib import admin from django.urls import path, include urlpatterns = [ path('admin/', admin.site.urls), path('api/', include('todo.urls')), # Add this line ]
from django.urls import path, include from rest_framework.routers import DefaultRouter from .views import TaskViewSet router = DefaultRouter() router.register(r'tasks', TaskViewSet) urlpatterns = [ path('', include(router.urls)), ]
By now you should be understanding why I've made the switch to using Wasp when building full-stack apps. Anyways, now we are actually able to make a react component with a Django backend ?
Ok, so now we can actually get back to comparing Wasp and Django.
Django?
To start, lets create our React app in our Django project:
npx create-react-app frontend
Finally, we can make a component in React. A few things:
I am using axios in the Django project here. Wasp comes bundled with React-Query (aka Tanstack Query), so the execution of (CRUD) operations is a lot more elegant and powerful.
The api call is to my local server, obviously this will change in development.
You can make this many different ways, I tried to keep it simple.
main.jsx:
import React, { useEffect, useState } from 'react'; import axios from 'axios'; const TaskList = () => { const [tasks, setTasks] = useState([]); const [newTask, setNewTask] = useState(''); const [editingTask, setEditingTask] = useState(null); useEffect(() => { fetchTasks(); }, []); const fetchTasks = () => { axios.get('http://127.0.0.1:8000/api/tasks/') .then(response => { setTasks(response.data); }) .catch(error => { console.error('There was an error fetching the tasks!', error); }); }; const handleAddTask = () => { if (newTask.trim()) { axios.post('http://127.0.0.1:8000/api/tasks/', { title: newTask, completed: false }) .then(() => { setNewTask(''); fetchTasks(); }) .catch(error => { console.error('There was an error adding the task!', error); }); } }; const handleUpdateTask = (task) => { axios.put(`http://127.0.0.1:8000/api/tasks/${task.id}/`, task) .then(() => { fetchTasks(); setEditingTask(null); }) .catch(error => { console.error('There was an error updating the task!', error); }); }; const handleDeleteTask = (taskId) => { axios.delete(`http://127.0.0.1:8000/api/tasks/${taskId}/`) .then(() => { fetchTasks(); }) .catch(error => { console.error('There was an error deleting the task!', error); }); }; const handleEditTask = (task) => { setEditingTask(task); }; const handleChange = (e) => { setNewTask(e.target.value); }; const handleEditChange = (e) => { setEditingTask({ ...editingTask, title: e.target.value }); }; const handleEditCompleteToggle = () => { setEditingTask({ ...editingTask, completed: !editingTask.completed }); }; return ( To-Do List
{tasks.map(task => ( - {editingTask && editingTask.id === task.id ? ( ) : ( {task.title} - {task.completed ? 'Completed' : 'Incomplete'} )}
))}
); }; export default TaskList;
Wasp?
And here's the Wasp React client for comparison. Take note how we're able to import the operations we defined earlier and call them here easily on the client with less configuration than the Django app. We also get the built-in caching power of the useQuery hook, as well as the ability to pass in our authenticated user as a prop (we'll get into this more below).
Main.jsx:
import React, { FormEventHandler, FormEvent } from "react"; import { type Task } from "wasp/entities"; import { type AuthUser, getUsername } from "wasp/auth"; import { logout } from "wasp/client/auth"; import { createTask, updateTask, deleteTasks, useQuery, getTasks } from "wasp/client/operations"; import waspLogo from "./waspLogo.png"; import "./Main.css"; export const MainPage = ({ user }) => { const { data: tasks, isLoading, error } = useQuery(getTasks); if (isLoading) return "Loading..."; if (error) return "Error: " + error; const completed = tasks?.filter((task) => task.isDone).map((task) => task.id); return (  {user && user.identities.username && (
 {user.identities.username.id} {`'s tasks :)`}
)} ); }; function Todo({ id, isDone, description }) { const handleIsDoneChange = async ( event ) => { try { await updateTask({ id, isDone: event.currentTarget.checked, }); } catch (err: any) { window.alert("Error while updating task " + err?.message); } }; return ( No tasks yet.
; return (Very nice! In the Wasp app you can see how much easier it is to call the server-side code via Wasp operations. Plus, Wasp gives you the added benefit of refreshing the client-side cache for the Entity that's referenced in the operation definition (in this case Task). And the cherry on top is how easy it is to pass the authenticated user to the component, something we haven't even touched on in the Django app, and which we will talk about more below.

So we already started to get a feel in the above code for how simple it is to pass an authenticated user around in Wasp. But how do we actually go about implementing full-stack Authentication in Wasp and Django.
This is one of Wasp’s biggest advantages. It couldn't be easier or more intuitive. On the other hand, the Django implementation is so long and complicated I'm not going to even bother showing you the code and I'll just list out the stps instead;
Wasp?
main.wasp:
app TodoApp { wasp: { version: "^0.14.0" }, title: "Todo App", auth: { userEntity: User, methods: { usernameAndPassword: {} } } //...
And that's all it takes to implement full-stack Auth with Wasp! But that's just one example, you can also add other auth methods easily, like google: {}, gitHub: {} and discord: {} social auth, after configuring the apps and adding your environment variables.
Wasp allows you to get building without worrying about so many things. I don’t need to worry about password hashing, multiple projects and apps, CORS headers, etc. I just need to add a couple lines of code.
Wasp just makes sense.

Django?
Let's check out what it takes to add a simple username and password auth implementation to a Django app (remember, this isn't even the code, just a checklist!):
Install Necessary Packages:
Update Django Settings:
Set Up URL Routing:
Implement Authentication Context in React:
Create Login Component in React:
Protect React Routes and Components:
Implement Task Update and Delete Functionality:
Add Authentication to Django Views:
I just want to highlight one more aspect of Wasp that I really love. In Django, we're completely responsible for dealing with all the boilerplate code when setting up a new app. In other words, we have to set up new apps from scratch every time (even if it's been done before a million times by us and other devs). But with Wasp we can scaffold a new app template in a number of ways toreallyjump start the development process.
Let's check out these other ways to get a full-stack app started in Wasp.
A simplewasp newin the terminal shows numerous starting options and app templates. If I really want to make a todo app for example, well there you have it, option 2.
Right out of the box you have a to-do application with authentication, CRUD functionality, and some basic styling. All of this is ready to be amended for your specific use case.
Or what if you want to turn code into money? Well, you can also get a fully functioning SaaS app. Interested in the latest AI offereings? You also have a vector embeddings template, or an AI full-stack app protoyper! 5 options that save you from having to write a ton of boilerplate code.
Just throw a name, prompt, and select a few of your desired settings and boom, you get a fully functioning prototype app. From here you can use other other AI tools, like Cursor's AI code editor, to generate new features and help you debug!
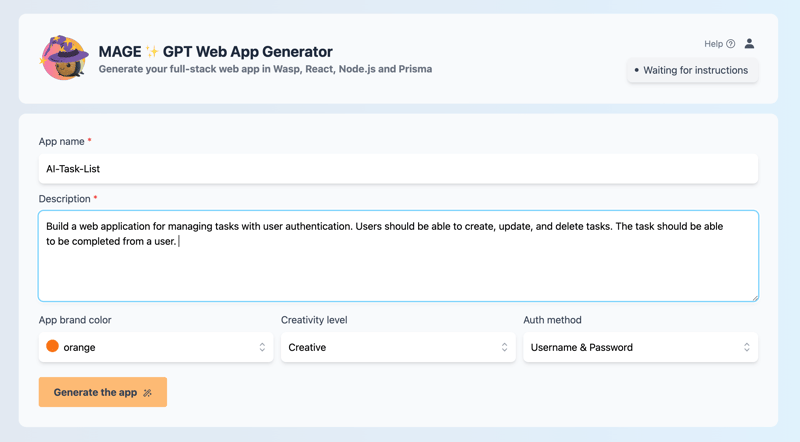
? Note that the Mage functionality is also achievable via the terminal ("ai-generated"), but you need to provide your own open-ai api key for it to work.

このようなコンテンツに興味がありますか?ニュースレターに登録して、GitHub でスターを付けてください。私たちのプロジェクトを前進させ続けるにはあなたのサポートが必要です?
⭐️ GitHub 上の Star Wasp ?
これで完了です。最初に述べたように、Django から来た私は、Wasp を使用してフルスタック アプリを構築するのがいかに簡単であるかに驚きました。それが、この記事を書こうと思ったきっかけです。
Django から離れて Wasp を選択することが、時間、エネルギー、感情の面で有益である理由を説明できれば幸いです。
The above is the detailed content of Wasp: The JavaScript Answer to Django for Web Development. For more information, please follow other related articles on the PHP Chinese website!


![[Web front-end] Node.js quick start](https://img.php.cn/upload/course/000/000/067/662b5d34ba7c0227.png)


