Have you ever come across an exciting open source project which you would love to make a contribution to, but you have no idea on how to start? Or perhaps you are a relatively experienced developer (Or just someone who’s more verse with open source) who’s looking to contribute to an exciting open source project? Well, I have an answer to your question on “How do I start contributing to open source”.
Technically, I won’t be answering that question in the general sense. This article will be more inclined towards a specific open source project, Utreexo. So, I guess this post aims rather, to answer the question “How do I start contributing to Utreexo?”.
Well, if you are here, I’m assuming that you have heard about Utreexo from somewhere, or at least you know that it is a project related to Bitcoin. If you have never heard of it however, that’s still fine, I will try to break it down more, and also provide relevant links, however, it is highly recommended to have a high level knowledge on how Bitcoin works, in order to better understand this article.
Anyways, to answer the question above, let’s give a little background of what Utreexo aims to achieve first.
The Bitcoin network as we know it, (or… don’t know it yet) stores records of all transactions in a digital ledger, known as the Blockchain. This ledger contains records of all the transactions that have ever been carried out on the network. The current state however of the network does not necessarily contain the history of everything that has ever happened on the network, rather, it consists of the set all the Unspent Transaction Outputs (UTXO set). This set holds information about “which wallet has what”. In simpler terms, the UTXO set basically just contains records of how much bitcoin a Bitcoin wallet has in their account. Well, the last sentence isn’t very accurate because our Bitcoin wallets usually have severally Unspent transaction outputs, which when combined, reflects as our wallet balance, and what is available to spend.
The problem is, this Bitcoin state is growing faster and larger as the number of transactions on the network increases. This poses a significant scalability issue, as the larger size requires larger hardware resources, which can therefore dissuade some people from operating Bitcoin nodes among other disadvantages.
That is where Utreexo comes in.
So we ask again, “What is Utreexo”?. Well, Utreexo is a method for greatly reducing the storage needed to run a fully validating node by proposing a hash based dynamic cryptographic accumulator, and introducing a Compact state node which stores only an accumulator representation of the state. These nodes require additional inclusion proofs from the sender, before they are able to verify transactions,
With Utreexo, the current state of the network is represented in a significantly smaller size, which means less resource usage, which will then encourage pretty much anyone to run a Node, conveniently. You can the read more about Utreexo from the following resources ELI5: Utreexo — A scaling solution, or Improving the Bitcoin network using Utreexo, or download the Utreexo white paper from here.
Setting up your development environment
Now that we know a little bit more about Utreexo, let’s dive in to setting up our development environment.
Utreexo is written in Go, so having a basic knowledge and understanding of Go programming language will be an added bonus. However, if you are new to Go, you can check out these resources to know more about the language, and to understand a few basic concepts of the language Effective Go, Learn Go.
I use Visual studio code for this post, but feel free to use any text editor of your choice.
First of all, we will need to install Go programming language. The steps to install will not be covered here, but you can check out this article, detailing how to install and run Go programs. Download and Install Go. Once you’ve finished installing Go, as per the article and ensuring that everything works, by checking the output of
go version
we can proceed to cloning the codebase. Having a basic knowledge of git will be beneficial here. First, we need to have git installed on our computer system. To check if git is installed, you can open a new terminal or powershell window and type
git –version
if git is installed, you will see an output with the version number. If not, you have to proceed to install git using directives from Installing Git.
Afterwards, you can try the the command
git –version
また。 git が正常にインストールされた場合は、リポジトリのフォークとクローン作成に進むことができます。
リポジトリのフォークとは基本的に、個人の GitHub アカウントにリポジトリのコピーを作成することを意味します。それ以降に加えた変更はフォークされたリポジトリにプッシュされ、プル リクエストを送信できます。
リポジトリのクローンを作成するには、目的の場所に移動し、ターミナルで開きます。または、ターミナルを使用して直接移動することもできます。
たとえば、デスクトップに「Projects」という名前のフォルダーがあり、そこに Utreexo コードを配置したいとします。単純にデスクトップに移動して、「Projects」フォルダーを開き、その中で右クリックして、 Windows および Ubuntu の場合は「ターミナルで開く」。または、ターミナル ウィンドウ内で直接移動することもできます
まず、システムのルート ディレクトリに移動して、そこにいることを確認しましょう。
CD ~
そして
CD デスクトップ/プロジェクト
ここに入ったら、リポジトリのクローンを作成する必要があります。ここで少し考慮する必要があります。 GitHub 上の utreexo メイン組織にアクセスすると、いくつかのリポジトリがあります。そのうちの 1 つは、実際の動的アキュムレータ実装を含む utreexo リポジトリで、もう 1 つは、Utreexo をサポートするビットコイン フルノード実装である utreexod リポジトリです。私たちは後者、つまり Utreexo をサポートするビットコインのフルノード実装に焦点を当てます。フォークに進み、リポジトリのクローンを作成しましょう
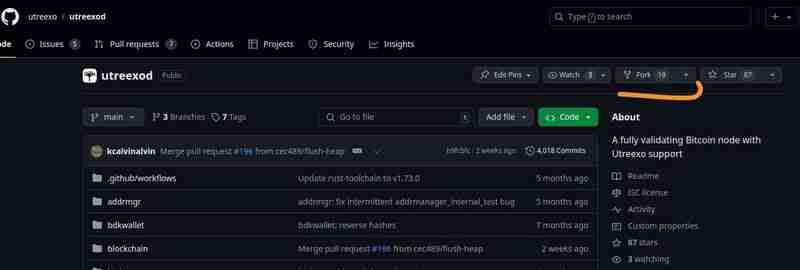
リポジトリをフォークするには、utreexod リポジトリの github ページに移動し、右端に「フォーク」ボタンがあります。

これをクリックして、画面上の指示に従う必要があります。完了すると、私たちの個人 github アカウントにはこのリポジトリの同じコピーが保持されます。
これで、個人アカウントからリポジトリのクローンを作成できます
git クローン https://github.com/yourgithubusername/utreexod.git
完了したら、テキスト エディターでフォルダーを開いて、GitHub リポジトリの説明に記載されているすべての依存関係のインストールに進むことができます。さあ、入ります
ここからは、コード ベースのさまざまなセクションと各セクションの役割を理解しながら、時間をかけていきます。コードベースの概要を理解したら、リポジトリの「問題」セクションを確認して、取り組みたい問題や機能の提案を見つけてください。
特定したら、新しいブランチを作成し、ブランチに適切な名前を付けます
ここで、「feature1」はこれから取り組む機能の名前です。よりわかりやすい名前を付けてください。
機能の作業が完了し、準備ができたと感じたら、github にコミットしてプッシュし、プル リクエストを発行します。
コミットするには、まず
を使用して行われた変更をステージングします。git add .
そしてコミットに進みます
git commit -m “コミットメッセージ”
コミットメッセージは行われた変更の短い説明である必要があり、上記のように引用符で囲む必要があります。
vscode を使用している場合、git 拡張機能によりこれらすべてのプロセスが大幅に簡素化されます。
変更をコミットして Github にプッシュする方法についてさらにリソースが必要な場合は、このリソースを確認してください。プル リクエストの作成については、ここでも確認できます。
プル リクエストが行われた後、メンテナからの更新を待ちます。すべてが整理され、おそらくさらに多くの変更がリクエストされたら、プル リクエストはマージされます。 Utreexo への貢献に成功しました
このようなオープンソースへの貢献は、主要なソフトウェアの原動力となっており、何万人ものユーザーが使用するソフトウェアに変更を加えるため、オープンソースに貢献することは非常に重要です。その貢献が高い満足感をもたらします。ここからは、他のコミュニティ メンバーやメンテナーとの関係を構築し続け、定期的にソフトウェアに貢献し続けることをお勧めします。
The above is the detailed content of How to start contributing to Utreexo. For more information, please follow other related articles on the PHP Chinese website!


