


When making a PPT presentation, sometimes we need to set the file to read-only mode to prevent others from editing. This method can protect the PPT content from tampering and make it easier for others to view it. The editor will share 3 methods below, let’s take a look!
The method of marking as final version is simple and quick, suitable for quickly setting the document read-only mode.
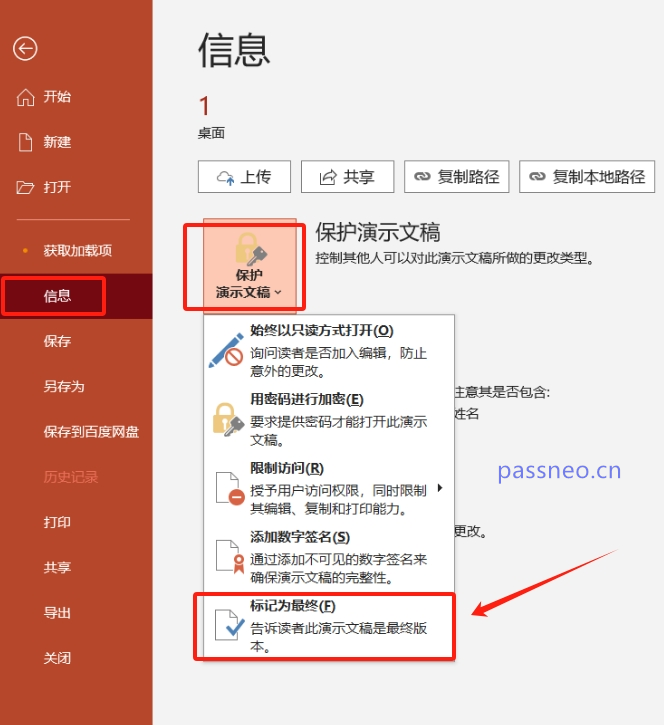
First, open the PPT file that needs to be set to read-only mode, click the [File] tab in the upper left corner, and then click [Information]-[Protect Presentation]-[Mark as Final Version] in the [File] menu ], and then the system will prompt you to confirm this operation. Click [Confirm] and save the PPT to complete the setting.
After completing the settings, the PPT file has been marked as the final version. When other users open it, they will see that the file is displayed as "read-only". In "read-only mode", the PPT content cannot be edited or modified.

How to cancel:
If you want to cancel the "final mark" later, you only need to follow the set process, that is, after opening the PPT, click [File] - [Information] - [Protect Presentation] - [Mark as Final]. .
You can also save PPT in "read-only mode" by setting "Always open in read-only mode".
Open the PPT file, click [File]-[Information]-[Protect Presentation]-[Always open as read-only], then save the file, and you are set.
After the setting is completed, when you open the PPT again, you will also see that the file is displayed as "read-only" and cannot be edited or changed.

Cancellation method:
If you want to cancel this "read-only mode", you need to click the [Edit Anyway] option in the prompt box below the menu tab after opening the PPT.

After clicking [Edit Anyway], follow the set process and click [File] - [Information] - [Protect Presentation] - [Always Open as Read-Only] to cancel it.

If you want to better protect the PP file, you can set the "read-only mode" with a password, so that "Read-only mode" cannot be canceled at will, and can only be canceled using a password.
First, open the PPT file, click the menu tab [File], click [Save As] in the [File] menu, and select the save path after saving on the right.

After opening the [Save As] dialog box, click [General Options] in the [Tools] drop-down list.

After opening the [General Options] dialog box, enter the password you want to set in the [Modify Permission Password] column, click [OK], enter it again and confirm, then save the PPT file, and it is set.

After the setting is completed, open the PPT again, and a dialog box will pop up, prompting you to enter a password. That is, you must enter the originally set password to gain modification permission. Otherwise, it can only be opened in "read-only mode" and you will not be able to edit or modify the PPT. .

Cancellation method:
If you want to cancel the "read-only mode" of PPT with password, you first need to enter the originally set password when opening the PPT and obtain the modification permission before proceeding.
After opening the PPT, follow the setting process to save the PPT as, and then bring up the [General Options] dialog box. You can see that a password already exists in the password column. This is the originally set password. Select and delete the password. , and then save the PPT, you can cancel the "read-only mode".

It should be noted that after setting the password for the "read-only mode" of the PPT, it must be easy to remember, because as can be seen from the above operations, whether you want to edit the PPT or cancel the "read-only mode", you need to enter it The originally set password.
What if you accidentally forget it? In this case, we need the help of other tools.
For examplePepsi Niu PPT Password Recovery Tool can directly remove the "read-only mode" of PPT with password without password.
Just select the [Unrestriction] module in the tool, and then import the PPT file.

The above is the detailed content of How to save PPT in 'read-only mode'? 3 methods are recommended!. For more information, please follow other related articles on the PHP Chinese website!


![[Web front-end] Node.js quick start](https://img.php.cn/upload/course/000/000/067/662b5d34ba7c0227.png)


