

 Topics
word
Sharing practical Word skills: There are too many pictures in the document and the display is too slow. How to solve this problem?
Topics
word
Sharing practical Word skills: There are too many pictures in the document and the display is too slow. How to solve this problem?
Sharing practical Word skills: There are too many pictures in the document and the display is too slow. How to solve this problem?


When a colleague sent me a Word document, it was too large and contained many pictures. As a result, when opening a document, the computer runs very slowly and freezes, making it very inconvenient and inefficient to check the document.
Some novices said that it would be enough to change to another computer. This is not a problem for machines with mainstream configurations, but if you encounter an old machine in the company...
How should we solve the above situation immediately? Learn the following two tricks and you can easily deal with it without changing your computer.
Method 1: Set the display picture box
Because there are many pictures in the document, the document is too large and the computer runs very slowly. We can set the pictures in the document.

Click the [File]-[Options] command to open the "Word Options" dialog box, select the "Advanced" tab, and check the "Show document content" column Check the "Show Picture Box" checkbox and click the "OK" button.
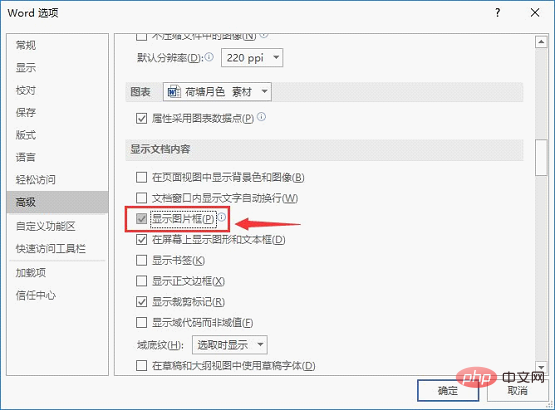
At this time, all pictures in the document will be displayed as a blank black border line, and the effect is as shown in the figure below.

In this way, the picture will be temporarily hidden! This increases the speed of document browsing.
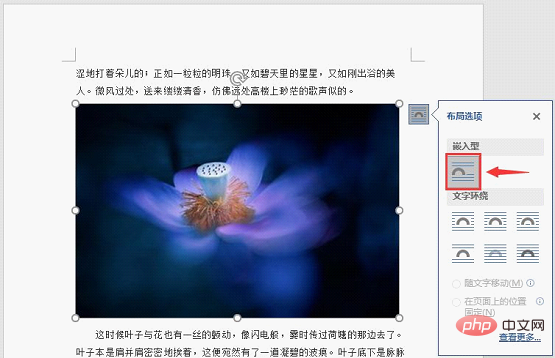
Tips: Some friends asked why the picture was not displayed as a blank box after I set the display picture box. What happened?
This is because the wrapping method of the picture in your current document is not embedded. How to set the image to be embedded? Just select the image, click the "Layout Options" button in the upper right corner, and select the "Embedded" option in the pop-up list box.
Method 2: Split the document
The document is too large, causing problems when opening or reading the document , the computer runs very slowly and lags. At this time, we can also split the document into multiple small documents for review.
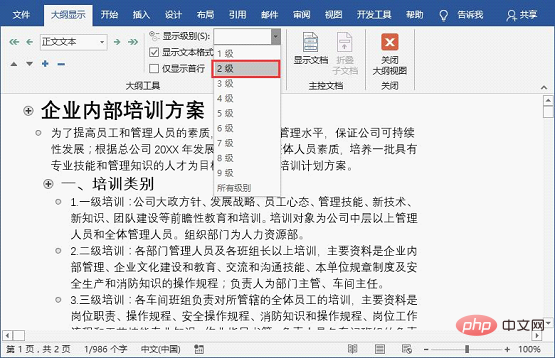
Step 1:Open the document, select the titles in the document in order, and apply title styles to them (if the style has been applied originally, there is no need to set it again).
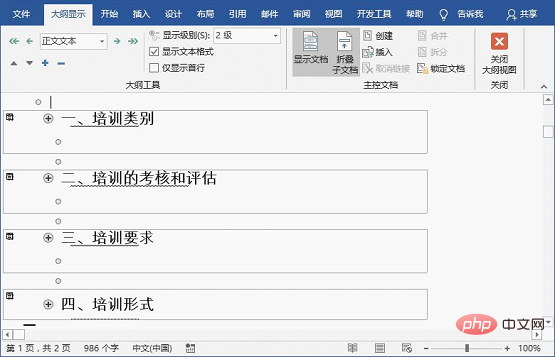
Step 2: Click the [View]-[Outline] button to enter the outline view.

Step 3: Select the "Outline Display" tab and set the title level in "Display Level". For title style 1, set level 1. If the title style is 2, it is set to display level 2...
Step 4: Select the module to be split and click the [Show Document]-[Create] button.
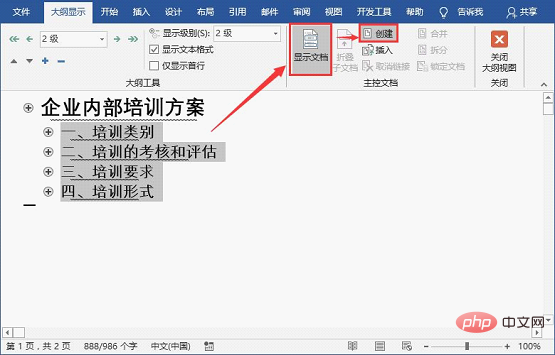
At this time, the selected module will be framed and distinguished.
Step 5: Save the current Word document. The document will be split. Open the storage folder on your computer to view the split sub-documents. .
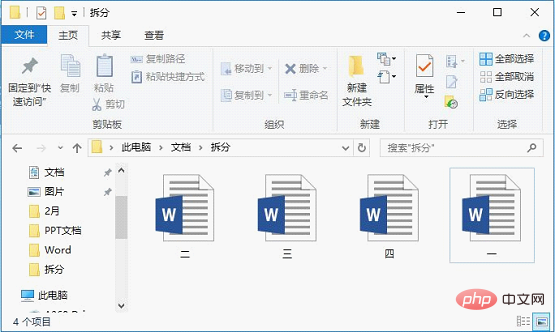
#Open the documents separately at this time, and the computer will no longer run very slowly!
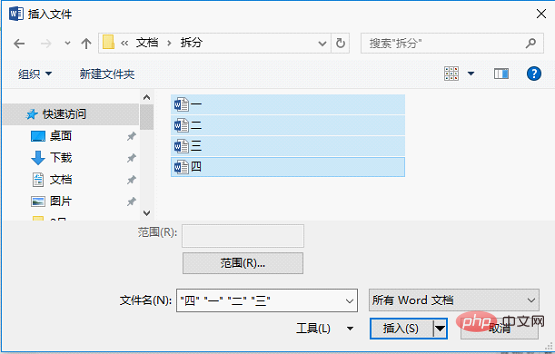
Tips: After document review is completed, how to quickly merge multiple split documents into one document?
Just click the [Insert]-[Object] button and select the "Text in File" command in the pop-up menu. Open the "Insert File" dialog box, select multiple subdocuments to be merged (Note: The order of the documents here directly determines the order of the merged content of the documents, so the documents must be sorted with caution), and click the "Insert" button.

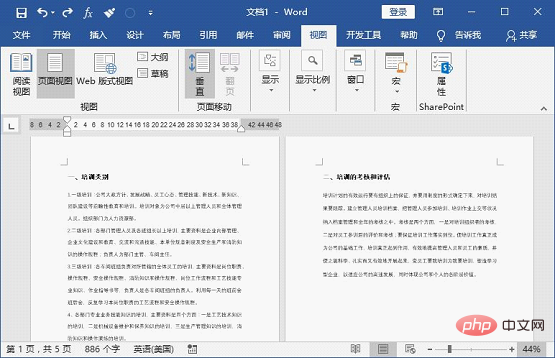
At this point, the contents of all documents have been inserted and merged into one document.
The above is all the content for today, I hope it will be helpful to you!
Recommended tutorial: "Word Tutorial"
The above is the detailed content of Sharing practical Word skills: There are too many pictures in the document and the display is too slow. How to solve this problem?. For more information, please follow other related articles on the PHP Chinese website!

Hot AI Tools

Undress AI Tool
Undress images for free

Undresser.AI Undress
AI-powered app for creating realistic nude photos

AI Clothes Remover
Online AI tool for removing clothes from photos.

ArtGPT
AI image generator for creative art from text prompts.

Stock Market GPT
AI powered investment research for smarter decisions

Hot Article
Hot Tools

Notepad++7.3.1
Easy-to-use and free code editor

SublimeText3 Chinese version
Chinese version, very easy to use

Zend Studio 13.0.1
Powerful PHP integrated development environment

Dreamweaver CS6
Visual web development tools

SublimeText3 Mac version
God-level code editing software (SublimeText3)

 How to edit DOCX files on Windows? Complete tutorials using Microsoft Word
Sep 05, 2025 pm 08:51 PM
How to edit DOCX files on Windows? Complete tutorials using Microsoft Word
Sep 05, 2025 pm 08:51 PM
Using Microsoft Word is the best way to edit DOCX files, including opening, editing, formatting, inserting content, page layout, reviewing revisions, and saving. Compatibility issues are mainly caused by missing fonts, different Word versions, printer drivers, display settings and operating systems, and can be solved by embedding fonts, using common fonts, or saving as compatible formats. Practical tips include using style uniform formatting, generating automatic directories, cross-references, revision annotations, macro automation, document inspectors, and accessibility checks. If the file is corrupt, you can try "Open and repair", restore temporary files, open them with other software, insert them into new documents, check permissions and storage, or use professional recovery tools. It is also recommended to enable automatic save and cloud backup to
 The folder or file has been opened in another program
Sep 20, 2025 am 08:24 AM
The folder or file has been opened in another program
Sep 20, 2025 am 08:24 AM
When the file is occupied, first check and close the relevant programs and try to restart the computer; if it is invalid, use task manager, resource monitor or ProcessExplorer to locate the occupied process, and forcefully terminate it by ending the task or taskkill command; for prevention, you need to develop good operating habits, avoid previewing or directly operating on mobile/network drives, and keep software updated.
 How to create a new word document on Apple phone
Sep 01, 2025 pm 04:00 PM
How to create a new word document on Apple phone
Sep 01, 2025 pm 04:00 PM
Please make sure that your iPhone has the WPSOffice app installed. This is a comprehensive office software that can meet your various needs of editing documents on your mobile phone. If you have not installed it yet, you can go to the AppStore, search for "WPSOffice", click "Get" and complete the download and installation. Create a new Word document and start the WPSOffice application. After opening it, you will see a clear and intuitive operation interface. Find and click the " " button in the bottom navigation bar, which is a quick entry to create a new file. Select the New Document option. The system will automatically open a blank Word document page, and you can start typing and editing content. Personalized document operation layout settings: click on the "Tools" picture in the upper right corner
 What is the problem that win10 cannot join the home group_File sharing alternative after Win10 home group feature has been removed
Sep 24, 2025 pm 05:33 PM
What is the problem that win10 cannot join the home group_File sharing alternative after Win10 home group feature has been removed
Sep 24, 2025 pm 05:33 PM
After Windows 10 version 1803, the home group function was removed, and file sharing needs to be achieved by enabling network discovery, configuring system services and registry modification. First, confirm the system version and check whether the home group options are missing; then enable network discovery and file printer sharing in "Network and Sharing Center" and turn off password protection; then start key services such as FunctionDiscoveryResourcePublication in the service manager, and adjust the MachineKeys folder permissions if necessary; then set AllowInsecureGuestAuth to 1 through the registry editor to support unsafe guest authentication; finally use File Explorer to share files directly
 How to search for files in your own disk in Quark network disk_Quark network disk accurate search skills
Sep 20, 2025 am 11:06 AM
How to search for files in your own disk in Quark network disk_Quark network disk accurate search skills
Sep 20, 2025 am 11:06 AM
Use keyword search, filtering conditions, file paths and recent records to quickly locate quark network disk files. First enter keyword search in the search box, then narrow the scope by type, time, etc. through the filter function, view the file path or collect common folders for quick access next time, and you can also retrieve the files of recent operations in the "Recent" list.
 How to batch convert file formats in Windows File Manager? Steps to efficient operation
Sep 05, 2025 pm 08:12 PM
How to batch convert file formats in Windows File Manager? Steps to efficient operation
Sep 05, 2025 pm 08:12 PM
Windows file manager cannot directly convert file formats in batches because it is only responsible for file management and does not process file contents; it needs to use third-party tools such as IrfanView and FFmpeg to achieve efficient batch conversion, combined with the file manager to filter files and import tools, and complete the conversion through a graphical interface or command line. The command line tools have the advantages of automation, high efficiency and precise control, but attention should be paid to learning costs, error handling and file backup.
 How to disable automatic maintenance services in Windows 10 system?
Sep 25, 2025 am 11:09 AM
How to disable automatic maintenance services in Windows 10 system?
Sep 25, 2025 am 11:09 AM
Windows 10 system comes with automatic maintenance function, which can perform maintenance tasks on the system according to the set time, such as system updates or disk defragmentation. By default, Windows 10 automatic maintenance is enabled. However, in some cases, we may prefer to manage these maintenance operations on our own to better control the equipment. So, how can I turn off the automatic maintenance service of Windows 10? Next, let’s take a look at the specific steps together, I hope it will be helpful to everyone. The specific method for disabling the automatic maintenance function in Win10 is as follows: Step 1, press the Win and R keys at the same time to open the running window. After entering regedit, click OK or press Enter; step 2: If the user account control is added
 How to close Xiaona search box in win10_How to disable or hide the Cortana Xiaona search box in Cortana_How to
Sep 20, 2025 pm 12:06 PM
How to close Xiaona search box in win10_How to disable or hide the Cortana Xiaona search box in Cortana_How to
Sep 20, 2025 pm 12:06 PM
1. You can set the hidden search box through the taskbar, and right-click the taskbar to select "Search" → "Hide"; 2. The Professional version can use the Group Policy Editor to disable Cortana, the path is Computer Configuration → Administrative Templates → Windows Components → Search, and set "Allow Cortana" to disabled; 3. All versions can modify the registry, create the AllowCortana value under HKEY_LOCAL_MACHINE\SOFTWARE\Policies\Microsoft\Windows and set it to 0; 4. You can also turn off data collection and voice recognition through privacy settings to limit the Cortana function.
