What to do if there are too many startup items on computer startup
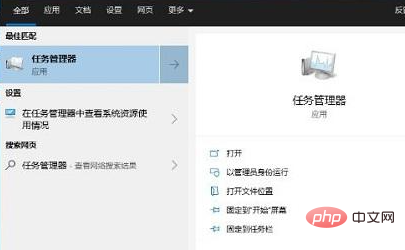
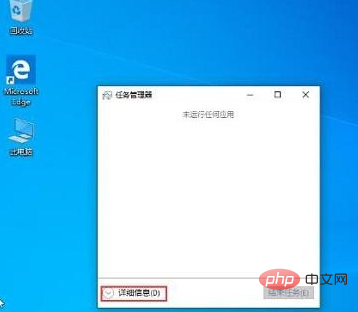
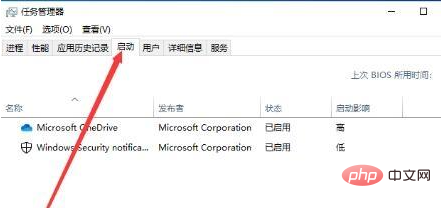
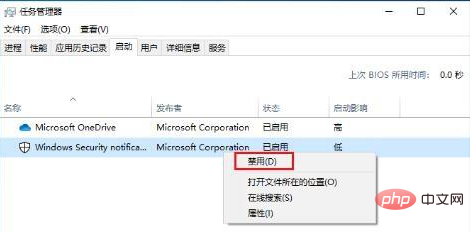
Solution to the problem of too many startup items when the computer starts up: 1. Search for "Task Manager" in the search box, find it and click to open it; 2. In the Task Manager window, click "Details"; 3. Switch Go to the "Startup" column; 4. Select the startup item that needs to be turned off, right-click the mouse, and select "Disable".

#The operating environment of this article: windows10 system, thinkpad t480 computer.
Too many self-starting programs when the computer is turned on will definitely affect the computer's startup speed and running speed.
Close unnecessary self-starting programs is an effective way to improve the speed of your computer.
Close method:
1. Open the Task Manager, as shown in the figure:

2. After the Task Manager window pops up, select "Details" in the lower left corner, as shown in the figure:

3. Switch to the "Startup" option card, you can see all the applications that are started, as shown in the picture:

4. Right-click the program that does not need to be started at startup and select "Disable" That’s it. As shown in the picture:

Related recommendations: windows system
The above is the detailed content of What to do if there are too many startup items on computer startup. For more information, please follow other related articles on the PHP Chinese website!

Hot AI Tools

Undress AI Tool
Undress images for free

Undresser.AI Undress
AI-powered app for creating realistic nude photos

AI Clothes Remover
Online AI tool for removing clothes from photos.

ArtGPT
AI image generator for creative art from text prompts.

Stock Market GPT
AI powered investment research for smarter decisions

Hot Article

Hot Tools

Notepad++7.3.1
Easy-to-use and free code editor

SublimeText3 Chinese version
Chinese version, very easy to use

Zend Studio 13.0.1
Powerful PHP integrated development environment

Dreamweaver CS6
Visual web development tools

SublimeText3 Mac version
God-level code editing software (SublimeText3)
 How to disable automatic maintenance services in Windows 10 system?
Sep 25, 2025 am 11:09 AM
Windows 10 system comes with automatic maintenance function, which can perform maintenance tasks on the system according to the set time, such as system updates or disk defragmentation. By default, Windows 10 automatic maintenance is enabled. However, in some cases, we may prefer to manage these maintenance operations on our own to better control the equipment. So, how can I turn off the automatic maintenance service of Windows 10? Next, let’s take a look at the specific steps together, I hope it will be helpful to everyone. The specific method for disabling the automatic maintenance function in Win10 is as follows: Step 1, press the Win and R keys at the same time to open the running window. After entering regedit, click OK or press Enter; step 2: If the user account control is added
 How to reset Windows security issues How to reset Windows account security issues
Sep 25, 2025 am 10:45 AM
You can reset security issues through the official Microsoft account website, log in and enter the security page to complete the identity authentication and update the recovery options; 2. You can modify your password in settings to prompt problems; 3. Use the password reset disk to reset your password and security prompts.
 Win10 Blue Screen: Kernel
Sep 25, 2025 am 10:48 AM
Everyone knows that there are many types of blue screen phenomena in Windows 10. When blue screen occurs, many people often don’t know how to deal with it. Since most of the code displayed on the blue screen is obscure and difficult to understand, many users are confused and difficult to solve the problem on their own. Today, let’s talk about how to effectively deal with Kernel_Security_check_Failure blue screen code. This blue screen code usually indicates that there are problems with the driver, and the most common errors are network cards and graphics drivers. The reasons for the KERNEL-SECURITY-CHECK-FAILURE blue screen may be as follows: There are compatibility issues with network card drivers. The graphics card driver version does not match or is damaged. In response to this situation,
 How to check the remaining time of Tencent VIP? How to check the status of Tencent VIP members
Sep 26, 2025 pm 12:06 PM
1. Enter the personal center through Tencent Video App and click on the VIP logo to view the "validity period to" date; 2. Log in to the official website v.qq.com by computer, hover the avatar and select [VIP Member] to view the expiration date; 3. Follow the "Tencent Video" official account on WeChat, and check the membership level and deadline through [My]-[VIP Member].
 How to deal with network connection errors of 360 Speed Browser_360 Speed Browser common network error code solutions
Sep 26, 2025 pm 12:30 PM
1. Use the "browser doctor" built in 360 Speed Browser to fix network problems with one click; 2. Clear cache and cookies to resolve loading exceptions; 3. Switch to compatibility mode to avoid rendering conflicts; 4. Repair LSP components through 360 Security Guard; 5. Change the DNS to 101.226.4.6 and 8.8.8.8 to improve the resolution success rate; 6. Check whether the firewall or antivirus software prevents the browser from being connected to the Internet, and add a whitelist if necessary.
 Is it true that 360 browser reports that it is poisonous? Identification and processing of 360 browser security risk false alarm issues
Sep 26, 2025 pm 12:36 PM
First, confirm whether it is a false alarm and verify the security of the website or file through platforms such as VirusTotal; if most security software does not report an alarm, it may be a 360 misjudgment. Then update the 360 browser and virus database to the latest version to improve recognition accuracy. For secure content, you can add trusted sites or file paths to avoid duplicate blocking. At the same time, submit false alarm feedback to 360 official, providing hash value, purpose description and scan result link. If necessary, the protection module test access can be temporarily turned off, but it needs to be re-enabled in time to ensure system security.
 Microsoft sends errors to users again Windows 10 update
Sep 26, 2025 pm 01:06 PM
Microsoft once again embarrassed users because it pushed the wrong Win10 update again. Last month, Microsoft launched an update that was originally designed to improve the quality of Windows Autopilot configuration devices. However, this update deviates from its original intention, not only covering devices through Autopilot, a device setting tool in a business environment, but also unexpectedly pushed to all Windows 10 users, including Windows 10 home version users. --Win10 Professional vs. Windows 10 Home -- Windows 10X leak shows it not only works on dual-screen devices -- check out the best Windows tablet history we picked seems to be repeating, Microsoft commits the same again
 Solution to the problem that cannot type in win7 computer
Sep 25, 2025 am 10:51 AM
When we use computers, typing is an indispensable basic operation - whether it is writing code, searching web pages, or using chat software, it is inseparable from typing text. Recently, a user using Win7 system reported that when he opened the browser and was about to enter the content, he found that the keyboard could not type normally, which made him very troubled. So, how to solve the problem that the computer cannot type in Win7 system? Next, this article will introduce the specific solutions in detail. Solutions to Win7 computers that cannot enter text: 1. First click the "Start" menu in the lower left corner of the desktop, and find and open the "Run" option. Enter the [regedit] command in the pop-up run window and press Enter to open the registry editor. as follows


