


How to check centos hard disk capacity

The following column centos tutorial will introduce to you the method of checking the centos hard disk capacity. I hope it will be helpful to friends in need!

查看磁盘使用情况
df -h

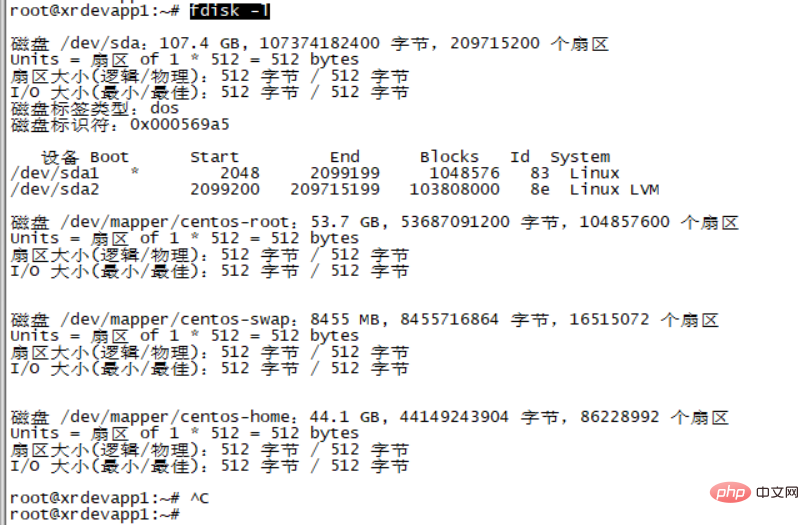
列出指定的外围设备的[分区表]状况
fdisk -l
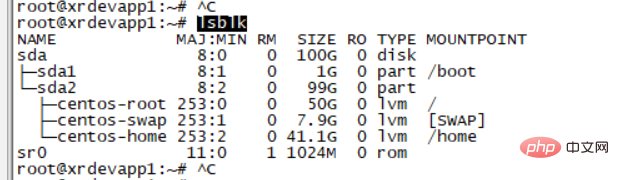
列出所有可用块设备的信息
lsblk
#sda1-->意思是第一个硬盘(a)的第一个分区(1)
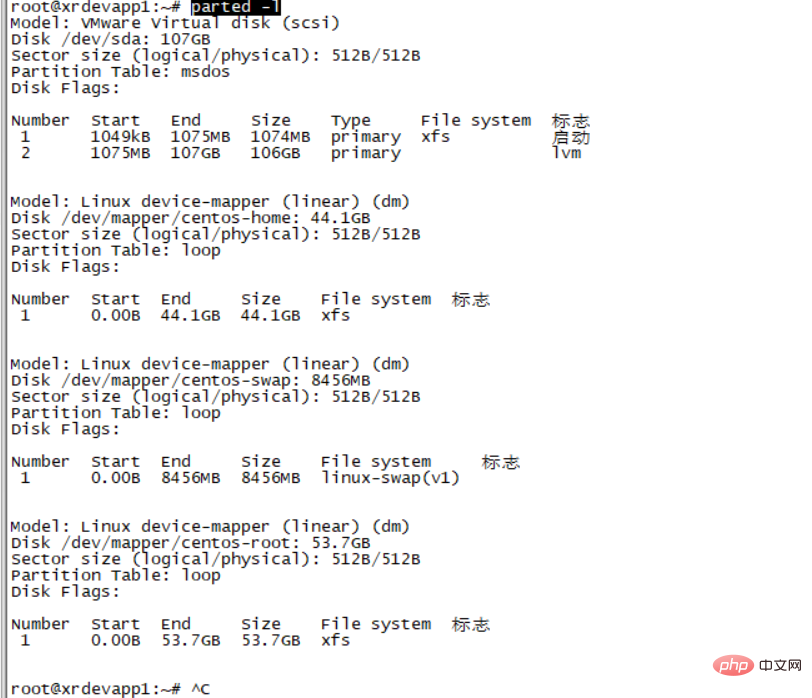
列出所有设备的[分区]信息
parted -l
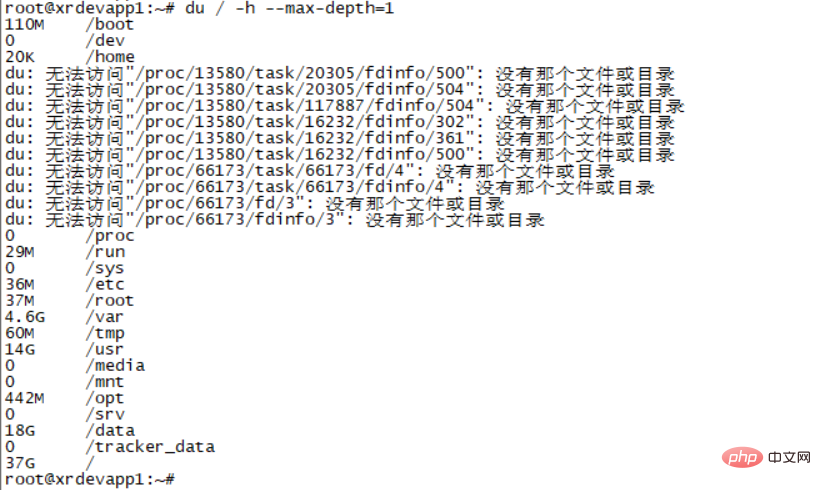
Command to check the space occupied by each directory and try to find the directory that takes up more space
du / -h --max-depth=1
Check the disk usage of Docker
docker system df

View image
docker images

Delete container
docker rm -f [containerID]
Deletion is useless Mirror
docker rmi 【镜像id】
Find the file to delete through the find command:
find /data/test/ -name "*.zip" -exec rm -rf {} \;
The above is the detailed content of How to check centos hard disk capacity. For more information, please follow other related articles on the PHP Chinese website!

Hot AI Tools

Undress AI Tool
Undress images for free

Undresser.AI Undress
AI-powered app for creating realistic nude photos

AI Clothes Remover
Online AI tool for removing clothes from photos.

ArtGPT
AI image generator for creative art from text prompts.

Stock Market GPT
AI powered investment research for smarter decisions

Hot Article
Hot Tools

Notepad++7.3.1
Easy-to-use and free code editor

SublimeText3 Chinese version
Chinese version, very easy to use

Zend Studio 13.0.1
Powerful PHP integrated development environment

Dreamweaver CS6
Visual web development tools

SublimeText3 Mac version
God-level code editing software (SublimeText3)


 CentOS server has no network connection, how to fix it?
Jun 19, 2025 am 12:13 AM
CentOS server has no network connection, how to fix it?
Jun 19, 2025 am 12:13 AM
When the CentOS server cannot be connected to the network, you can follow the following steps to check: 1. Check the status of the network interface, use iplinkshow to confirm whether the interface is enabled, if not enabled, use sudoiplinksetup to start, and use ipaddrshow to check the IP allocation status; 2. If it is in DHCP mode, run sudodhclient to obtain the IP. If it is static configuration, check the IP, gateway and DNS settings in /etc/sysconfig/network-scripts/ifcfg- and restart the network service; 3. Check the routing table iprouteshow to ensure that there is a default gateway. If there is no, add it temporarily or modify GATEWAY in the configuration file.
 How to update all packages on a CentOS system?
Jun 25, 2025 am 12:01 AM
How to update all packages on a CentOS system?
Jun 25, 2025 am 12:01 AM
To update all software packages on the CentOS system, you can use yum (CentOS7) or dnf (CentOS8 and above). The specific steps are as follows: 1. Check for available updates and use "sudoyumcheck-update" or "sudodnfcheck-update" to list the packages to be updated; 2. Execute the system-wide update, and use "sudoyumupdate-y" or "sudodnfupgrade--allowerasing" commands to upgrade, where the -y parameter is automatically confirmed, and --allowerasing allows the deletion of conflicting packages; 3. If the update involves a new kernel, the system needs to be restarted to take effect, and "unam can be used to use "
 How to add a new user to CentOS?
Jun 13, 2025 am 12:21 AM
How to add a new user to CentOS?
Jun 13, 2025 am 12:21 AM
Adding new users to the CentOS system requires attention to security settings and permission management. The most basic method is to use the useradd command. Execute sudouseraddnewusername and add the -m parameter to create the user and home directory; use the -G parameter to specify the user group such as wheel to give sudo permissions. Then use sudopasswd to set the password. To configure sudo permissions, it is recommended to add the user to the wheel group: sudousermod-aGwheelnewusername and verify the sudo permissions. If you need SSH login, 1. Check the AllowUsers settings in /etc/ssh/sshd_config and add users
 How to update the kernel on CentOS?
Jul 02, 2025 am 12:30 AM
How to update the kernel on CentOS?
Jul 02, 2025 am 12:30 AM
The key to updating the CentOS kernel is to use the ELRepo repository and set up the startup items correctly. 1. First run uname-r to view the current kernel version; 2. Install the ELRepo repository and import the key; 3. Use yum to install kernel-lt (long-term support version) or kernel-ml (main version); 4. After the installation is completed, check the available kernels through the awk command and use grub2-set-default to set the default startup item; 5. Generate a new GRUB configuration file grub2-mkconfig-o/boot/grub2/grub.cfg; 6. Finally restart the system and run uname-r again to confirm whether the kernel version is effective. The whole process requires
 How to format a new disk in CentOS
Aug 03, 2025 am 08:19 AM
How to format a new disk in CentOS
Aug 03, 2025 am 08:19 AM
Identifythenewdiskusinglsblkorfdisk-ltolocatethecorrectdevicelike/dev/sdb.2.Optionallypartitionthediskwithfdisk/dev/sdb,createaprimarypartitionusingdefaultsettings,andwritechangeswithw,thenrunpartprobetoupdatethekernel.3.Createafilesystemusingmkfs-tx
 How to configure MongoDB support for PHP environment Settings for PHP connection to Mongo database
Jul 23, 2025 pm 06:54 PM
How to configure MongoDB support for PHP environment Settings for PHP connection to Mongo database
Jul 23, 2025 pm 06:54 PM
To configure the PHP environment to support MongoDB, the core step is to install and enable the PHP driver of MongoDB to enable the PHP application to communicate with the MongoDB database. 1. Install MongoDBPHP driver, it is recommended to use PECL to install. If there is no PECL, you need to first install the PHP development package and related compilation tools; 2. Edit the php.ini file and add extension=mongodb.so (or .dll) to enable the extension; 3. Restart the web server or PHP-FPM service to make the configuration take effect; 4. Verify whether the extension is loaded successfully through phpinfo() or php-m. Frequently asked questions include missing PECL commands, compilation errors, php.ini
 How to install and configure fail2ban on CentOS?
Jul 10, 2025 pm 12:21 PM
How to install and configure fail2ban on CentOS?
Jul 10, 2025 pm 12:21 PM
Installing and configuring fail2ban on CentOS is not complicated, it mainly includes the following steps: 1. Install fail2ban using yum; 2. Manually enable and start the service; 3. Create a jail.local file for custom configuration; 4. Set SSH defense rules, including enabling sshd, specifying the blocking time and retry times; 5. Configure firewalld as an action actuator; 6. Regularly check the blocking IP and logs. Fail2ban detects abnormal login behavior through monitoring logs and automatically blocks suspicious IPs. Its core mechanism relies on key parameters such as bantime (banned time), findtime (statistic window time) and maxretry (maximum failure number).
 How to change the hostname on CentOS 7/8/9?
Jun 24, 2025 am 12:09 AM
How to change the hostname on CentOS 7/8/9?
Jun 24, 2025 am 12:09 AM
The recommended method to modify the CentOS host name is to use the hostnamectl command. The specific steps are: 1. Execute sudohostnamectlset-hostnamenew-hostname to set the new host name; 2. Check whether the cloud server or container environment needs to add the command to the initialization script to prevent the original name from being restored after restart; 3. Manually edit the /etc/hostname file and update the hostname resolution in /etc/hosts to ensure compatibility and normal service operation; 4. Verify whether the hostname is effective through the hostname or hostnamectl command. The entire process requires attention to configuration file adaptation and environment restrictions to avoid host name resolution problems.
