How to set grid lines not to be displayed?
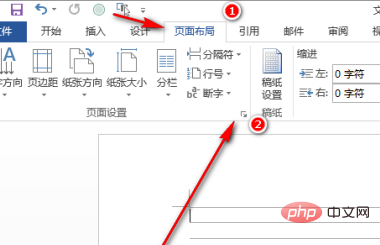
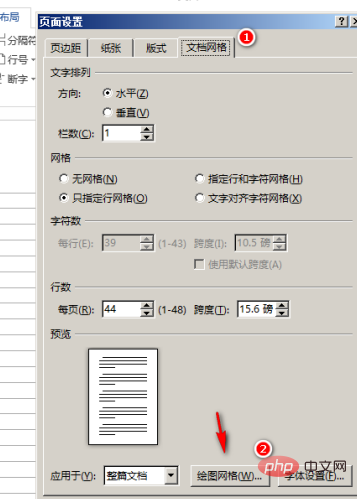
Method: 1. Open Word, click [View], and click [Grid]; 2. Click [Page Layout], and click the [oblique arrow] in the lower right corner of [Page Settings]; 3. Click [ Document Grid], click [Drawing Grid]; 4. Click [Vertical Spacing], adjust the parameters, and click [OK].

Method:
Create a new document, click on the "View" tab above the document, and then, Here in the "Display" group, we see "Gridlines";

Check the small box in front of "Gridlines" and the document will be displayed immediately. grid lines.

Grid lines are displayed horizontally by default; then, if you want vertical grid lines, you can do this:
Click on the "page Layout", then click the diagonal arrow in the lower right corner of the "Page Setup" group, as shown in the image below.

The page setting operation box pops up; click on the "Document Grid" option, and then click "Drawing Grid" below;

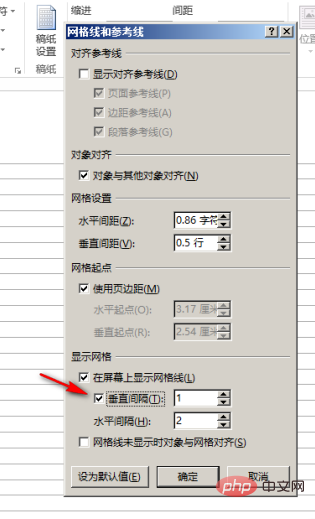
Another box pops up, check the "Vertical Spacing" under "Show Grid" in the box;

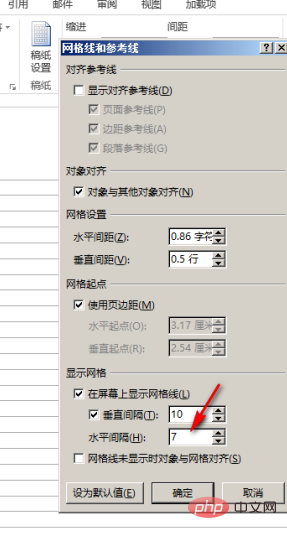
Here, we You can see that there is an input box on the right side of "Vertical Spacing". The number in the box defaults to 1, which is the vertical spacing. We can customize the settings. For example, the "horizontal interval" below the input 10


Word Tutorial"
The above is the detailed content of How to set grid lines not to be displayed?. For more information, please follow other related articles on the PHP Chinese website!

Hot AI Tools

Undress AI Tool
Undress images for free

Undresser.AI Undress
AI-powered app for creating realistic nude photos

AI Clothes Remover
Online AI tool for removing clothes from photos.

ArtGPT
AI image generator for creative art from text prompts.

Stock Market GPT
AI powered investment research for smarter decisions

Hot Article

Hot Tools

Notepad++7.3.1
Easy-to-use and free code editor

SublimeText3 Chinese version
Chinese version, very easy to use

Zend Studio 13.0.1
Powerful PHP integrated development environment

Dreamweaver CS6
Visual web development tools

SublimeText3 Mac version
God-level code editing software (SublimeText3)
 Detailed explanation of Word document operation: merge two pages into one
Mar 26, 2024 am 08:18 AM
Word documents are one of the most frequently used applications in our daily work and study. When working with documents, you may sometimes encounter a situation where you need to merge two pages into one. This article will introduce in detail how to merge two pages into one page in a Word document to help readers handle document layout more efficiently. In Word documents, the operation of merging two pages into one is usually used to save paper and printing costs, or to make the document more compact and neat. The following are the specific steps to merge two pages into one: Step 1: Open the Word that needs to be operated
 How to convert pdf to word
Apr 30, 2024 pm 05:58 PM
1. Use online conversion tools such as Smallpdf, Adobe Acrobat or Zamzar. 2. These tools usually provide an easy-to-use interface, allowing users to upload PDF files and optionally convert them to Word format. 3. After the conversion is completed, users can download the Word document and perform further editing. 4. Use professional PDF conversion software, such as Adobe Acrobat Pro or Wondershare PDFelement.
 Put a √ symbol in the word box
May 07, 2024 pm 01:06 PM
1. Open the Word document and move the cursor to the position in the box where the √ symbol needs to be inserted. 2. Select the [Insert] option on the menu bar. In the [Insert] option, find the [Symbol] group and click the [Symbol] button. 3. In the pop-up symbol dialog box, select the [Common Mathematical Symbols] category and find the [√] symbol among the common mathematical symbols. 4. Click the √ symbol and click the [Insert] button to insert the √ symbol in the box.
 Why do words disappear after typing in word?
Apr 28, 2024 pm 01:45 PM
1. Text box overflow: If you use a text box in your document and the text in the text box is cropped or disappears, it may be because the text box is not large enough to accommodate all the text. The solution is to resize the text box so that all text can be displayed. 2. Line breaks and page breaks: The line breaks and page breaks in Word may cause text to disappear in some cases. Make sure text is not accidentally broken or hidden at the edge of the page. This problem can be solved by adjusting the page margins, line spacing, or manually inserting page breaks.
 Easily learn how to create Word document tables
Mar 26, 2024 am 08:39 AM
With the development of science and technology, computers have become one of the indispensable tools for our daily work and study. In computer office work, Word documents, as one of the most commonly used word processing software, also have many practical functions. Among them, making tables is undoubtedly one of the commonly used functions. This article will introduce you how to easily learn how to create tables in Word documents, so that you can use Word software to work and study more efficiently. First, open your Word document and select where you want to insert the table. In the Word menu bar
 How to generate word directory
Apr 28, 2024 pm 01:52 PM
1. First, open your Word document and move the cursor to the location where you want to add a table of contents. 2. Then, click the [Reference] tab in the menu bar at the top of the Word document. 3. Under the [References] tab, you will see a button named [Table of Contents], click it. 4. In the pop-up menu, you can choose different catalog styles, such as [Automatic Catalog 1] or [Customized Catalog]. 5. Choose a style that suits your document style. Once you select a table of contents style, Word will automatically generate a table of contents for you and create a table of contents based on the headings and subheadings in your document.
 Microsoft Office 2024 launches without a subscription, with a fresh design and new features
Oct 02, 2024 pm 09:04 PM
Although Microsoft's marketing continues to push Office 365, which is sold exclusively via a subscription, the Group continues to offer an Office version for customers who do not wish to take out a subscription. Microsoft began selling Office 2024 on
 Illustration of steps to adjust line spacing in Word documents
Mar 25, 2024 pm 10:42 PM
Illustration of the steps to adjust the line spacing of a Word document. Adjusting the line spacing of a Word document is one of the operations we often need to perform when editing a document. Properly adjusting line spacing can make your document clearer and easier to read, and make your layout more beautiful. The following will introduce you in detail how to adjust line spacing in Word documents, and demonstrate it step by step through diagrams so that you can easily master it. Step 1: Open the Word document First, double-click to open the Word document you need to edit and make sure you are ready to adjust the line spacing. Step 2: Select text in the document


